|
The Feed Sack Store at the Shadow J Ranch proudly presents |
|
Origami Inspired Clutch Purse Sewing Patterns For
Upcycling Feed Sacks |
|
Helping save the earth one feed sack at a time |
|
|
|
|
|
By C. A.
Johns & J. F. Johns January 2015 |
|
|
Woven polypropylene feed sacks are a durable fabric often covered with stunning natural images. Upcycling feed sacks into stunningly beautiful and yet extremely practical products will reduce the amount of non-biodegradable feed sacks in our landfills. This is a book of Origami inspired sewing patterns designed to use woven polypropylene feed sacks as the fabric.
The Shadow J Ranch is dedicated to making the world a better place for humans and animals. Our efforts honor the natural partnership between humans and animals while developing environmentally responsible products that you can enjoy while saving the earth!
Please let us know if you have any questions or suggestions. Our websites are:
http://www.feedsackstore.com and http://www.shadowj.com.
Please feel free to contact us via email: trailboss@shadowj.com.
Please follow our upcycling efforts on social media and feel free to share your experiences. Our Twitter account is @FeedSackStore. Our Facebook and Pinterest accounts are The Feed Sack Store.
Origami Inspired Clutch
Purse Patterns for Upcycled Feed Sacks
Reproduction or use without express permission, of editorial or pictorial content, in any manner is prohibited. While every precaution has been taken in the preparation of this book, the author and publisher assume no responsibility for errors or omissions. Neither is any liability assumed for damages resulting from the use of the information contained herein.
Copyright © 2015 by J. F. Johns, Tioga, Texas
All rights reserved.
ISBN: 978-1-312-92070-5
Printed in the United States of America.
Contents
Thank you for helping save the earth one
feed sack at a time.
Go Green and Upcycle Feed Sacks
Make sure the bag is Woven Polypropylene
Cutting
Woven Polypropylene Fabric
Ironing Woven Polypropylene Fabric
Origami Inspired Pattern Guide
The Origami Inspired Feed Sack Square
Origami Inspired Feed Sack Square
Preparation
Origami Inspired Envelope Clutch
Origami Inspired Triangles Envelope
Clutch
Origami Inspired Square Envelope Clutch
Origami Inspired Diamond Clutch
Origami Inspired 3 Pocket Purse
Origami Inspired Pyramid Clutch
Origami Inspired Teacup Clutch
Origami Inspired Winged Heart Clutch
Origami Inspired Triangle Clutch
Origami Inspired Butterfly Clutch
Origami Inspired Graceful Swan Clutch
C. A. Johns
Cody Anne Johns is a college student at the University of North Texas in Denton Texas where she is studying computer technology and business. During high school, Cody spent 4 summers as a volunteer zoo keeper at the Frank Buck Zoo in Gainesville Texas as part of her 4-H Veterinary Science program. Her love of animals grew from the familiar ranch animals to include the exotic animals and especially the reptiles under her care as a volunteer junior zoo keeper.
Cody noticed the colorful woven polypropylene feed sacks being thrown into the trash by local ranches and became interested in finding a way to use the beautiful imagery while keeping the feed sacks out of the landfills. Her interest blossomed into a passion to use woven polypropylene feed sack fabric in upcycled products that are as beautiful as they are practical.
Cody has enjoyed paper Origami since she was a small child. Once she began recycling the woven polypropylene fabric from feed sacks, she immediately recognized that it was an ideal fabric for Origami inspired projects. The result is the lovely Origami inspired clutch purse designs in this book.
J. F. Johns
Janet Johns operates the Shadow J Ranch in North Texas. She has dedicated the ranch to making the world a better place for humans and animals. Activities at the ranch honor the natural partnership between humans and animals while fostering an atmosphere of environmental responsibility.
Janet has a keen interest in reducing agricultural waste with innovative value added agricultural products that can be made from the trash generated on the ranch. One of the biggest non-biodegradable ranch waste products is the livestock feed sacks. The idea of converting feed sacks into upcycled goods is definitely worth pursuing and Janet created the Feed Sack Store to showcase Cody’s designs and help others learn how to save their feed sacks from the landfill.
Janet added her sewing skills to Cody’s Origami inspired designs to complete and document the patterns in this book. We hope the patterns in this book will encourage others to learn to upcycle their own feed sacks into lovely clutch purses.
Woven polypropylene feed sacks are a durable material often covered with stunning images of horses, poultry, ranch animals, song birds, and wildlife. These sacks are being thrown into the garbage contributing to the growing landfill crisis. We would like to encourage everyone to upcycle feed sacks as part of their routine recycling efforts.
Upcycling feed sacks into useful products will reduce the amount of non-biodegradable feed sacks in our landfills. Products made of upcycled woven polypropylene fabric are extremely strong, lightweight, waterproof, and easily wipe clean with a damp cloth.
We have developed patterns specifically for woven polypropylene feed sack fabric to enable everyone to able to create products that are stunningly beautiful and yet extremely practical. The custom and recycled nature of each handmade upcycled feed sack product only adds to its charm and allure.
Inspire your life with the vivid images of natural beauty found on woven polypropylene feed sacks. Upcycled feed sacks are an excellent fabric for Origami inspired products. The fabric is stiff enough to create exceptionally crisp seams and pleats.
We have created easy Origami inspired clutch purse patterns to encourage everyone to recycle their feed sacks into beautiful and practical custom works of usable art. These patterns take advantage of Origami folding techniques and require minimal sewing. All of the patterns use a 16 inch square of feed sack fabric as the basic pattern piece. Experiment with your feed sack fabric to find the most interesting image layout for the Origami inspired patterns.
All you need to get started is some basic sewing skills and a few woven polypropylene feed sacks. Use your imagination to add custom touches and trims to the patterns. And remember to have fun!
Here is a quick look at the Origami inspired patterns in this book.
|
Envelope Clutch |
|
|
Triangles Envelope Clutch |
|
|
Square Envelope Clutch |
|
|
Diamond Clutch |
|
|
The 3 Pocket Purse |
|
|
Pyramid Clutch |
|
|
Teacup Clutch |
|
|
Winged Heart Clutch |
|
|
Triangle Clutch |
|
|
Butterfly Clutch |
|
|
Wedge Clutch |
|
|
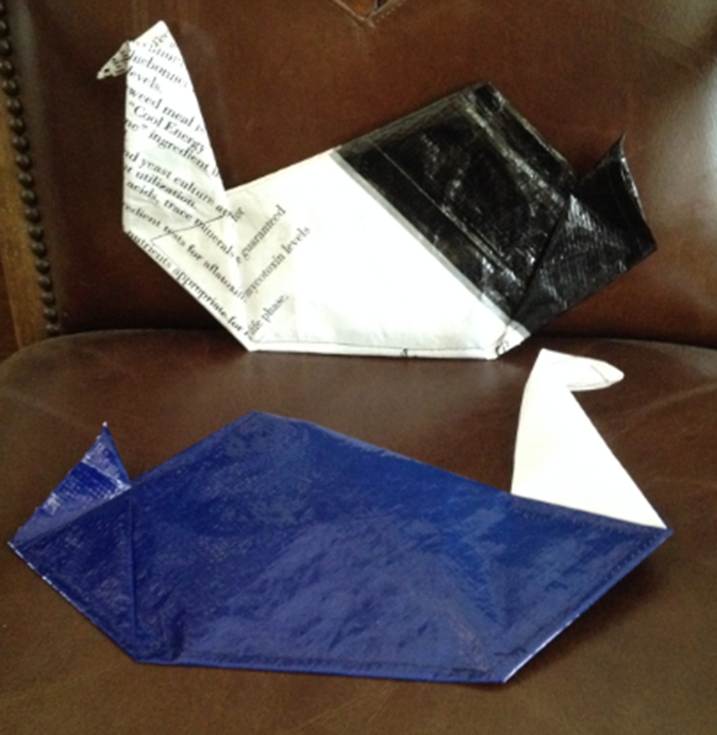
Graceful Swan Clutch |
|


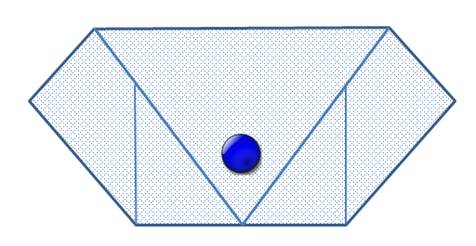
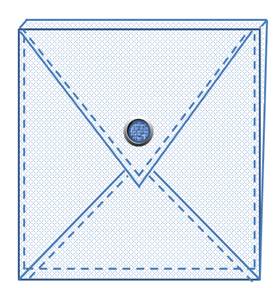
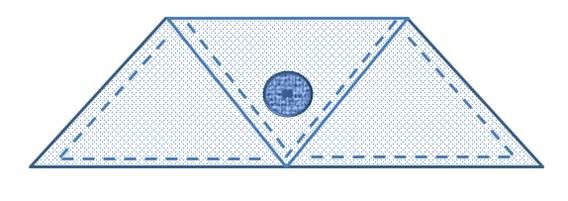
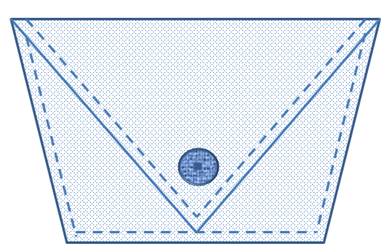
Make sure
the bag is Woven Polypropylene
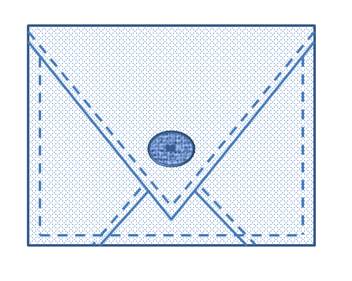
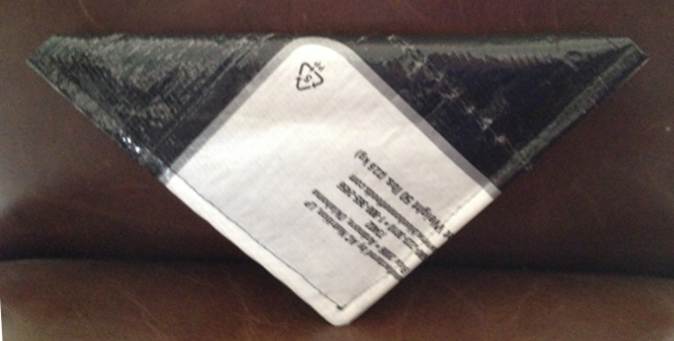
These patterns are designed to use woven polypropylene feed sack as the fabric. Plastic, paper, and loosely woven mesh bags are not appropriate for these patterns. A woven polypropylene feed sack is made of tightly woven polypropylene threads and you can clearly see the weave pattern on the bag as shown in the following picture. For more information, check out http://www.wovenpolypropylene.com.
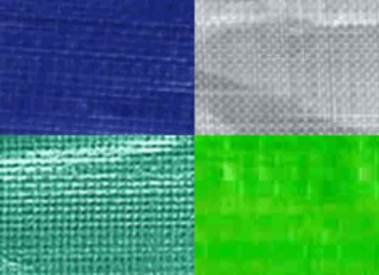
Woven polypropylene sacks vary greatly based on the type of feed in the sacks and the manufacturing process. The vivid images can be printed directly on the woven polypropylene or on a laminated layer adhered to the woven polypropylene. The tightness of the weave varies and some sacks have a waterproof coating for moist foods.
To
Flatten or Not
Some patterns require the feed sack to be flattened while other patterns use the feed sack in its original bag shape (un-flattened). If the bag is to be used un-flattened, then simply remove all strings and tape from the top and bottom of the feed sack.
If the bag is to be flattened:
Remove all strings and tape from the top and bottom of the feed sack.
Tear open or cut the seam running lengthwise down the back of the feed sack.
The feed sack should now lay flat in a single layer of fabric.
Cleaning
Feed Sacks
Cleaning can be the most challenging aspect of feed sack preparation. The inside and outside of the feed sacks must be cleaned thoroughly prior to cutting out the pattern pieces or sewing. An un-flattened bag needs to be turned inside out to thoroughly clean the fibers that may hold feed remnants. Use soap, bleach, and warm water to clean the fibers of the woven polypropylene. A stiff brush can be used to remove any mold or dirt in the fibers. Stubborn stains and mold may require the use of a strong mold and mildew cleaner. Dry the sacks thoroughly prior to use.
Planning
a project
The beauty of the final product can be greatly improved by selecting feed sack imagery that corresponds to the size and shape of the final product.
Read all pattern instructions prior to beginning a project. This will help you understand the best way to use the vivid images on the feed sack to create your product.
Cutting
Woven Polypropylene Fabric
Woven polypropylene feed sacks can be cut with regular scissors or a rotary cutting mat and blade.
Ironing
Woven Polypropylene Fabric
Feed sacks often have wrinkles that can be ironed out. Woven polypropylene feed sacks CANNOT be ironed with the iron directly on the fabric. A damp towel must be placed between the fabric and the iron.
Pins and
Needles
Pinning woven polypropylene fabric can be a real challenge. The fabric is very stiff and regular pins bend and often break. Binder clips and clothes pins are easier to use on corners and straight seams than straight pins.
It can also be difficult to remove straight pins from the fabric. Straight pins with a ball head are easier to grasp and remove than headless pins.
Sewing machine needles often bend and break when sewing multiple layers of woven polypropylene fabric. To reduce needle stress, sew slowly across changes in the thickness of the fabric being sewn and make sure the presser foot remains as level as possible.
Thread
Woven polypropylene fabric should be sewn using 100% polyester thread. Cotton threads or a blend of polyester and cotton thread tends to fray. Seams sewn with cotton or cotton blend threads tend to break apart under heavy loads in tote bags.
Crisp
Seams
The look of the finished product is greatly enhanced if seams are pressed flat with your hands. Feed sack fabric is stiff and can hold very crisp seams pressed with your hands. The pattern instructions indicate areas where pressing seams flat will improve the sewing process or make the product look better.
The
Origami Inspired Feed Sack Square
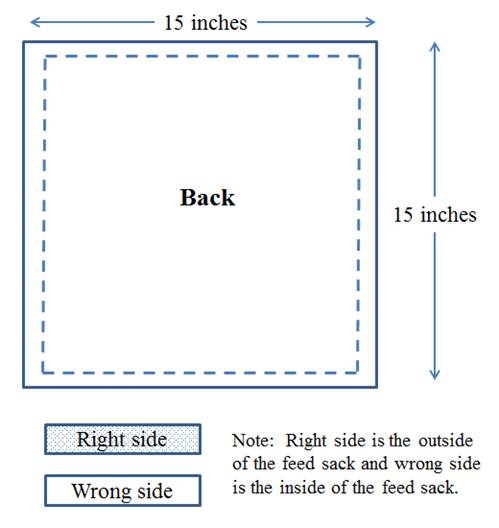
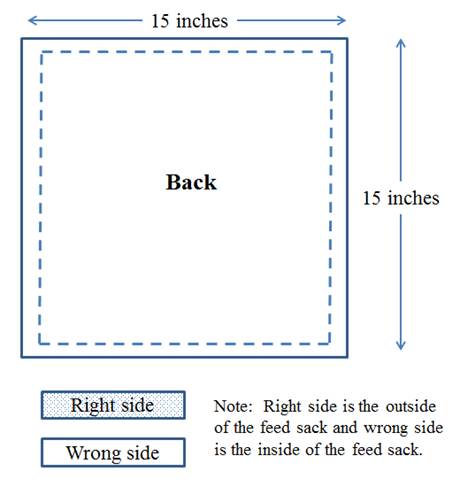
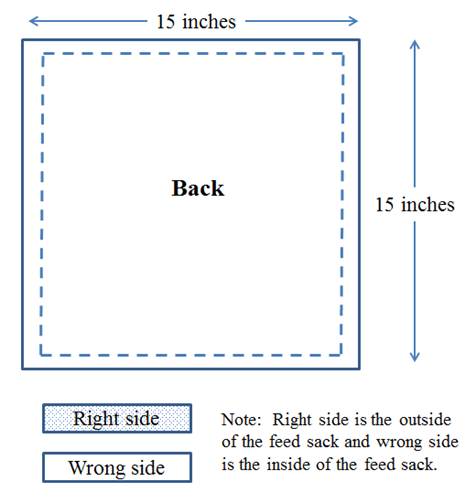
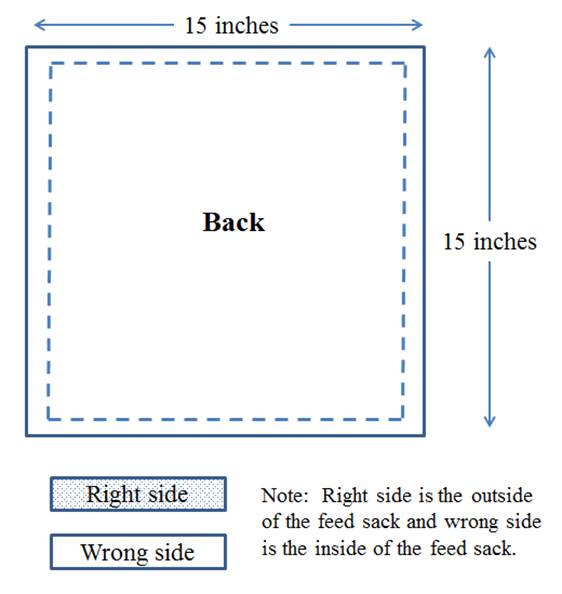
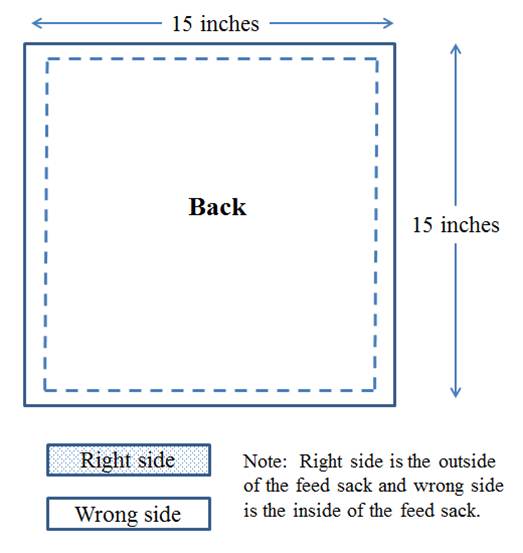
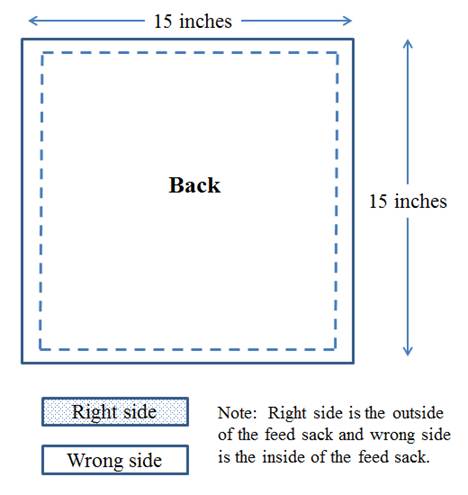
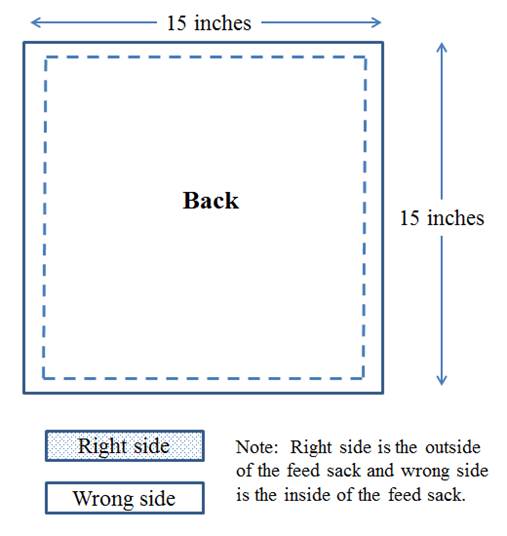
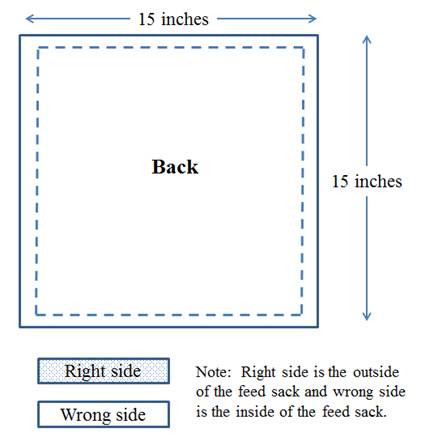
Origami inspired patterns use a square of fabric. Detailed instructions for making a basic 15 inch Origami square of upcycled feed sack fabric are provided in the Origami Inspired Feed Sack Square Preparation section in this pattern book. All of the patterns in this book use this square.
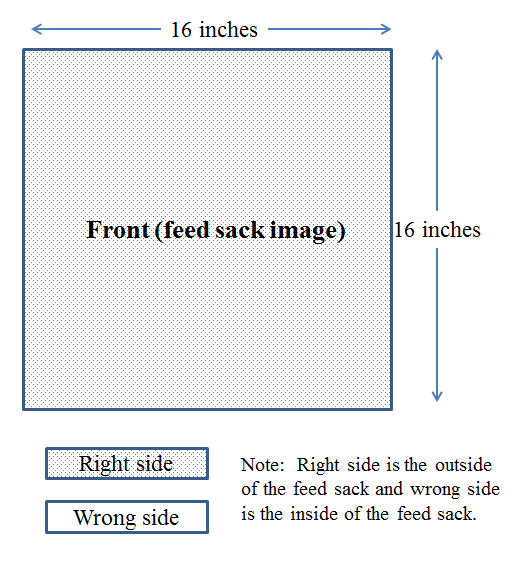
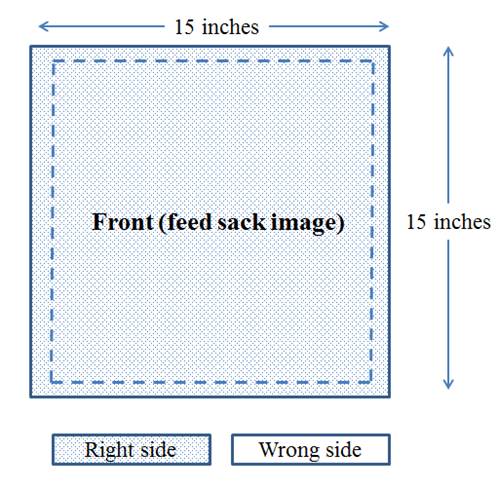
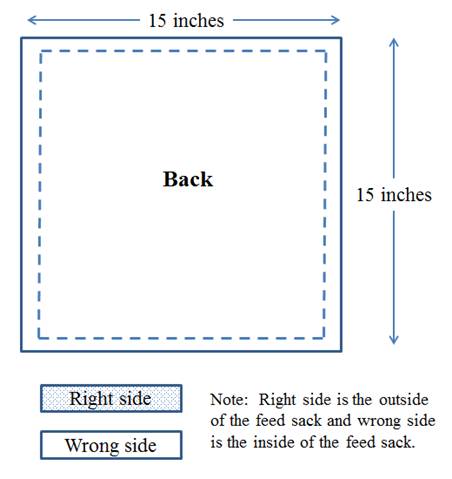
The Origami inspired feed sack square has a right and a wrong side as shown in the following figure. The right side is the side that will be the outside of the finished project and the wrong side will be inside. The patterns use shading to indicate the right side and white to indicate the wrong side.
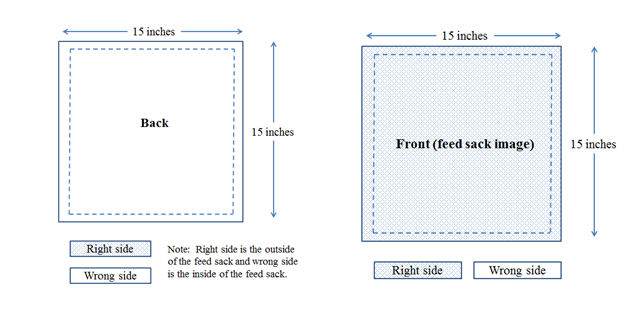
The right side is usually the outside of the feed sack with beautiful images and colors. For some patterns, you may want to use the inside of the feed sack for a white exterior on the finished project. Spend some time looking at the feed sack images with the patterns to determine how you want the imagery to look on the final product before cutting out the square.
Origami
Inspired Folds
Origami inspired patterns use folds to create different shapes. Folds are made using a combination of foldlines and fold points that indicate where to make a fold and the direction of the fold. The patterns provide step by step instructions for measuring, marking, and using foldlines on the feed sack square.
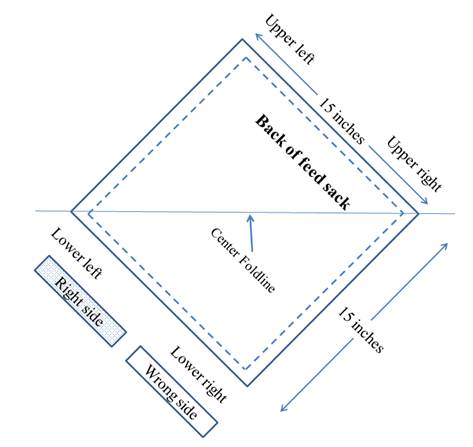
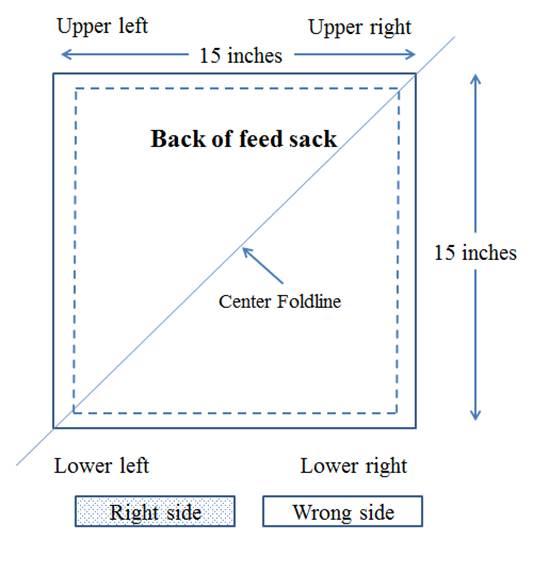
The foldlines are named in the instructions and figures as “X Foldline” where X is the name given to the foldline. The pattern figures show a foldline using a line with the name of the foldline and an arrow pointing to the corresponding foldline. In the following figure, a foldline from the lower left corner to the upper right corner of the square has been named “Center Foldline”.
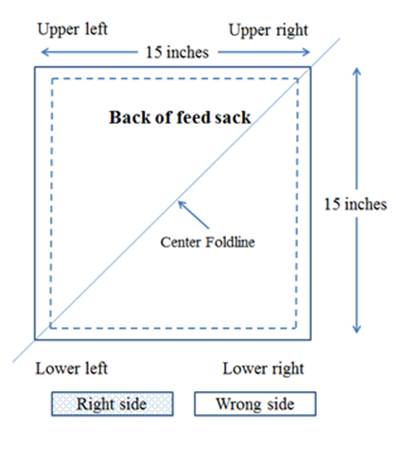
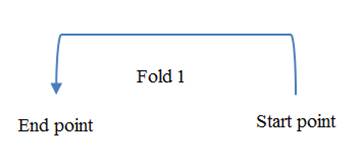
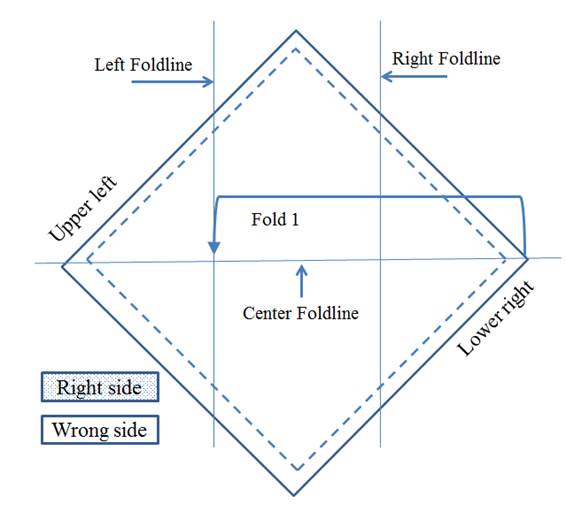
The Origami inspired folds are numbered in the instructions and figures as “Fold n” where n is the number of the fold. The fabric folds are from a start point to an end point, usually along a foldline. The pattern figures use a directional line to indicate the start and end points for the fold. The arrow end of the line points to the end point of the fold.
In the following figure, a fold from the start point to the end point has been named “Fold 1”. After the completion of “Fold 1”, the start point will be laying on top of the end point.
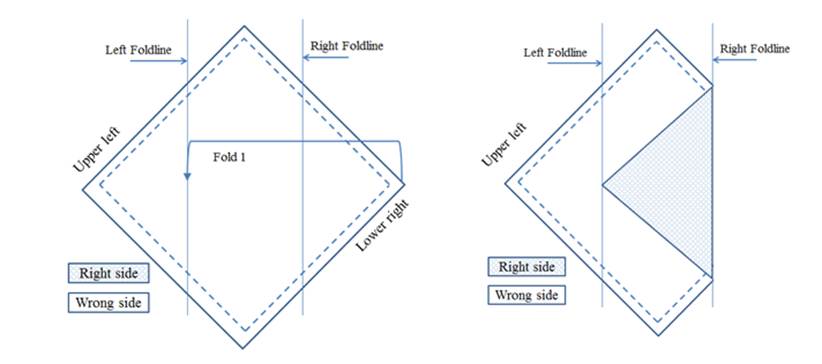
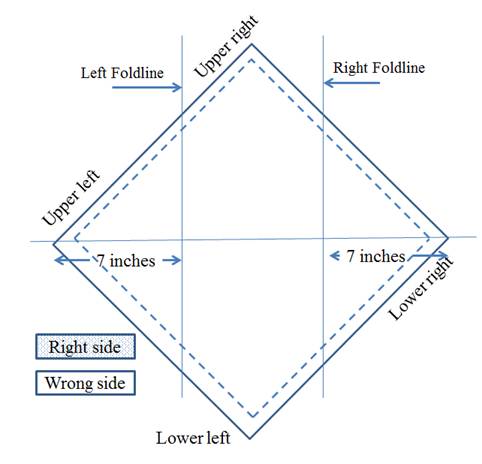
The Origami inspired folds can use a foldline to help guide a section of fabric from the start point to the end point. The pattern instructions name the fold start point, endpoint, and foldline. In the following figure, there is a “Right Foldline”, a “Left Foldline”, and a “Fold 1”. The pattern instructions for “Fold 1” are to fold the lower right corner of the feed sack square to the “Left Foldline” using the “Right Foldline”. The result of the fold is shown in the figure on the right.
All of the Origami inspired patterns in this book start with a 16 inch square of feed sack fabric. Use these instructions to prepare your 15 inch Origami square.
Instructions
Step 1. Clean
and flatten the feed sack using the Feed Sack Preparation Instructions.
Step 2. Cut out
the Origami square using the following dimensions.
Step 3. Fold the Hem
A. On the wrong side of the fabric, measure and mark a ½ hem line on all four sides of the square.
B. Use this hem line to fold under the ½ inch hem on each side of the 16 inch square. The fold will have wrong sides together.
C. Press the folds with your hands to make a crisp edge.
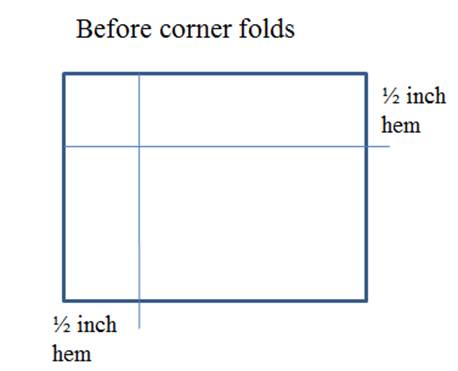
Step 4. Make crisp corners using the following steps.
A. Fold 1: On the wrong side, each corner will have a point where the ½ inch hem fold lines meet. This is the center point of the first corner fold. Fold the corner over with wrong sides together. Align the hem fold lines as a guide to make the corner symmetric as shown in the following figure. Press the fold flat and crisp with your hands.
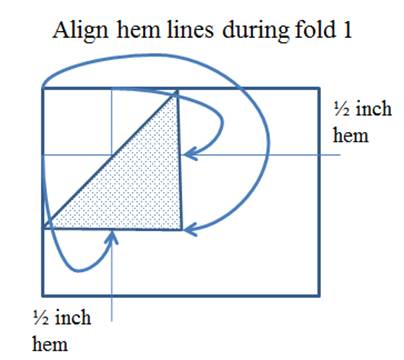
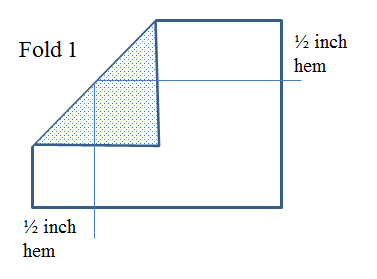
B. Fold 2: Fold the top side of the fabric down onto the corner in fold 1 keeping wrong sides together as shown in the following figure. Press the fold flat and crisp with your hands.
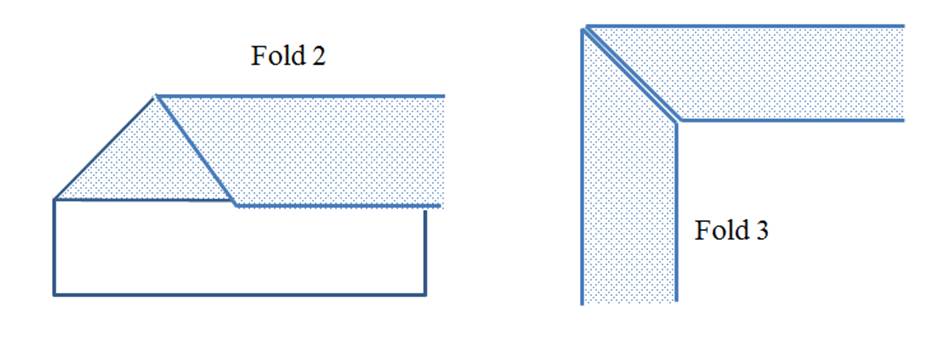
C. Fold 3: Fold the adjacent side of the fabric down onto the corner in fold 1.
D. Adjust the folds if needed to make the center seam of the corner line up for a 90 degree angle. Press the fold flat and crisp with your hands.
E. Secure the two sides of the corner in place for sewing.
F. Repeat folds 1, 2, and 3 for the remaining 3 corners.
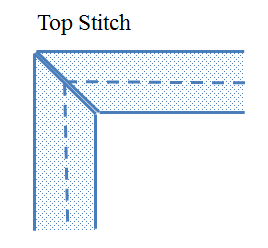
Step 5. Topstitch the hem on all 4 sides and corners to complete the Origami square for all of the Origami inspired patterns.
This pattern makes an envelope
clutch from woven polypropylene feed sack fabric.
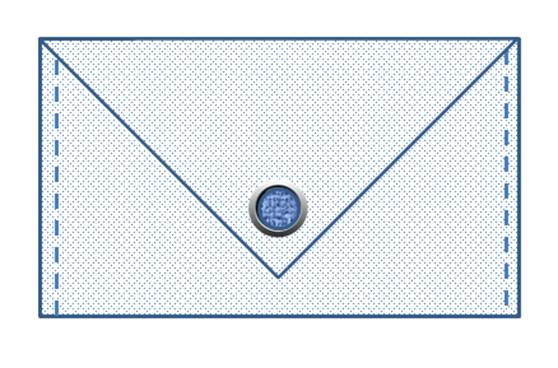
The finished rectangular clutch
dimensions are 10.5 inches wide and 5.5 inches high.
Instructions
Step 1. Clean
and flatten the feed sack using the Feed Sack Preparation Instructions.
Step 2. Create
a 15 inch Origami square using the Origami inspired
feed sack square preparation instructions.
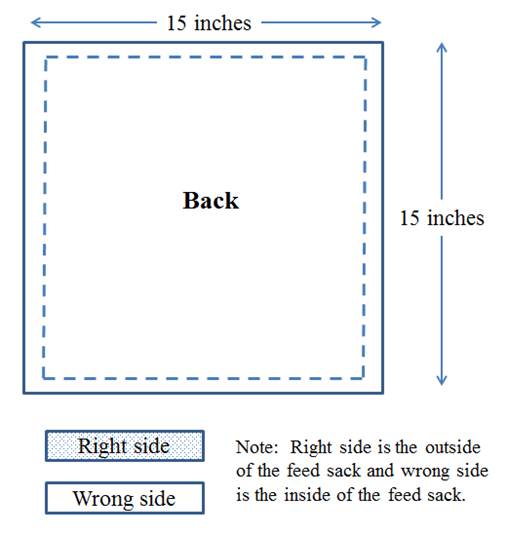
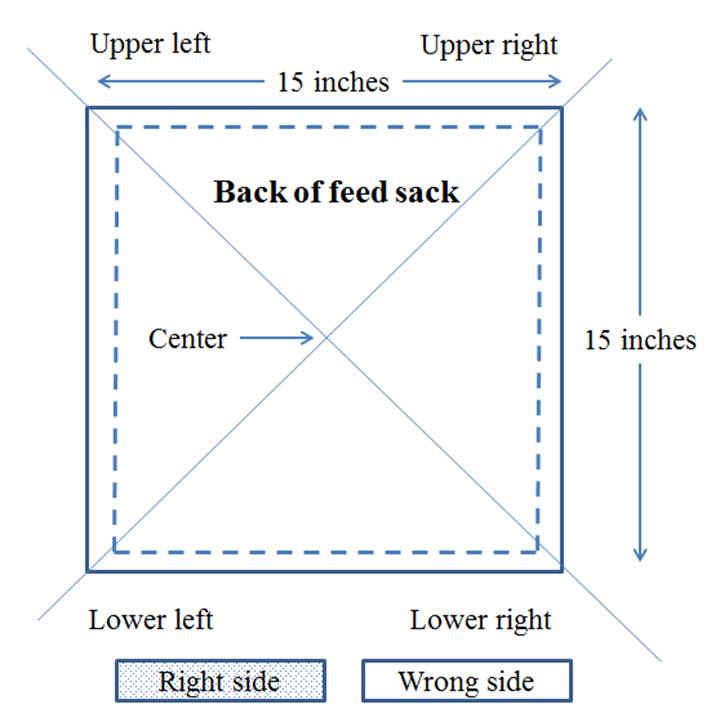
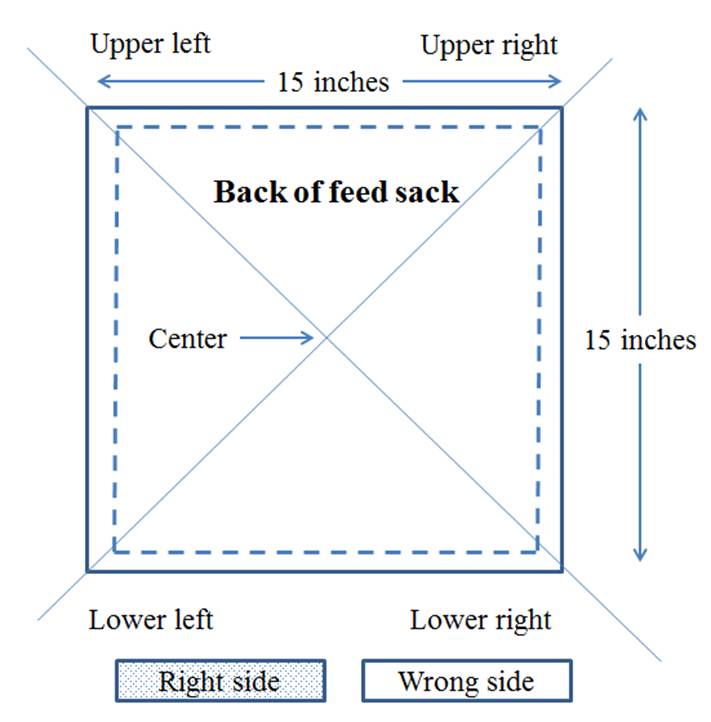
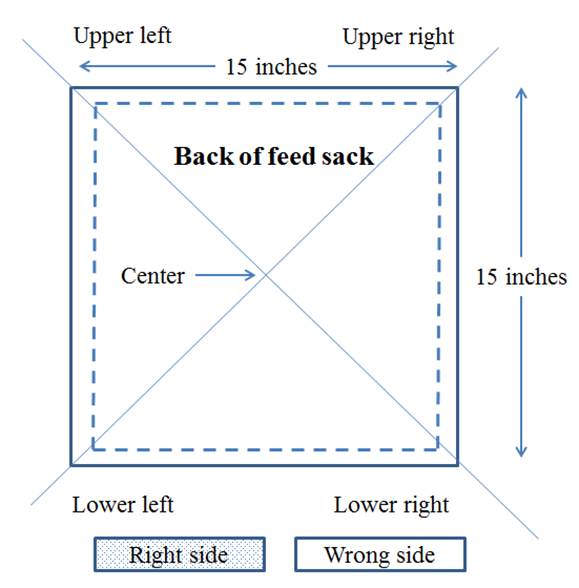
Step 3. Mark the center of the Origami square using the following steps.
A.
An easy way to mark the
center is to use triangle folds bringing opposite corners together.
B.
Fold 1: Fold the upper left
corner to the lower right corner.
C.
Fold 2: Fold the upper
right corner to the lower left corner.
D. Mark the center point where the folds meet.
Step 4. Make the envelope clutch using the following steps.
A.
Lay the Origami square
right side down and rotate 90 degrees so that the feed sack image that will be
on the front of the clutch is the upper right corner of the square as shown in
the following figure. The following
folds will use the fabric right side down.
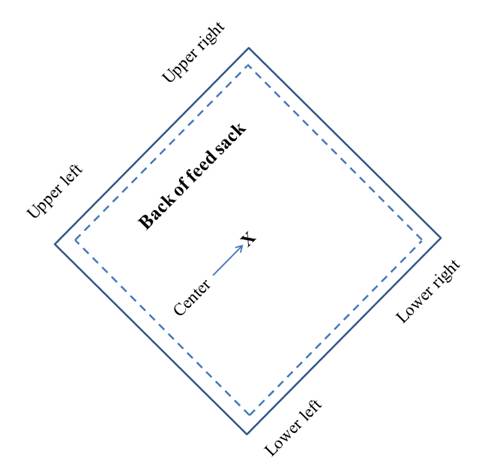
B.
Make the clutch body with the following
steps.
a.
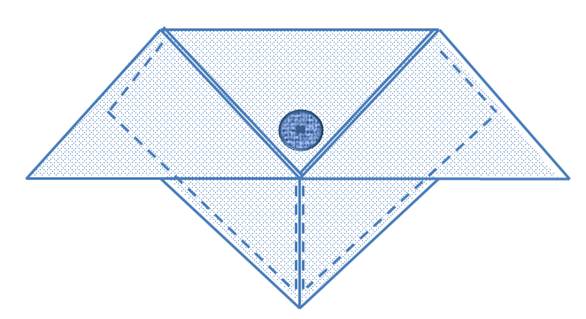
Fold 1: Fold the lower left corner to the
center point with wrong sides together as shown in the following figure.
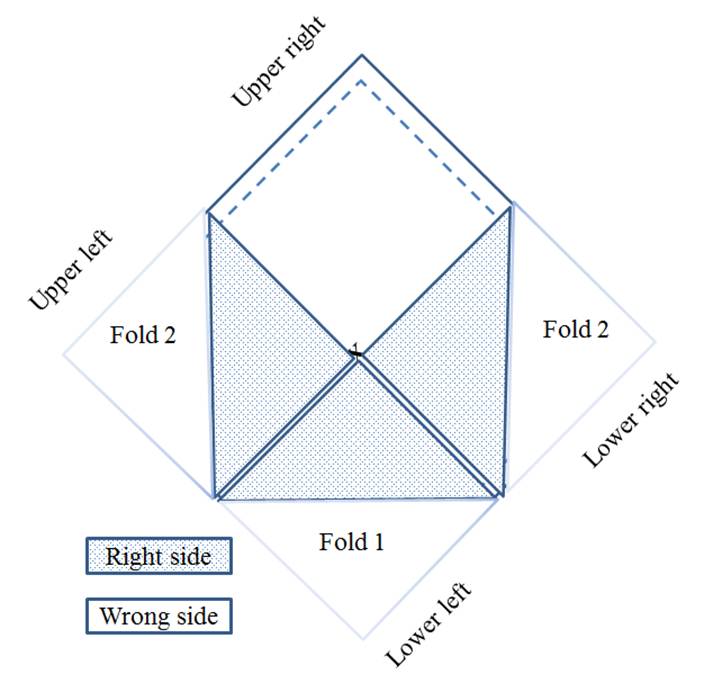
b.
Fold 2: Fold the upper left corner to the
center point with wrong sides together.
c.
Fold 3: Fold the lower right corner to the
center point with wrong sides together.
d.
Use your hands to flatten the folds and
make crisp seams.
e.
The feed sack square now has an enveloped
body and a flap.
f.
Fold 4: Using the center of the feed sack
square, fold the bottom edges of the envelope to the bottom edge of the flap as
shown in the following figure.
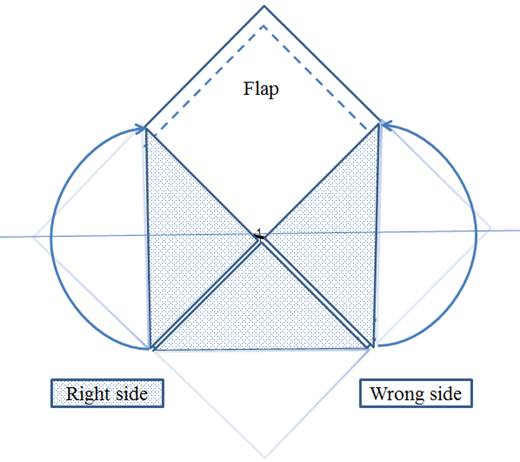
g.
Use your hands to flatten the fold and
make a crisp seam.
C.
The result is an envelope with an envelope
body and a flap as shown in this figure.
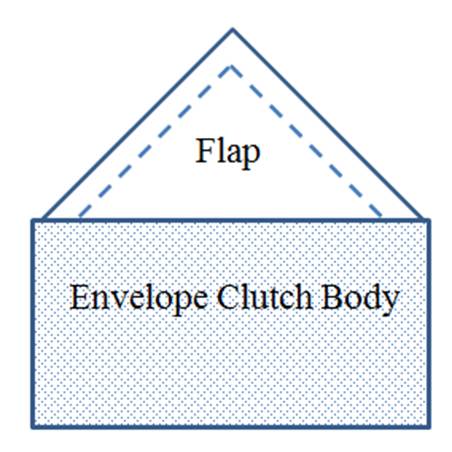
D.
Finish the clutch with the following
steps.
a.
Secure the envelope sides together for sewing.
b.
Top stitch the right and left sides of the
envelope clutch body as shown in the following figure.
c.
Fold the flap over the envelope clutch
body and make a crisp seam with your hands.
d.
If desired, Velcro, a button or a snap can
be added to secure the flap to the envelope clutch body.

E.
Here is an example of a finished Origami
inspired envelope clutch.
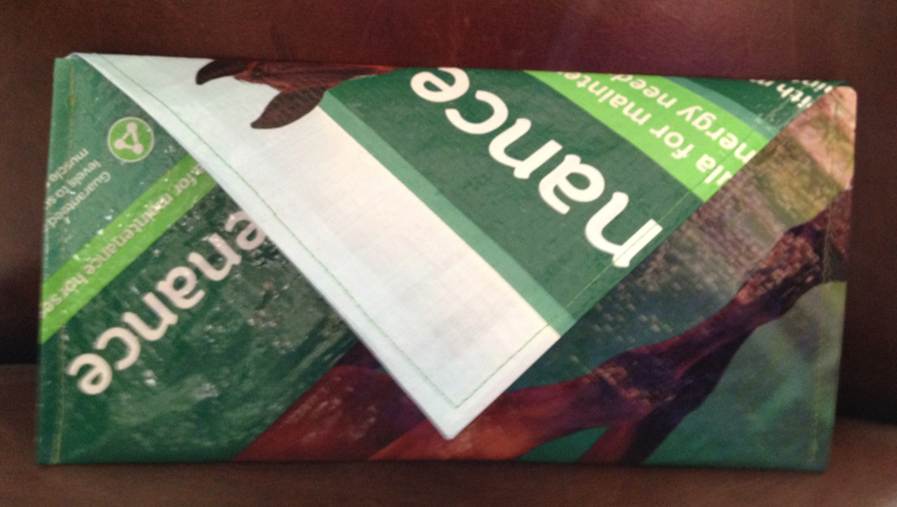
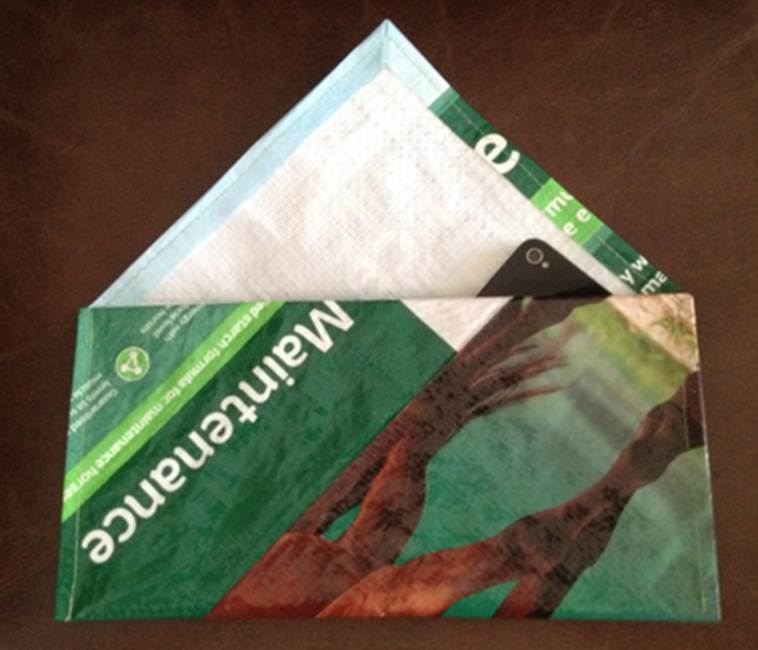
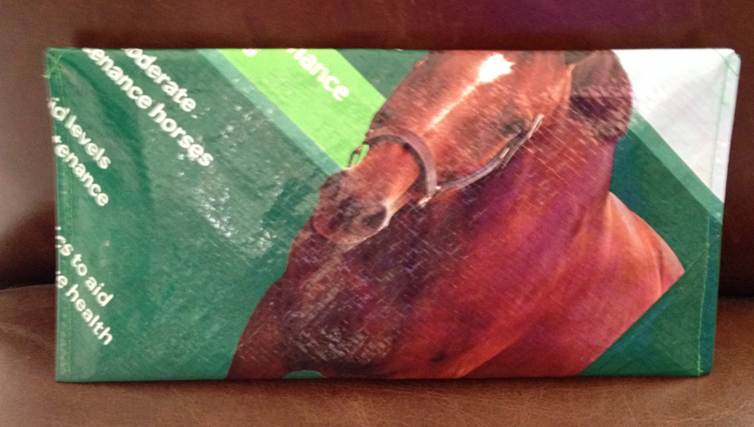
This pattern makes an envelope
clutch from woven polypropylene feed sack fabric.

The finished rectangular
clutch dimensions are 10.5 inches wide and 5.5 inches high. The front of this envelope clutch has a rich
depth and texture created by three lovely Origami inspired triangles.
Instructions
Step 1. Clean
and flatten the feed sack using the Feed Sack Preparation Instructions.
Step 2. Create
a 15 inch Origami square using the Origami inspired
feed sack square preparation instructions.
Step 3. Mark the center of the Origami square using the following steps.
A.
An easy way to mark the
center is to use triangle folds bringing opposite corners together.
B.
Fold 1: Fold the upper left
corner to the lower right corner.
C.
Fold 2: Fold the upper
right corner to the lower left corner.
D. Mark the center point where the folds meet.
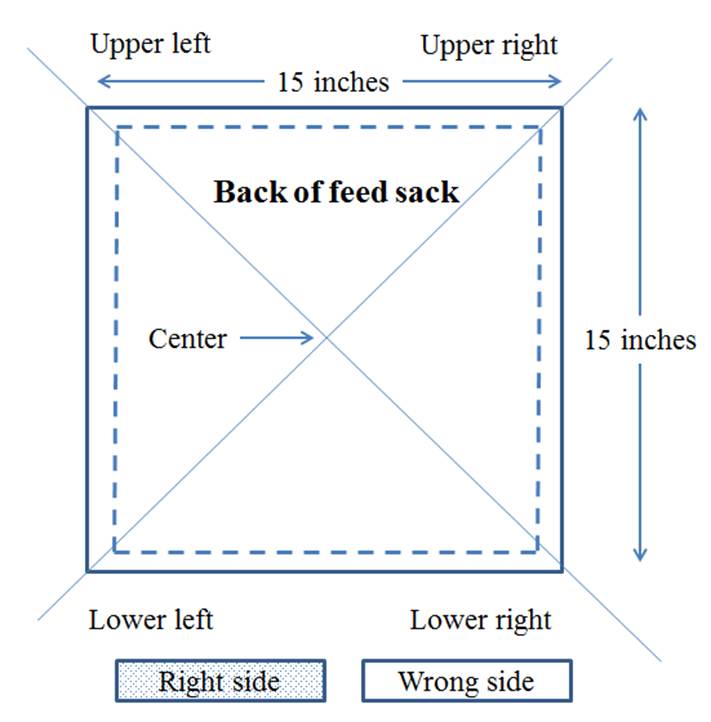
Step 4. Make the clutch using the following steps.
A.
Lay the Origami square right side down and
rotate 90 degrees so that the feed sack image that will be on the back of the
clutch is the upper right corner of the square as shown in the following
figure. The following folds will use the
fabric right side down.
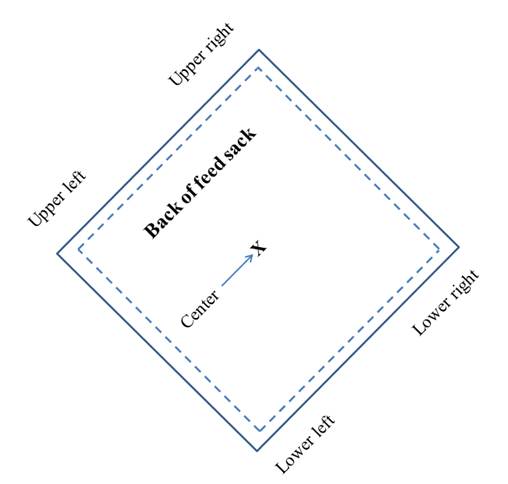
B.
Make the body of the clutch with the
following steps.
a.
Fold 1: Fold the lower left corner to the
center point with wrong sides together as shown in the following figure.
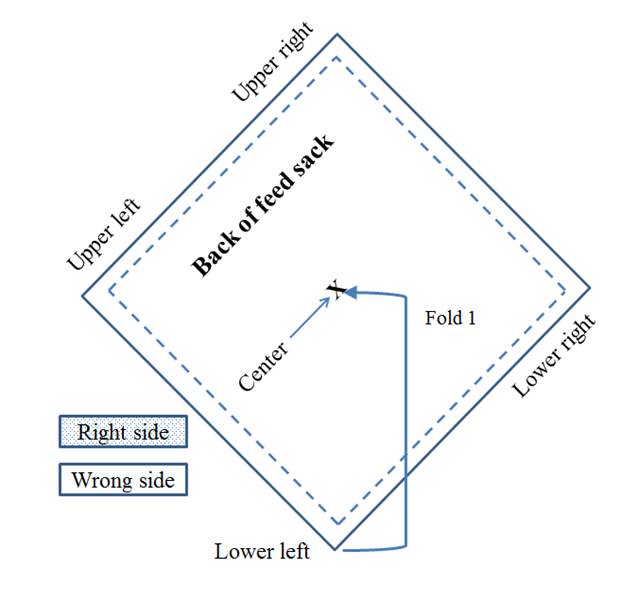
b.
Use your hands to flatten the folds and
make crisp seams.
c.
Fold 2: Fold the bottom half of the Origami
square onto the top half of the square lining up the outer edges as shown in
the following figure.
d.
Use your hands to flatten the folds and
make crisp seams.
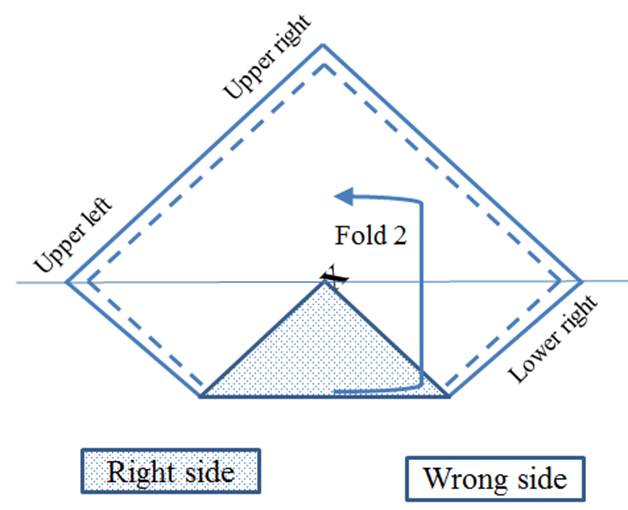
C.
Make the two triangles on the front of the
clutch with the following steps.
a.
Fold 3: Fold the upper left corner to the
center point of the square as shown in the following figure.
b.
Fold 4: Fold the lower right corner to the
center point of the square as shown in the following figure.
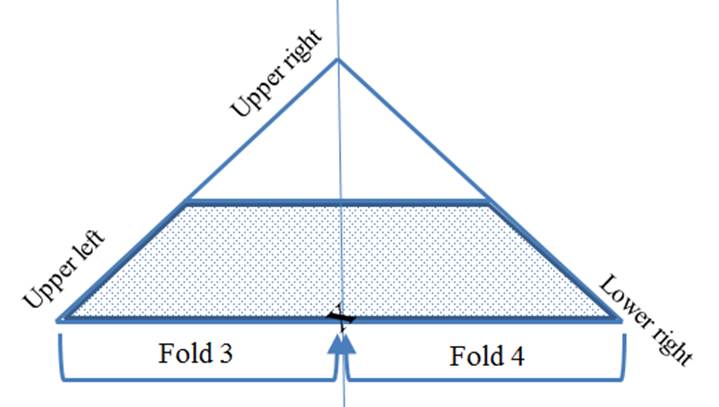
c.
Use your hands to flatten the folds and
make crisp seams.
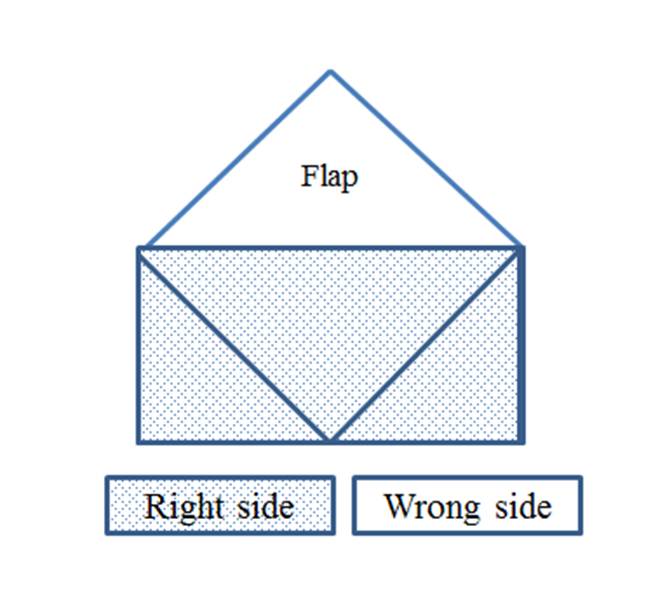
d.
The result is an envelope clutch with a body
and a flap as shown in this figure.
D.
Finish the edges of the clutch with the
following steps.
a.
Secure the folded triangular pockets to
the clutch body for sewing.
b.
Top stitch the right side, bottom, and
left side of the clutch body.
c.
Fold the flap over the clutch body and
make a crisp seam with your hands.
d.
If desired, Velcro, a button or a snap can
be added to secure the flap to the clutch body.

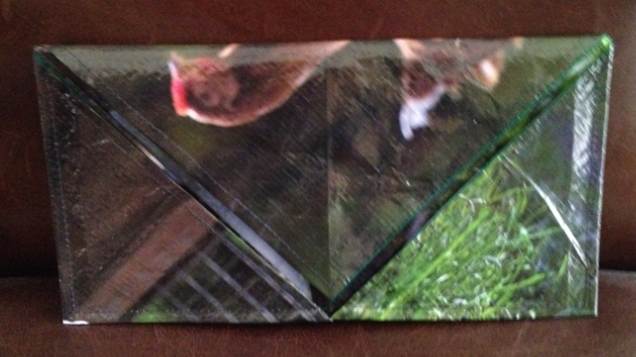
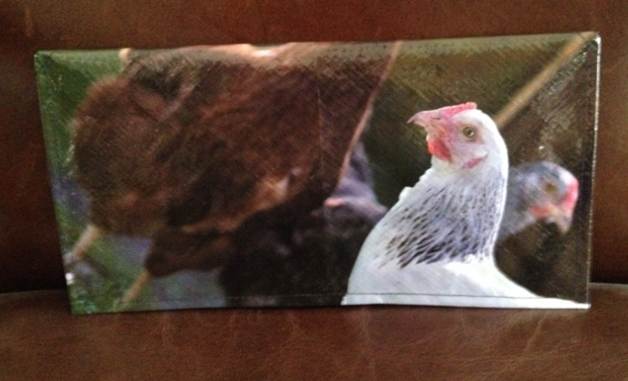
E.
Here is an example of a finished clutch.
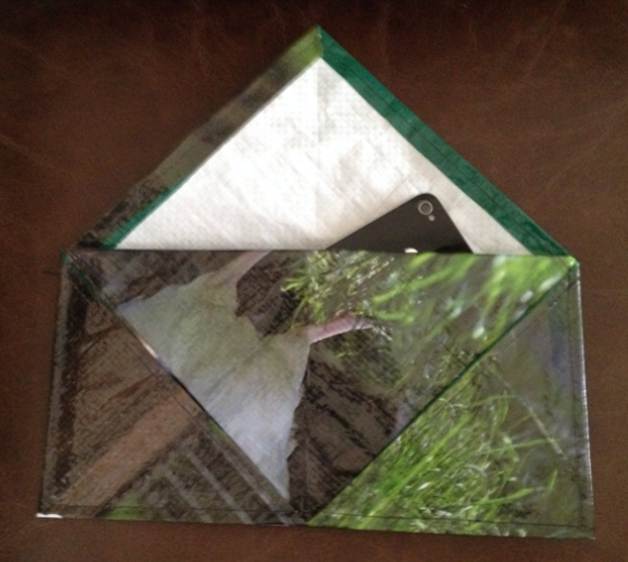
This pattern makes an Origami
inspired square envelope clutch using woven polypropylene feed sack fabric.
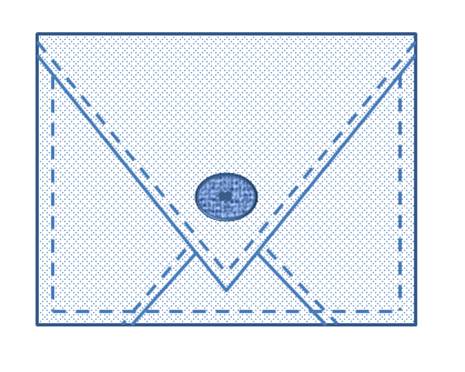
Instructions
Step 1. Clean
and flatten the feed sack using the Feed Sack Preparation Instructions.
Step 2. Create
a 15 inch Origami square using the Origami inspired
feed sack square preparation instructions.
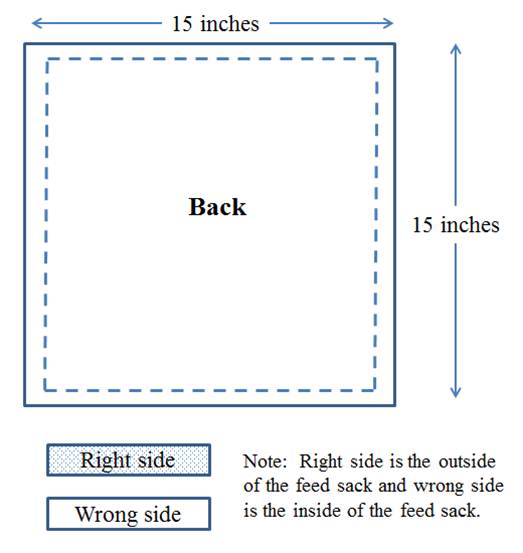
Step 3. Mark foldlines on the wrong side of the Origami square using the following steps.
A.
Lay the Origami square
right side down and rotate 90 degrees as shown in the following figure. The following folds will use the fabric right
side down.
B.
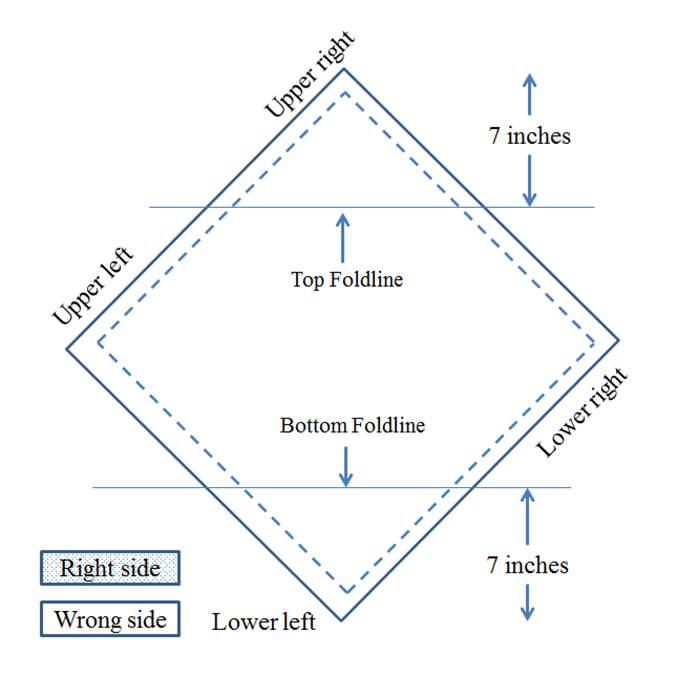
Mark 2 horizontal foldlines
that divide the square into thirds as shown in the following figure. On the wrong side of the 15
inch square, measure and mark the top foldline
7 inches from the upper right corner of the feed sack square. Measure and mark the bottom foldline 7 inches from the lower left corner.
C.
If you are using a different size square,
you will need to determine the foldlines based on the
size of the square.
D.
Measure and mark a left foldline 6 inches from the upper left corner as shown in
the following figure.
E.
Measure and mark a right foldline 6 inches from the lower right corner.
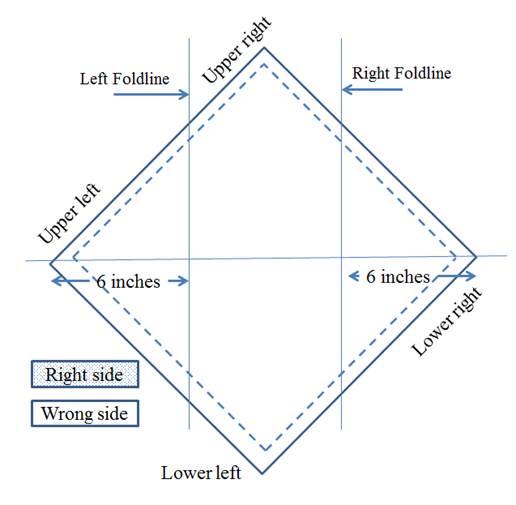
Step 4. Make the clutch using the following steps.
A. Make the clutch body with the following steps.
a. Fold 1: With wrong sides together, fold the lower left corner to the center of the top foldline as shown in the following figure.
b. Fold 2: With wrong sides together, tuck 2 inches of the lower left corner to the inside.
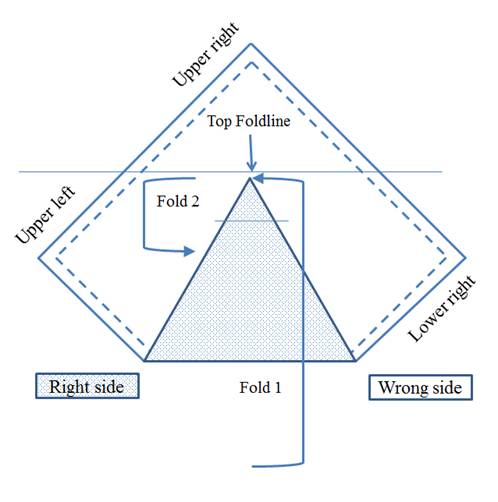
c. Use your hands to flatten the folds and make crisp seams.
d. Fold 3: With wrong sides together, use the right foldline to fold the lower right corner onto the square as shown in the following figure.
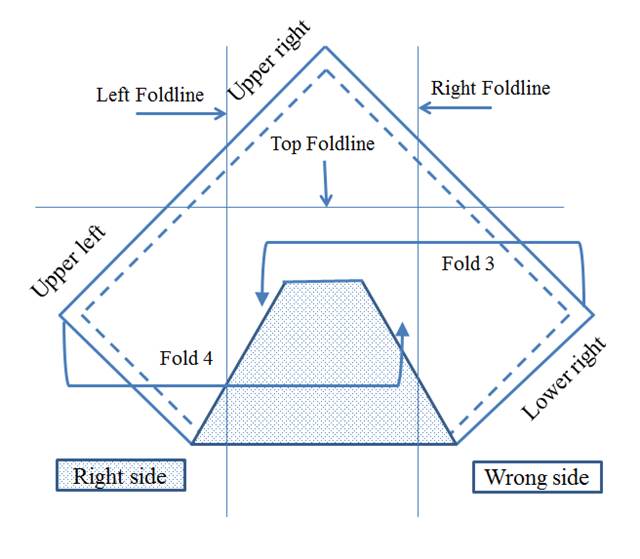
e. Fold 4: With wrong sides together, use the left foldline to fold the upper left corner onto the square.
f. Use your hands to flatten the folds and make crisp seams.
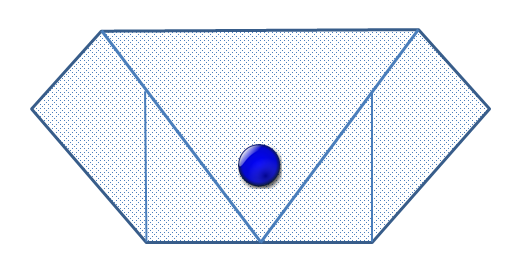
B. The result is a clutch body and a flap as shown in the following figure.
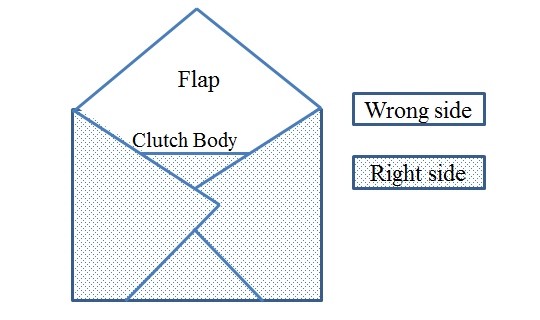
C. Finish the clutch with the following steps.
a. Secure the folded layers of the front of the clutch body so that you can stitch the folds together. Do not stitch the clutch front and back together.
b. Top stitch across the top of folds 2, 3, and 4 as shown in the following figure.
c. Topstitch from the point of fold 3 through the point of fold 4.
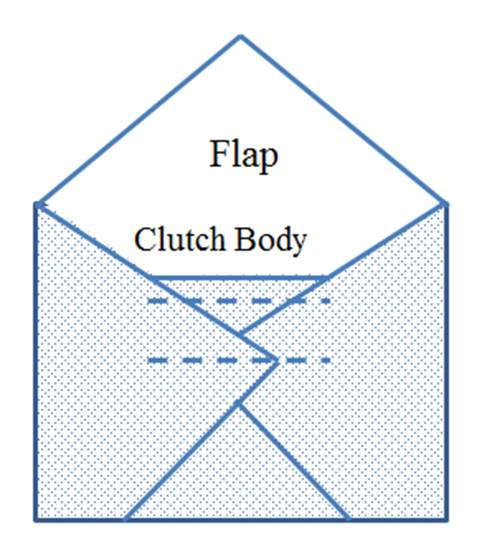
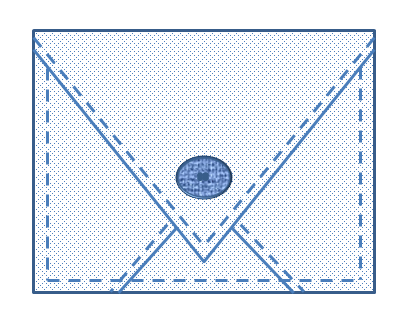
d. Top stitch the left, bottom, and right side of the clutch body securing the clutch front to the clutch back as shown in the following figure.
e. Fold the flap over the clutch body above the top horizontal foldline for the desired flap look and make a crisp seam with your hands.
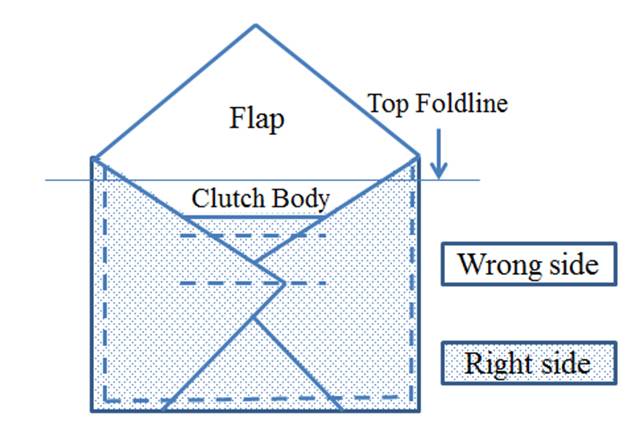
f. If desired, Velcro, a button or a snap can be added to secure the flap to the clutch body.
g. If desired, a paracord or other lightweight purse strap material can be top stitched along the inside of the flap for a purse strap.
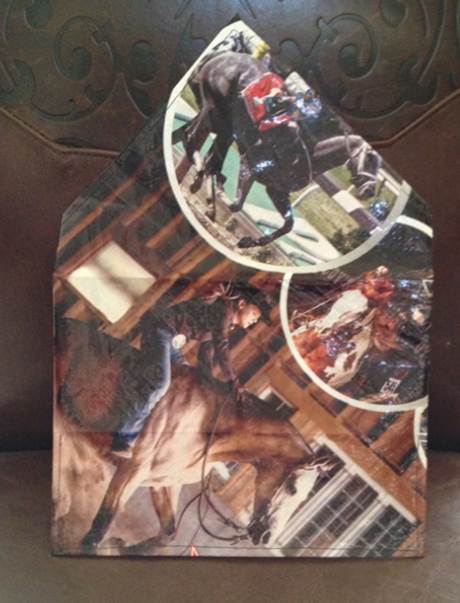
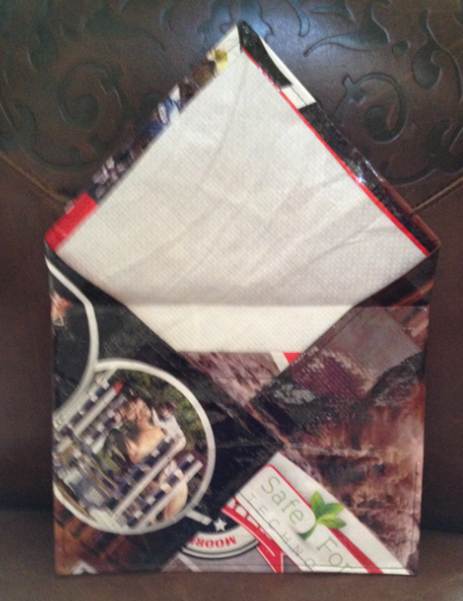
D. Here is an example of a completed clutch.
This pattern makes an Origami
inspired diamond shaped clutch using woven polypropylene feed sack fabric.
Instructions
Step 1. Clean and flatten the feed sack using the Feed Sack Preparation Instructions.
Step 2. Create
a 15 inch Origami square using the Origami inspired
feed sack square preparation instructions.
 .
.
Step 3. Mark the center of the Origami square using the following steps.
A.
An easy way to mark the
center is to use triangle folds bringing opposite corners together.
B.
Fold 1: Fold the upper left
corner to the lower right corner.
C.
Fold 2: Fold the upper
right corner to the lower left corner.
D. Mark the center point where the folds meet.
Step 4. Make the diamond clutch body and flap using the following steps.
A.
The first two folds will create the top
edge of the clutch.
a.
Fold 1: With wrong sides together, fold the
lower left corner to the center point as shown in the following figure.
b.
Use your hands to flatten the fold and
make a crisp seam.
c.
Open fold 1.
d.
Fold 2: With wrong sides together, fold the
lower left corner to the upper right corner.
e.
Use your hands to flatten the fold and
make a crisp seam.
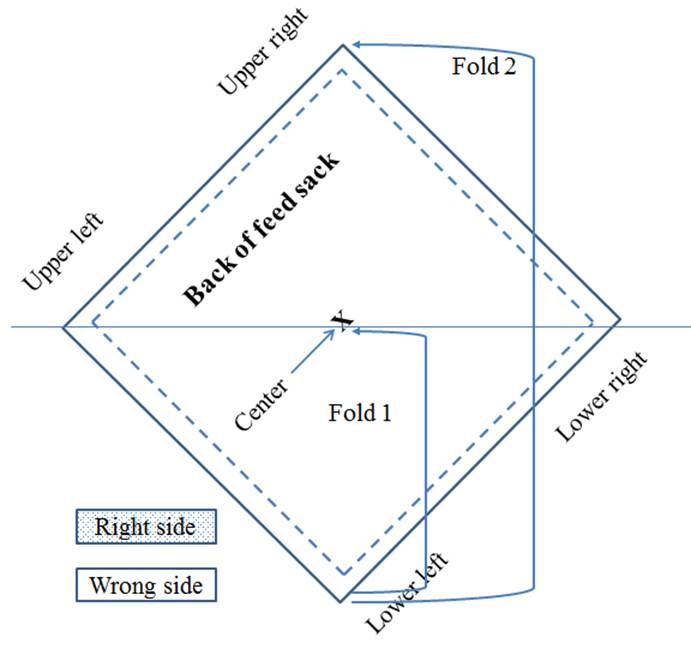
f.
Repeat fold 1 to tuck the lower left
corner inside of fold 2 to create the top edge of the clutch as shown in the
following figure.
B.
Use your hands to press the fold flat and
make a crisp seam. The result is a flap for the clutch and a clutch body.
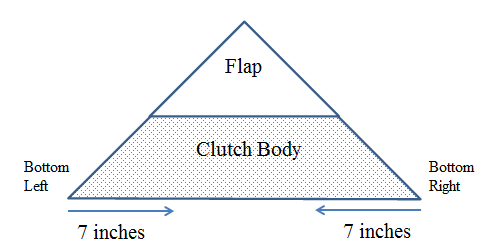
E. Make the diamond shape with the following steps.
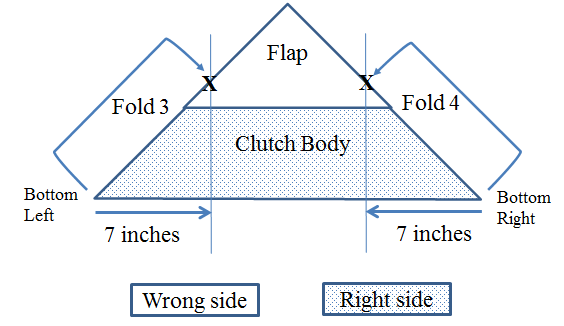
a. Measure and mark 7 inches from both bottom corners of the clutch body as shown in the following figure.
b. Measure and mark the flap edge directly above the 7 inch mark on both sides.
c. The next two folds create the sides of the clutch body:
i. Fold 3: Fold the bottom left corner over the clutch body along the outer edge to the mark on the left side of the flap.
ii. Fold 4: Fold the bottom right corner over the clutch body along the outer edge to the mark on the right side of the flap.
d. The result is a clutch with a flap and a body.
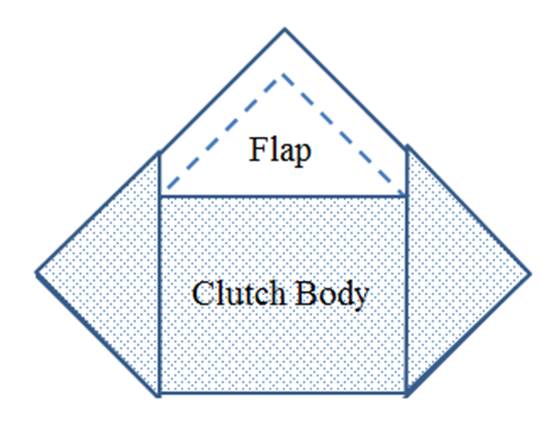
e. The upper edges of the left and right side triangles of the clutch body made in folds 3 and 4 need to be folded to the inside.
i. Mark a line level with the clutch body upper edge on the upper edges of the left and right clutch body triangles.
ii. Fold the left and right edges into the inside of the clutch body along this line as shown in the following figure.
f. Flatten these edges into a crisp seam.
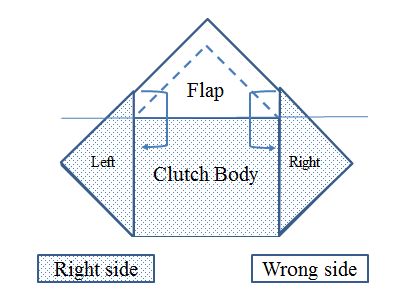
F. Finish the edges of the clutch with these steps.
a. Secure the left and right folded edges to keep them in place for sewing.
b. Open up the clutch body enough to top stitch along top of the left and right folded edges as shown in the following figure. Do not stitch the clutch front and back together.
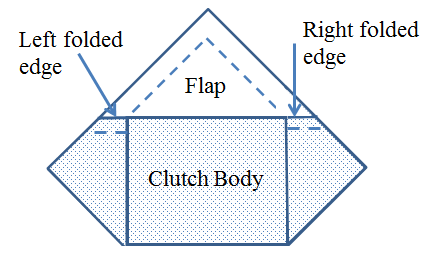
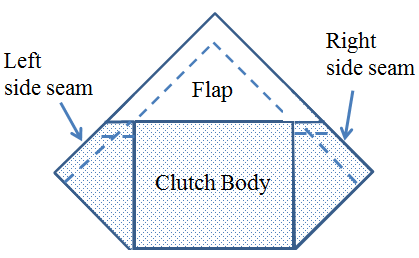
c. Fold the clutch body back into shape and secure the left and right side seams to keep them in place for sewing.
d. Top stitch along the left and right side seams to complete the clutch body as shown in the following figure.
G. The final result is a diamond clutch. If desired, Velcro, a button or a snap can be added to secure the flap to the clutch body.
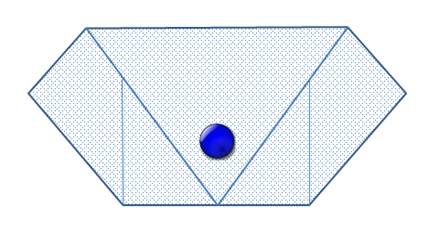
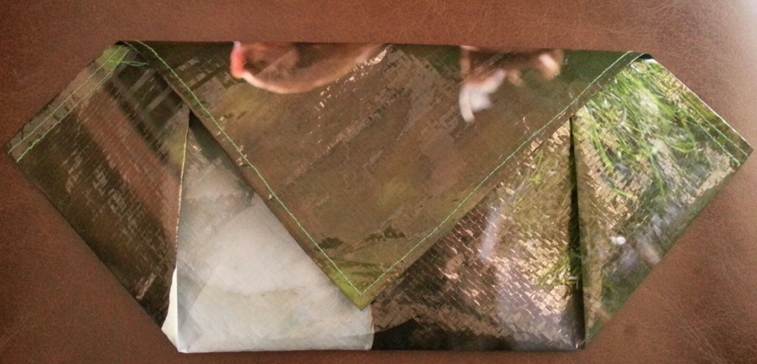
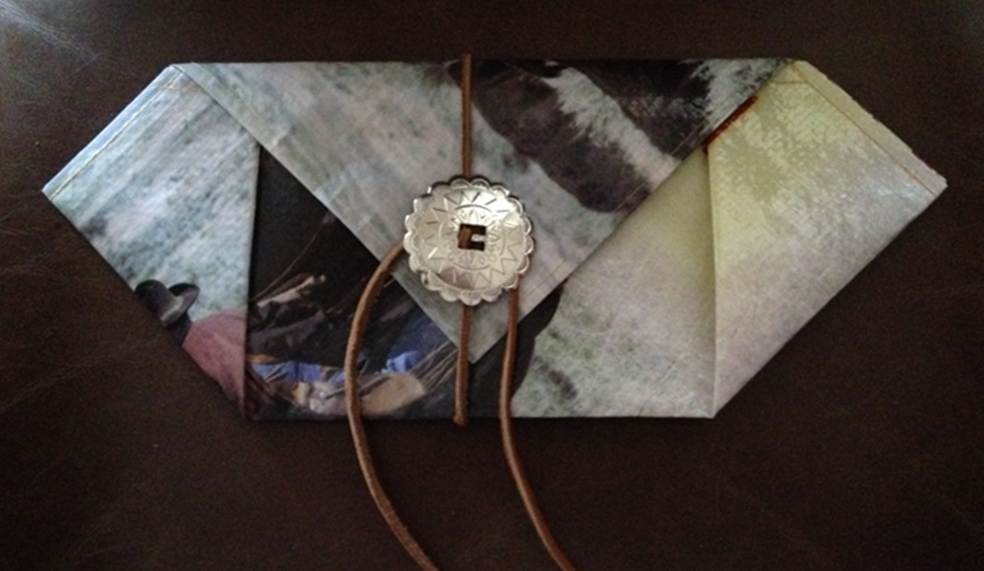
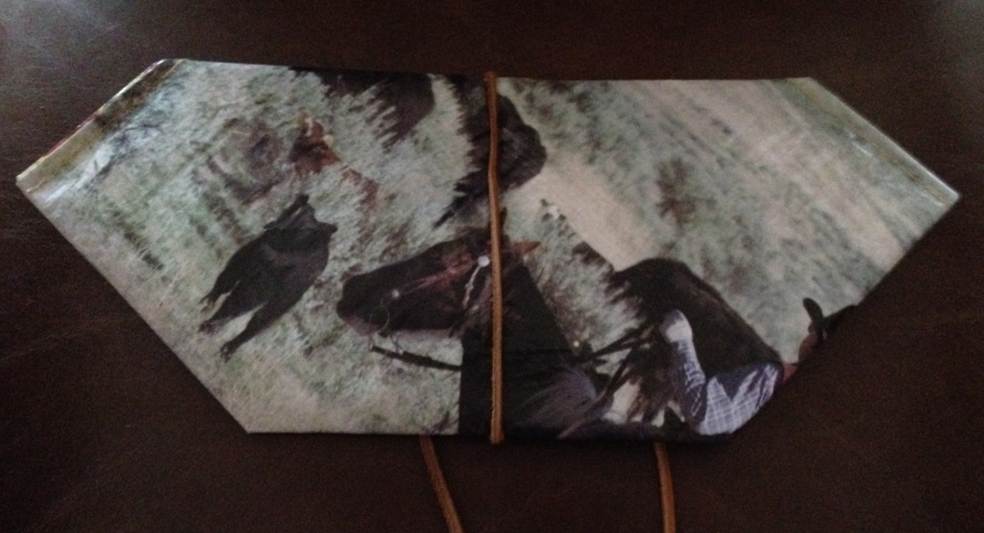
H. Here are some photos of completed Origami inspired diamond clutches.
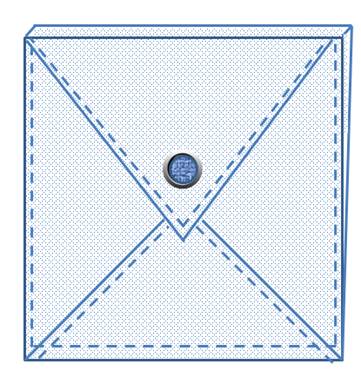
This pattern makes an Origami
inspired purse with two flap pockets and an open pocket using woven
polypropylene feed sack fabric. The
finished clutch is 8.5 inches wide and 7 inches high.
Instructions
Step 1. Clean
and flatten the feed sack using the Feed Sack Preparation Instructions.
Step 2. Create
a 15 inch Origami square using the Origami inspired
feed sack square preparation instructions.
Step 3. Mark foldlines on the wrong side of the Origami square using the following steps.
A.
Lay the Origami square
right side down and rotate 90 degrees as shown in the following figure. The following folds will use the fabric right
side down.
B.
Mark a diagonal center foldline
on the wrong side of the Origami square from the upper right corner to the
lower left corner as shown in the following figure.
C.
Mark 2 vertical foldlines
that divide the square into thirds as shown in the following figure. On the wrong side of the 15
inch square, measure and mark the left vertical foldline
7 inches from the upper left corner of the feed sack square. Measure and mark the right vertical foldline 7 inches from the lower right corner.
Step 4. Make the 3 pocket purse using the following steps.
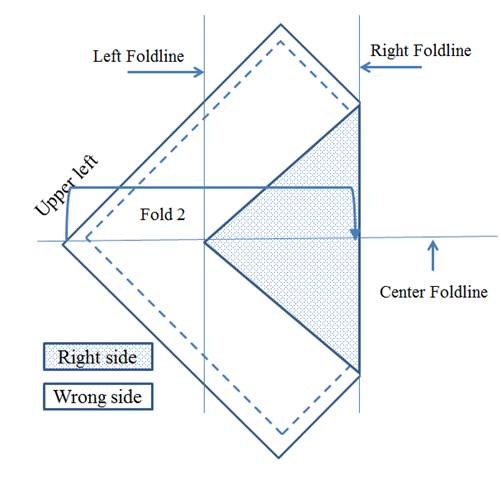
A. Fold 1: With wrong sides together, fold the lower right corner to the left foldline. The lower right corner should be centered on the center foldline as shown in the following figure.
B. Use your hands to flatten the fold and make a crisp seam.
C.
Fold 2: fold the upper left
corner to the right foldline. The upper left corner should be
centered on the center foldline.
D.
Use your hands to flatten the fold and make a
crisp seam.
E.
Fold 1 and 2 can be done in a different order if there
is a specific color or image on the feed sack that you would like to have
appear on the outside pockets.
F. Fold 3: With right sides together, fold the lower half to the back onto the upper half along the center foldline as shown in the following figure.
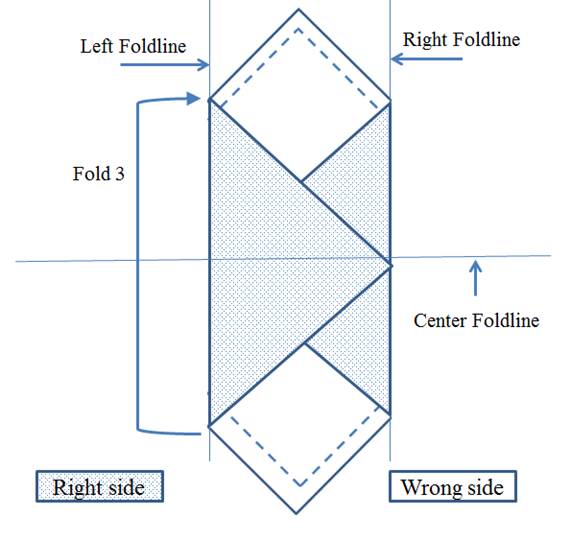
G. The result is a purse body with a flap pocket on each side and an open pocket in the middle.
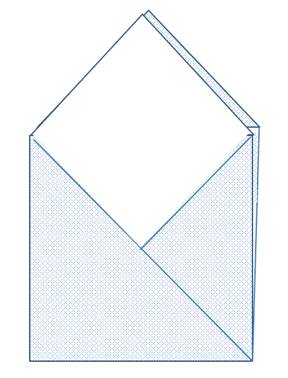
H. Use your hands to flatten the fold and make a crisp seam.
I. Secure the two pockets together for sewing.
J. Topstitch the left side, bottom, and right side through all of the layers of the fabric to create a purse body with a flap pocket on each side and an open pocket in the middle.
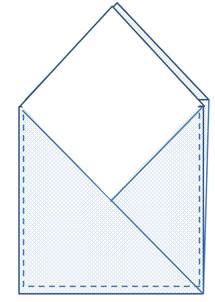
K. If desired, a paracord or other lightweight purse strap material can be top stitched along the inside of a flap for a purse strap.
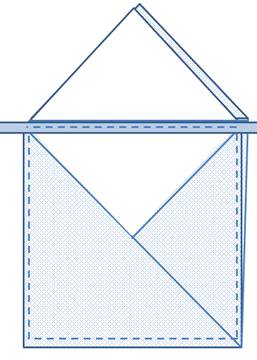
L. Fold the flap over the purse on each side. For a little added interest, one flap can be made longer than the other flap. If desired, Velcro, a button or a snap can be added to secure each flap to the purse body.
M. The result is a flap pocket on each side with an open pocket in the middle.
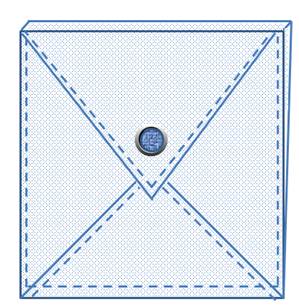
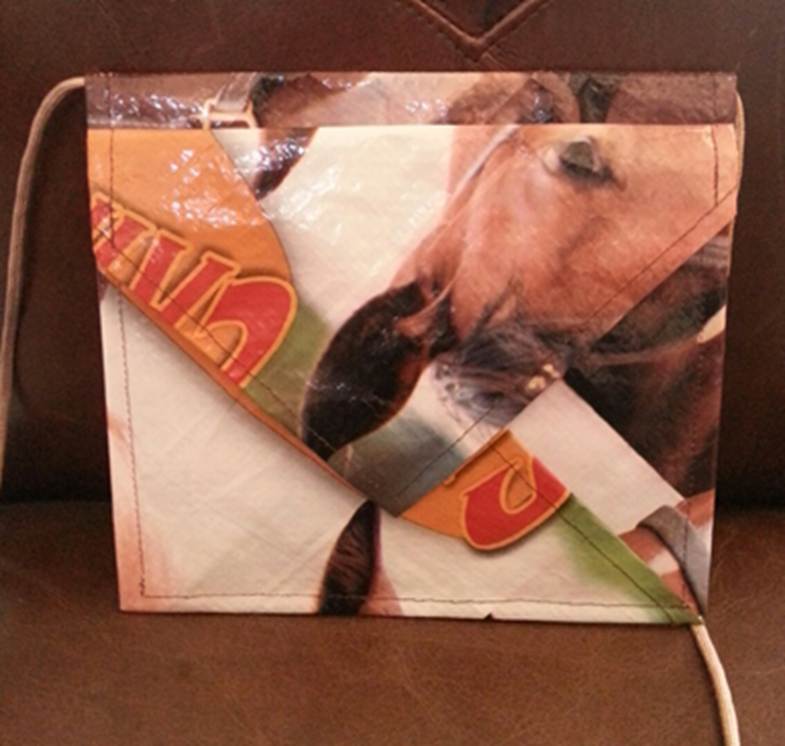
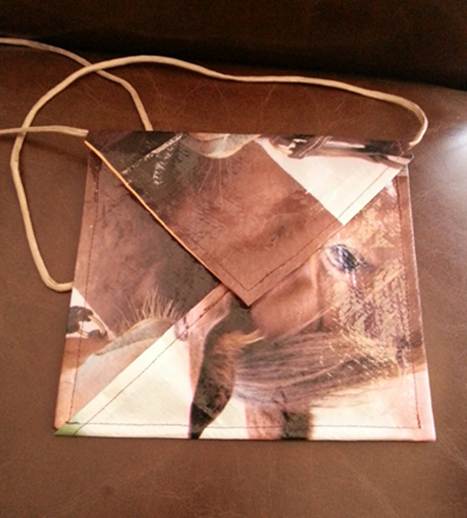
N. Here is an example of a finished 3 Pocket Purse. This purse has a paracord purse strap and different flap lengths to add an extra dimension to the origami folds.
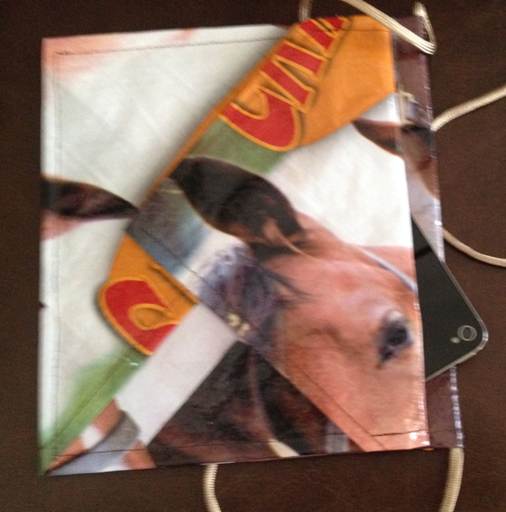
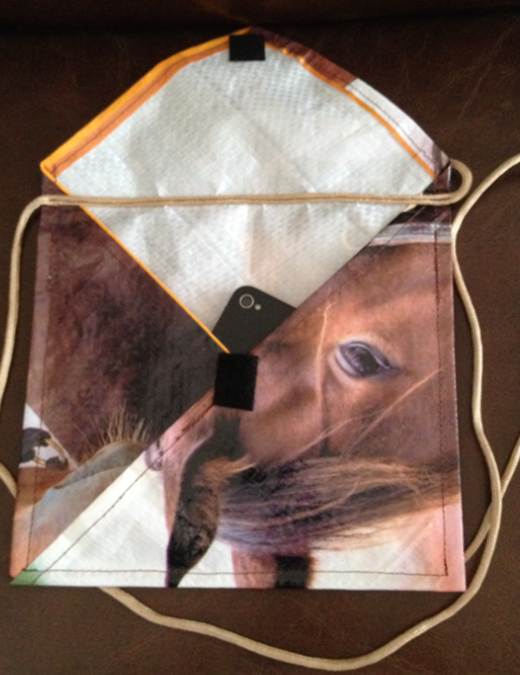
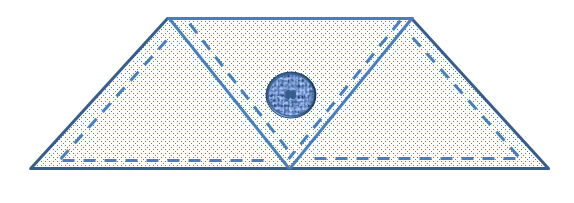
This pattern makes a Pyramid
shaped clutch from woven polypropylene feed sack fabric. The finished rectangular clutch dimensions are
15 inches wide and 5 inches high.
Instructions
Step 1. Clean
and flatten the feed sack using the Feed Sack Preparation Instructions.
Step 2. Create
a 15 inch Origami square using the Origami inspired
feed sack square preparation instructions.
Step 3. Mark foldlines on the Origami square using the following steps.
A. Measure and mark a vertical center foldline from the top to the bottom of the square as shown in the following figure. An easy way to mark the center fold line is to fold the one side of the square over the other side of the square with right sides together and mark the fold.
B. Measure and mark a horizontal center foldline from the left side to the right side of the square.
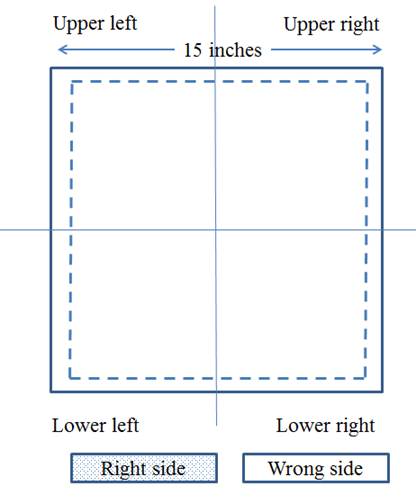
Step 4. Make the clutch using the following steps.
A.
Lay the Origami square
right side down so that the feed sack image that will be on the back of the
clutch as shown in the following figure.
The following folds will use the fabric right side down.
B.
Make the first folds for the clutch body
with these steps.
a.
Fold 1: with wrong sides together, fold the
bottom edge of the square up to the horizontal center foldline
as shown in the following figure.
b.
Use your hands to flatten the fold and
make a crisp seam.
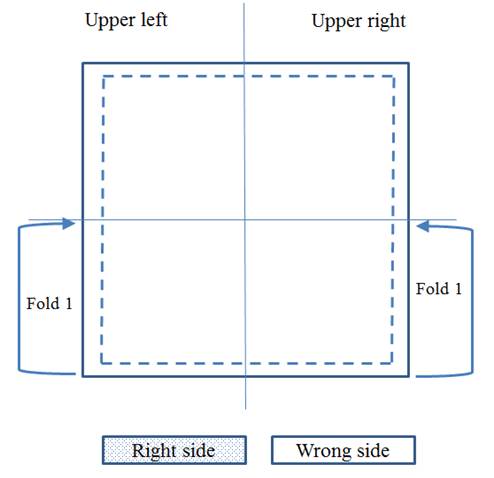
C.
Make the triangle flap with the following
steps.
a.
Fold 2: With wrong sides together, fold the
upper right corner to the center of the square as shown in the following
figure.
b.
Fold 3: With wrong sides together, fold the
upper left corner to the center of the square.
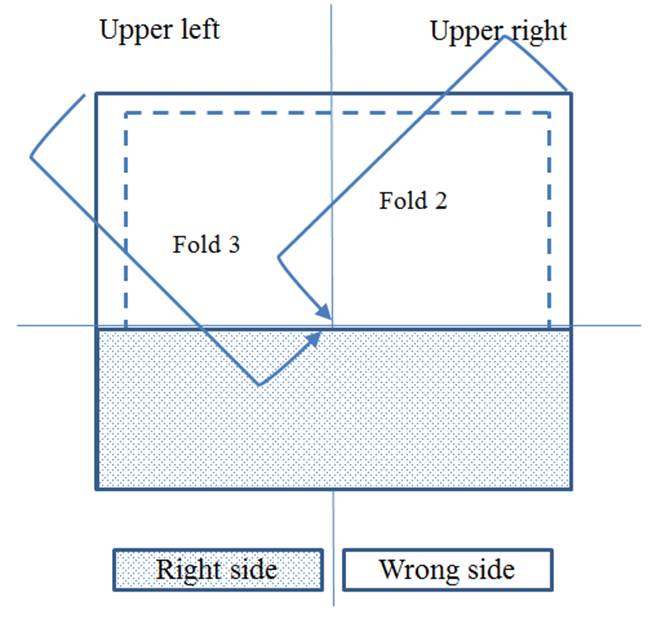
c.
Use your hands to flatten the folds and
make crisp seams.
D.
Finish the clutch body with these steps.
a.
Fold 4: Fold the rectangle below the
horizontal foldline, up onto the triangle above the
horizontal foldline as shown in the following figure.
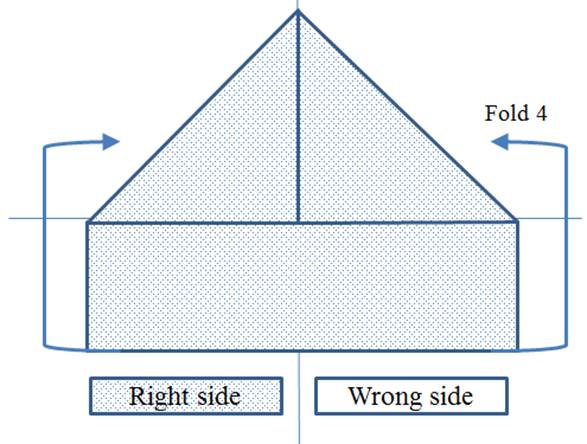
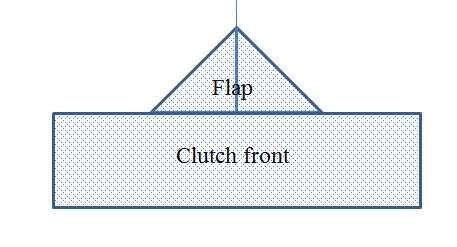
b.
The result is a triangle on top of a
rectangle.
c.
Use your hands to flatten the folds and
make crisp seams.
d.
Turn over the clutch so that the clutch
front is face down.
e.
Fold 5: On the back of the clutch, fold the
top right corner of the rectangle over the body of the clutch to the bottom of
the clutch as shown in the following figure.
f.
Fold 6: On the back of the clutch, fold the
top left corner of the rectangle over the body of the clutch to the bottom of
the clutch.
g.
Use your hands to flatten the folds and
make crisp seams.
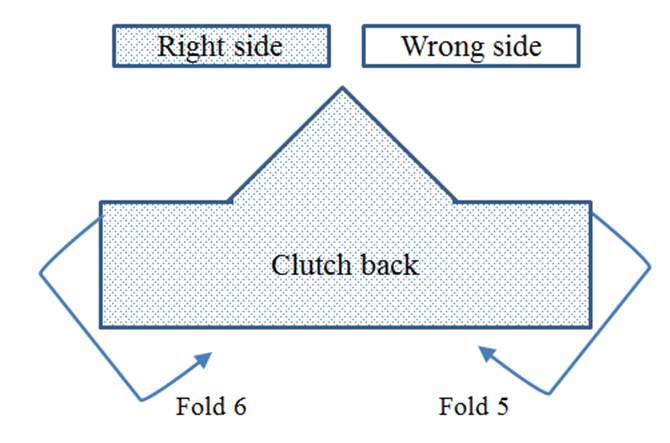
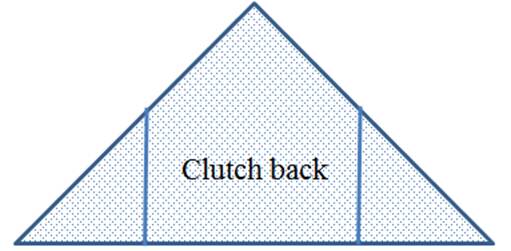
h.
The result is a large triangle. The following figure shows the back of the
clutch.
i.
Use your hands to flatten the folds and
make crisp seams.
E.
Finish the clutch with the following
steps.
a.
Turn the clutch over so that the clutch
back is face down.
b.
Fold the flap over the clutch body and
make a crisp seam with your hands.
c.
Secure the sides on the perimeter of the
clutch body for sewing.
d.
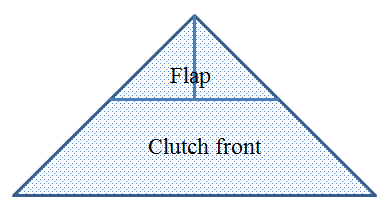
Top stitch the complete perimeter of the
triangle, including the clutch flap and body as shown in the following figure.
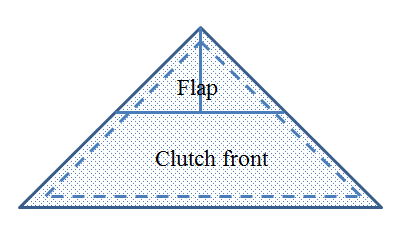
e.
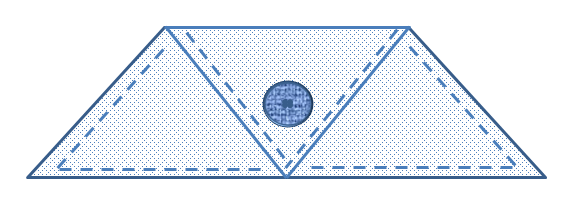
If desired, Velcro, a button or a snap can
be added to secure the flap to the clutch body.
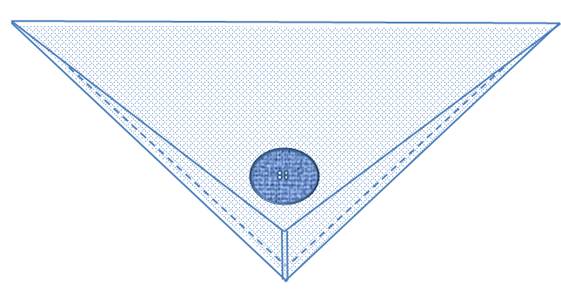
A completed Pyramid clutch is shown in the following figure.
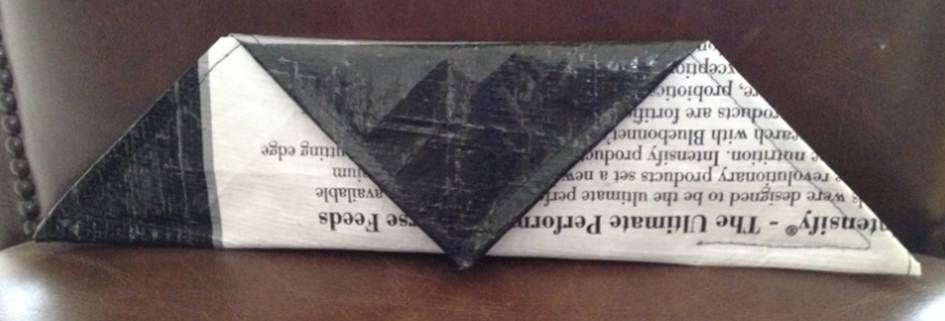
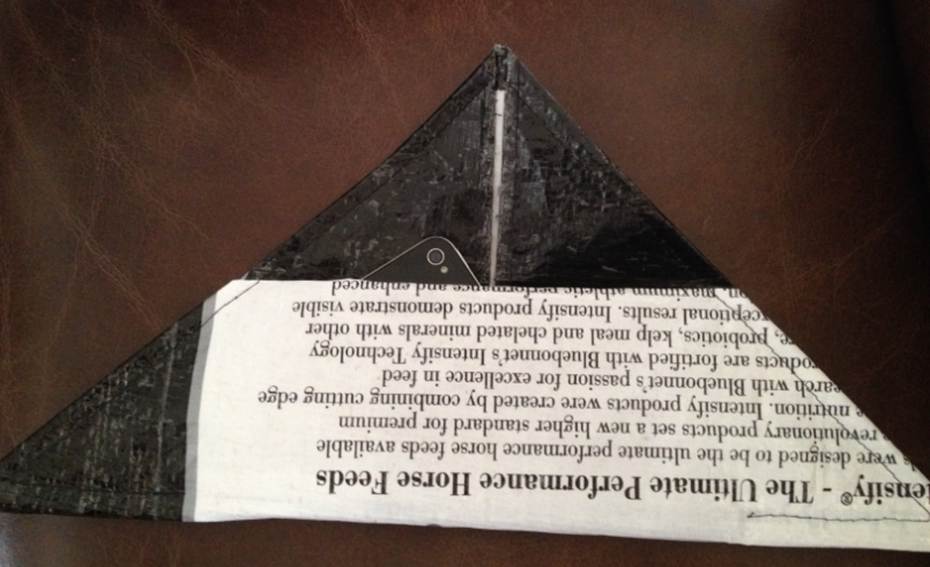
F.
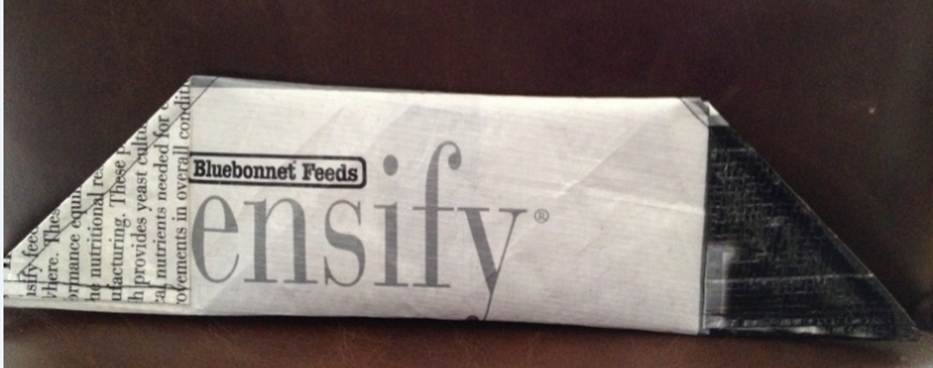
Here is an example of a finished clutch.
This pattern makes an Origami
inspired Teacup clutch using woven polypropylene feed sack fabric. The top of the clutch is wider than the
bottom of the clutch. The finished
clutch is 5.5 inches high, the bottom is 7 inches wide, and the top is 10
inches wide.
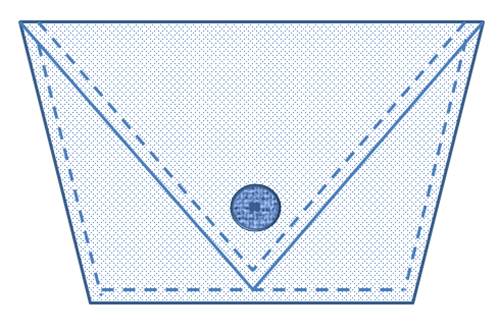
Instructions
Step 1. Clean
and flatten the feed sack using the Feed Sack Preparation Instructions.
Step 2. Create
a 15 inch Origami square using the Origami inspired
feed sack square preparation instructions.
Step 3. Mark foldlines on the wrong side of the Origami square using the following steps.
A.
Lay the Origami square
right side down and rotate 90 degrees as shown in the following figure. The following folds will use the fabric right
side down.
B.
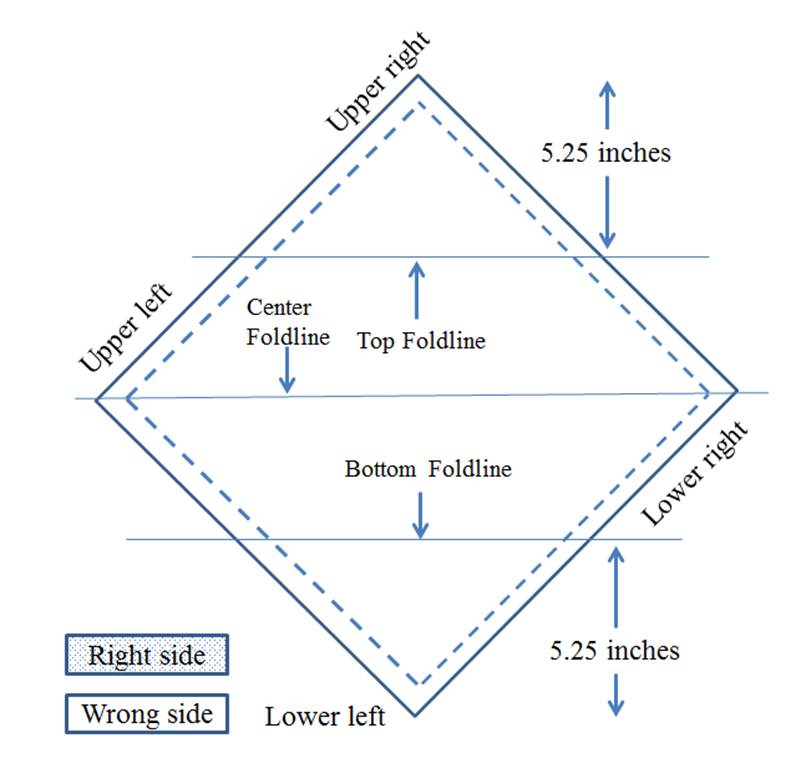
This pattern requires marking horizontal foldlines that divide the square into fourths. On the wrong side of the 15
inch square, measure and mark the center foldline
from the upper left to the lower right corner.
C.
For a 15 inch
square, measure and mark a top foldline 5.25 inches
from the upper right corner and the bottom foldline
5.25 inches from the lower left corner.
D.
If you are using a different size square,
you will need to determine the foldlines based on the
size of the square.
Step 4. Make the teacup clutch using the following steps.
A. Make the body of the clutch with the following steps.
a. Fold 1: With wrong sides together, use the bottom foldline to fold the lower left corner to the center foldline.
b. Use your hands to flatten the fold and make a crisp seam.
c. Fold 2: Use the center foldline to fold the bottom edge to the top foldline.
d. Use your hands to flatten the fold and make a crisp seam.
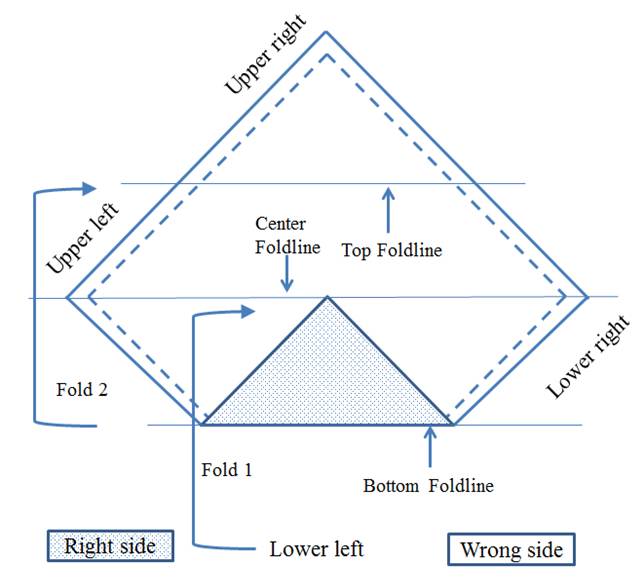
e. The result is a triangle as shown in the following figure.
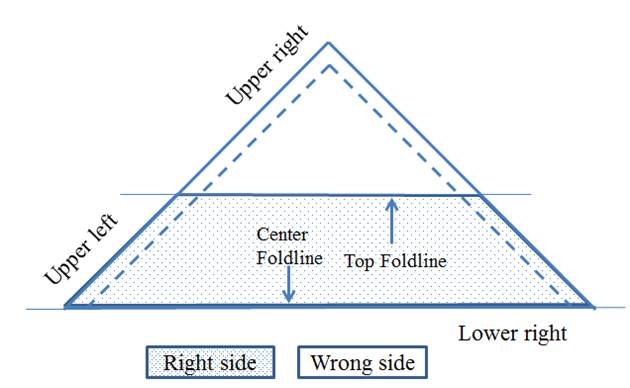
f. Fold 3: Fold the upper left corner toward the right edge of the triangle lining up the point on the top foldline. The left edge of the triangle will lay on the top foldline as shown in the following figure.
g. Use your hands to flatten the fold and make a crisp seam.
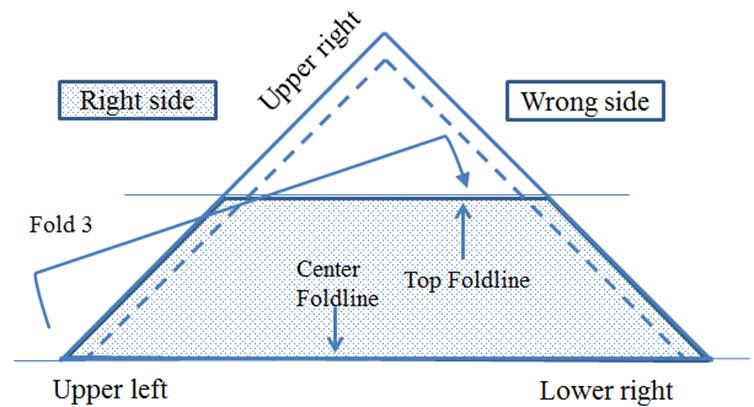
h. Fold 4: Fold the lower right corner toward the left edge of the triangle at the top foldline. The right edge of the triangle will lay on the top foldline as shown in the following figure.
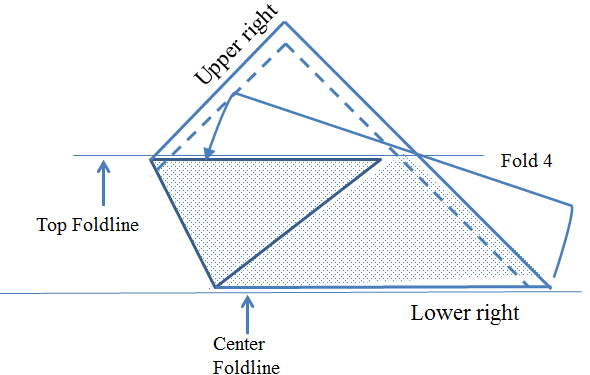
i. Use your hands to flatten the fold and make a crisp seam.
B. The result is a tea cup shaped clutch where the bottom is smaller than the top edge.
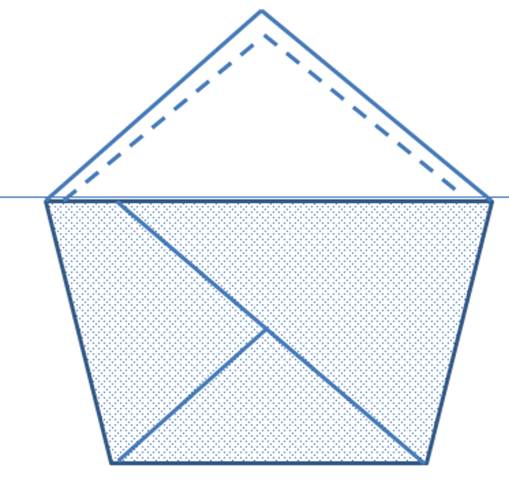
C. Finish the clutch with these steps.
a. Secure the top edge of the clutch front to hold the folds in place for sewing.
b. Top stitch the front upper edge of the clutch opening through all folded layers as shown in the following figure; do not sew through the clutch body.
c. Top stitch the left side, bottom, and right side of the clutch body.
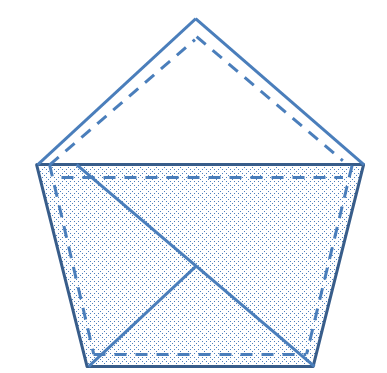
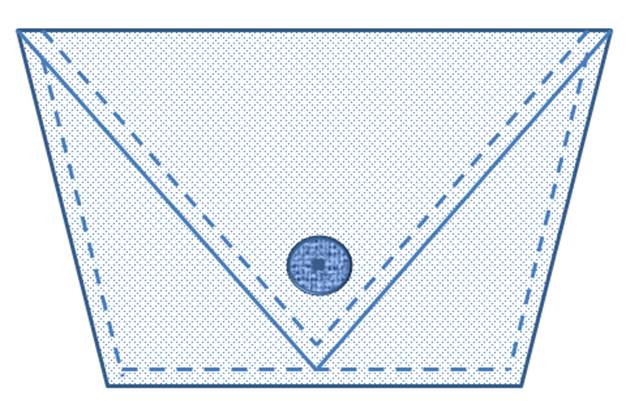
d. Fold the flap over the front of the clutch along the top foldline.
e. If desired, Velcro, a button or a snap can be added to secure the flap to the clutch body.
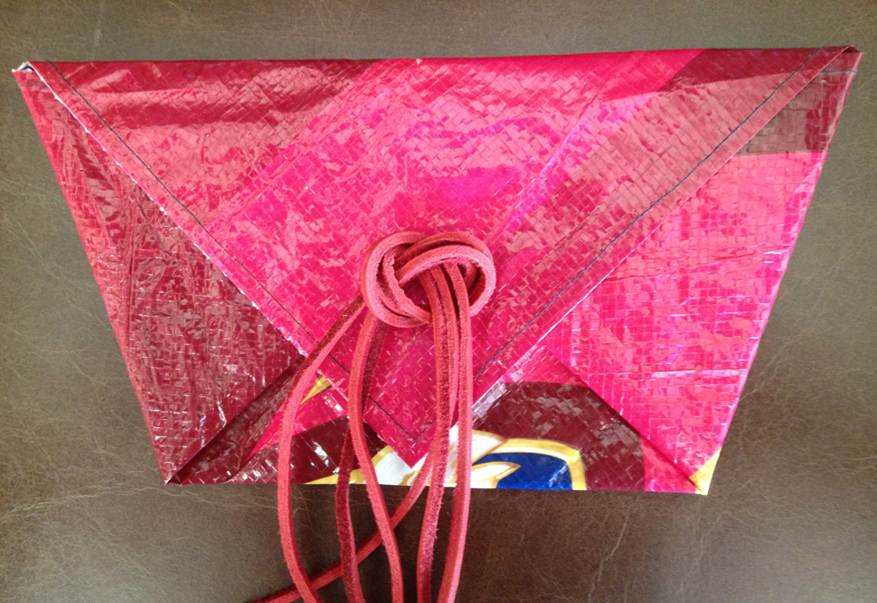
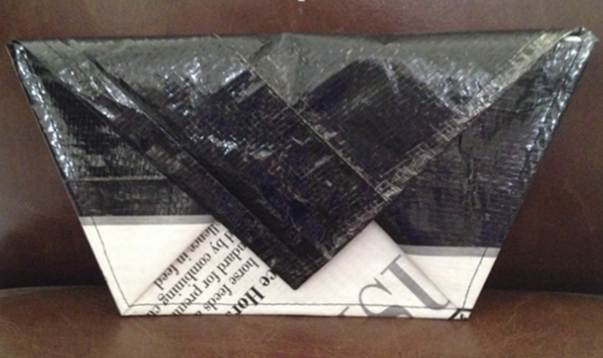
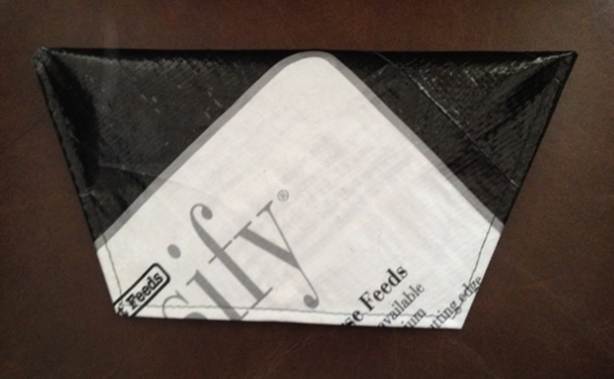
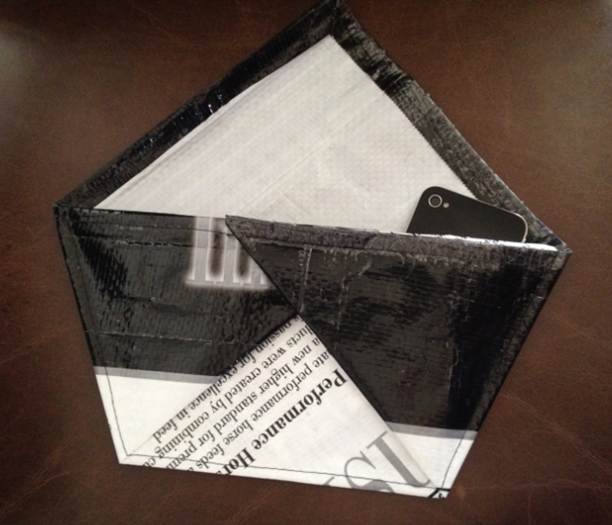
D. Here are some examples of completed feed sack clutches.
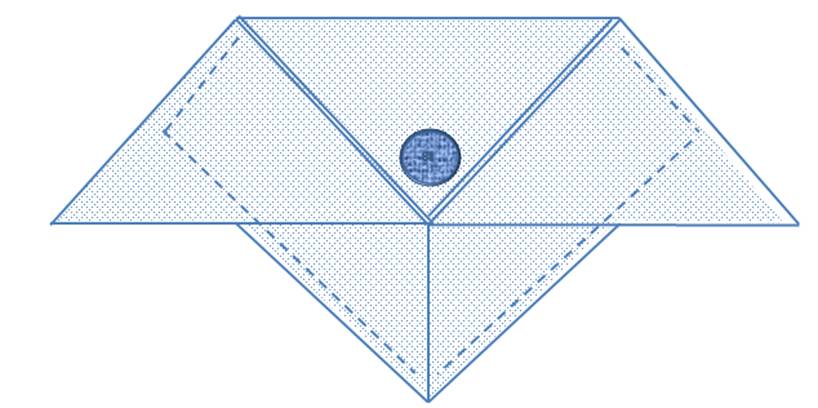
This pattern makes an Origami
inspired heart clutch using woven polypropylene feed sack fabric. The clutch has an inner pocket with a flap
and an open pocket in the wings. The heart
clutch is 7 inches high and the wings span 14
inches.
Instructions
Step 1. Clean
and flatten the feed sack using the Feed Sack Preparation Instructions.
Step 2. Create
a 15 inch Origami square using the Origami inspired
feed sack square preparation instructions.
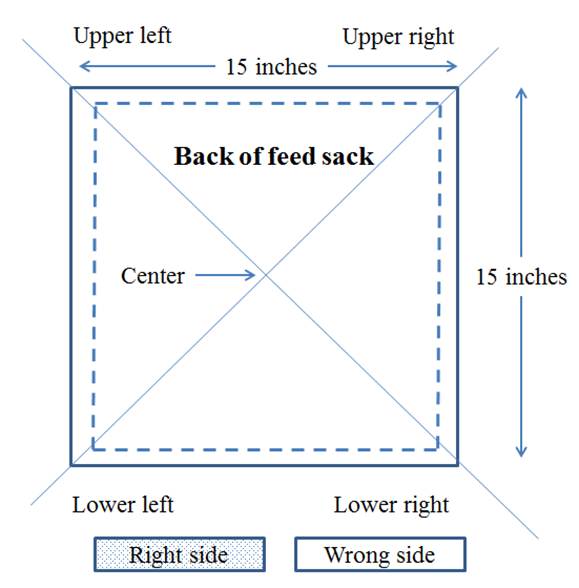
Step 3. Mark the center of the Origami square using the following steps.
A.
An easy way to mark the
center is to use triangle folds bringing opposite corners together.
a.
Fold 1: Fold the upper left
corner to the lower right corner.
b.
Fold 2: Fold the upper
right corner to the lower left corner.
c. Mark the center point where the folds meet.
B.
Lay the Origami square
right side down and rotate 90 degrees as shown in the following figure. The following folds will use the fabric right
side down.
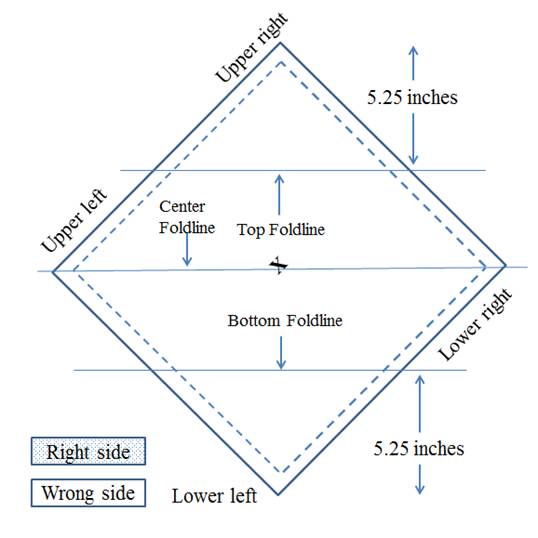
C. This pattern requires marking horizontal foldlines that divide the square into fourths. On the wrong side of the 15 inch square, measure and mark the center foldline from the upper left to the lower right corner as shown in the following figure.
D. For a 15 inch square, measure and mark a top foldline 5.25 inches from the upper right corner and the bottom foldline 5.25 inches from the lower left corner.
E. If you are using a different size square, you will need to determine the foldlines based on the size of the square.
Step 4. Make the clutch using the following steps.
A.
Make the clutch body with the following
steps.
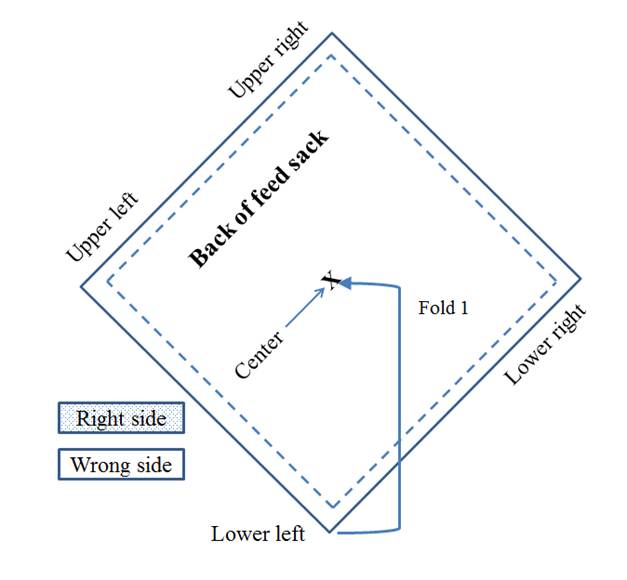
a.
Fold 1: Fold the lower left corner to the
center point with wrong sides together as shown in the following figure.
b.
Use your hands to flatten the folds and
make crisp seams.
c.
Fold 2: Fold the bottom half of the Origami
square onto the top half of the square lining up the outer edges as shown in
the following figure.
d.
Use your hands to flatten the folds and
make crisp seams.
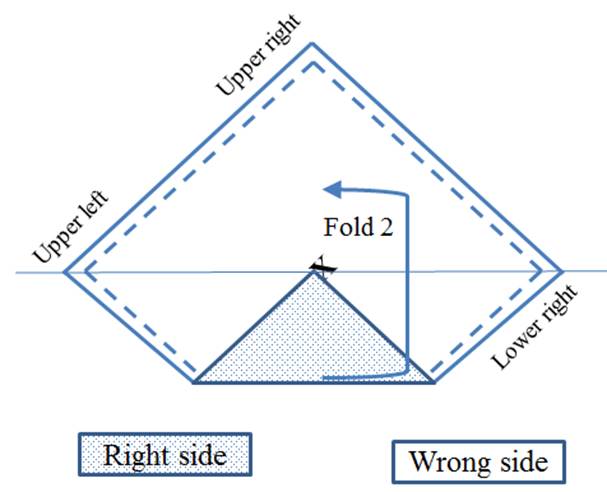
B.
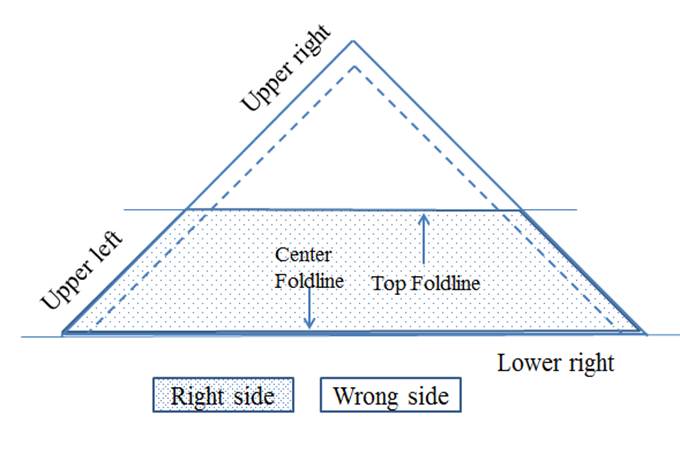
The result is a triangle as shown in the
following figure.
C.
Make the wings with the following steps.
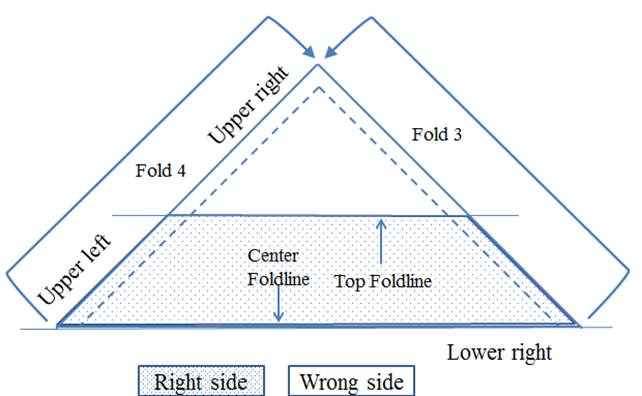
a.
Fold 3: Fold the lower right corner to the
upper right corner keeping the outer edges together as shown in the following
figure.
b.
Fold 4: Fold the upper left corner to the
upper right corner keeping the outer edges together.
c.
Use your hands to flatten the folds and
make crisp seams.
d.
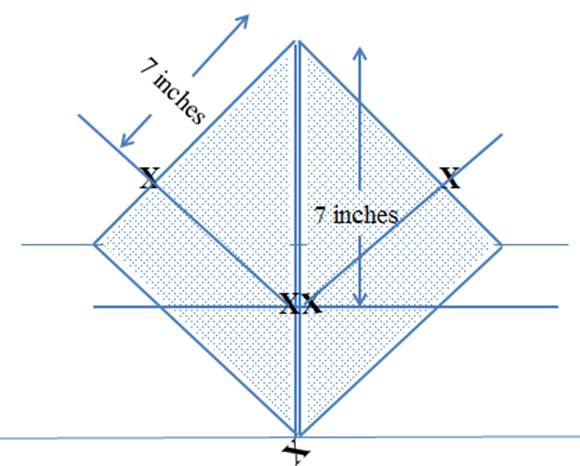
Measure and mark a point 7 inches from the
top on the left and right center edges of the triangles created in folds 4 and
5 as shown in the following figure.
These are the inner fold points for the wings.
e.
Measure and mark a point 7 inches from the
top on the left and right side edges of the triangles
created in folds 4 and 5.
These are the outer fold points for the wings.
f.
Mark a foldline
between the inner fold point and the outer fold point on the left and right
sides.
g.
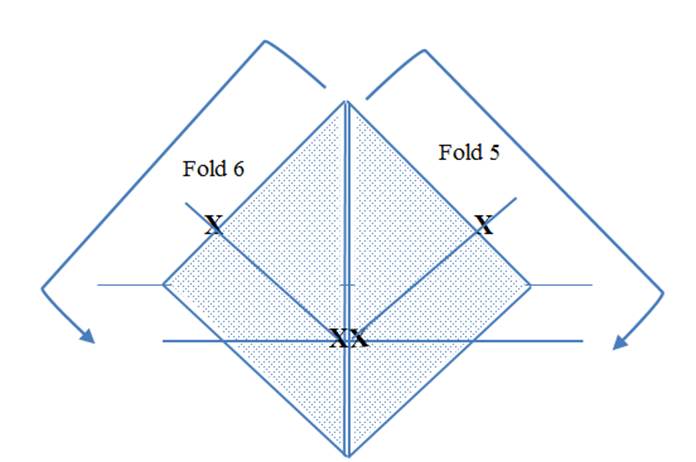
Fold 5: Fold the top right point down along
the outer right edge using the right foldline as
shown in the following figure.
h.
Fold 6: Fold the top left point down along the
outer left edge using the left foldline.
i.
Use your hands to flatten the folds and
make crisp seams.
D.
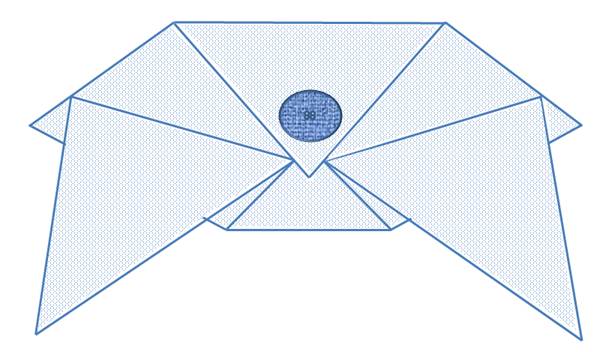
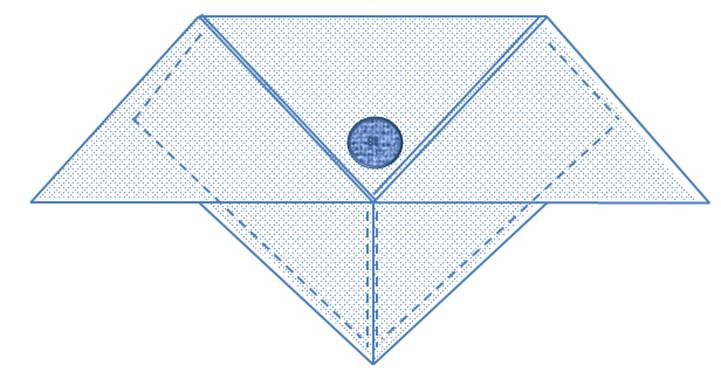
The result is a winged heart clutch body with
a triangular flap.
E.
Finish the clutch with the following
steps.
a.
A narrow seam needs to be sewn between the
point where the wings meet in the middle and the bottom of the heart as shown
in the following figure.
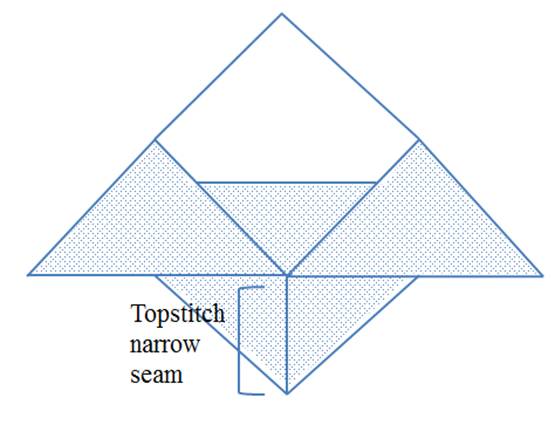
i. Pull
the left and right edges for the seam out away from the body of the clutch.
ii. Hand
stitch or topstitch a narrow seam along the edges; do
not sew through the clutch body.
iii. Use
your hands to flatten the seam.
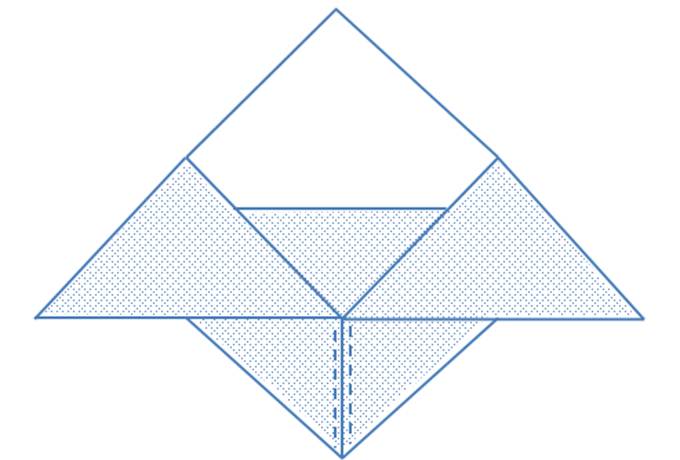
b.
Secure the outer edge of the clutch and
the folded wings for sewing.
c.
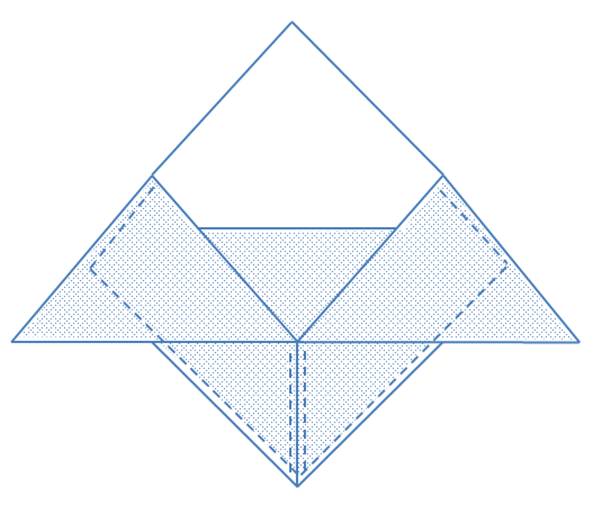
Topstitch along outer edge of the heart as
shown in the following figure. Topstitching
can be under or on top of the wings depending on the desired look.
d.
The result is a winged heart with a
triangle shaped flap as shown in this figure.
F. Fold the flap over the front of the clutch along the top foldline.
G. If desired, Velcro, a button or a snap can be added to secure the flap to the clutch body.
H.
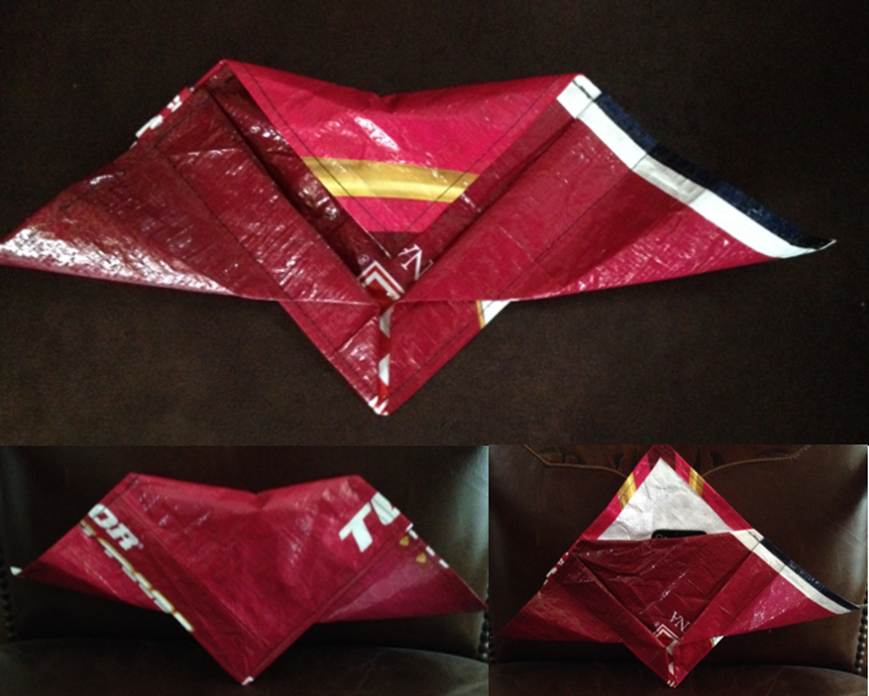
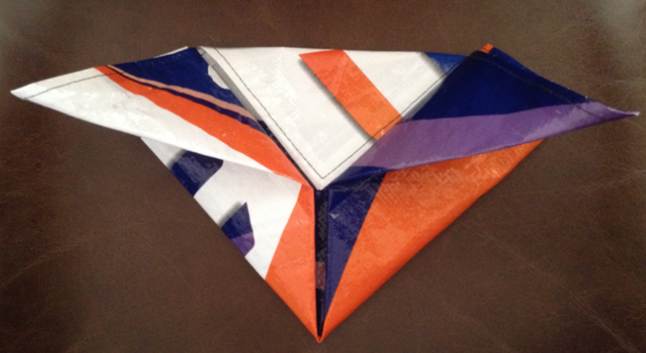
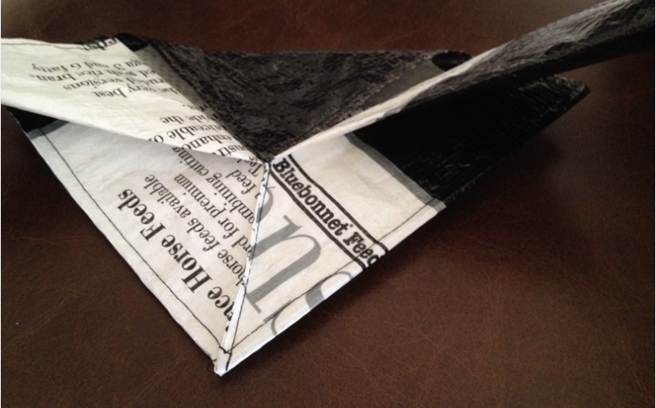
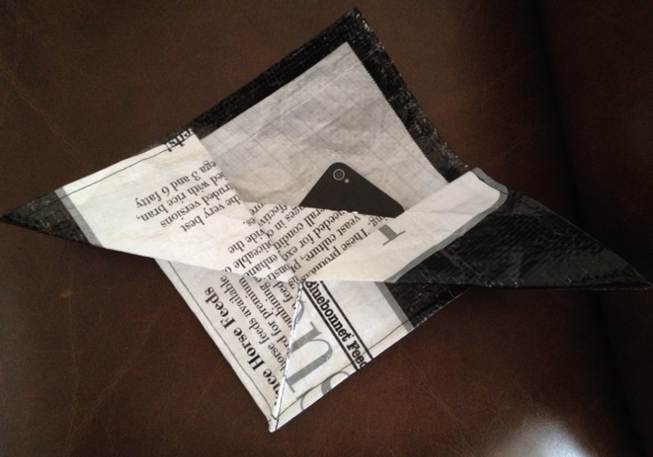
Here are examples of Winged Heart clutches. As you can see the clutch is sized to carry a
cell phone, key, credit card, ID card, and lip gloss.
This pattern makes an Origami
inspired triangle clutch using woven polypropylene feed sack fabric. The clutch is 5 inches high and 10 inches
wide.
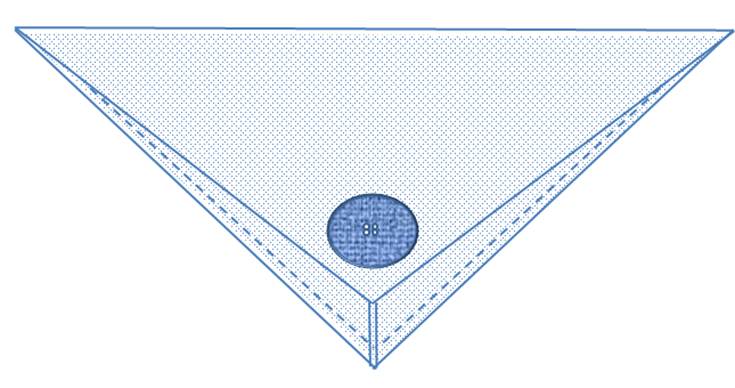
Instructions
Step 1. Clean
and flatten the feed sack using the Feed Sack Preparation Instructions.
Step 2. Create
a 15 inch Origami square using the Origami inspired
feed sack square preparation instructions.
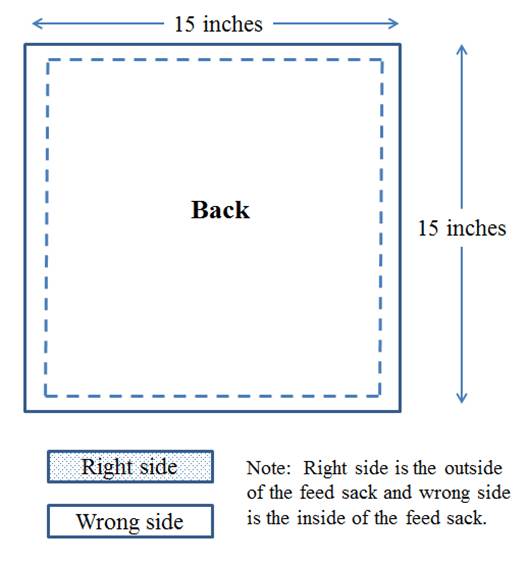
Step 3. Mark the center of the Origami square using the following steps.
A.
An easy way to mark the
center is to use triangle folds bringing opposite corners together.
a.
Fold 1: Fold the upper left
corner to the lower right corner.
b.
Fold 2: Fold the upper
right corner to the lower left corner.
c. Mark the center point where the folds meet.
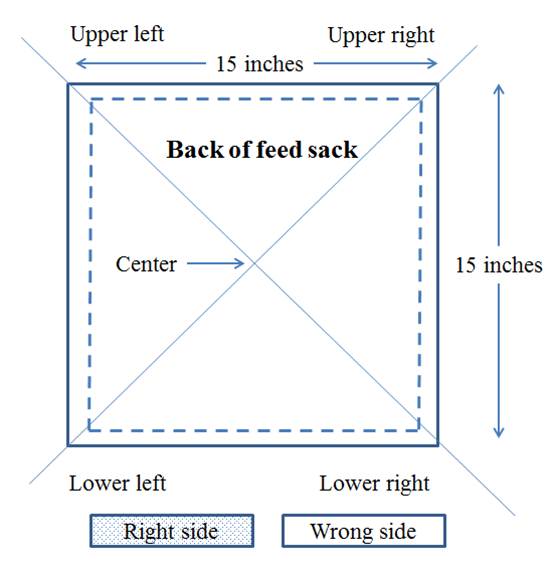
B.
Lay the Origami square
right side down and rotate 90 degrees as shown in the following figure. The following folds will use the fabric right
side down.
C. This pattern requires marking horizontal foldlines that divide the square into fourths. On the wrong side of the 15 inch square, measure and mark the center foldline from the upper left to the lower right corner as shown in the following figure.
D. For a 15 inch square, measure and mark a top foldline 5.25 inches from the upper right corner and the bottom foldline 5.25 inches from the lower left corner.
E. If you are using a different size square, you will need to determine the foldlines based on the size of the square.
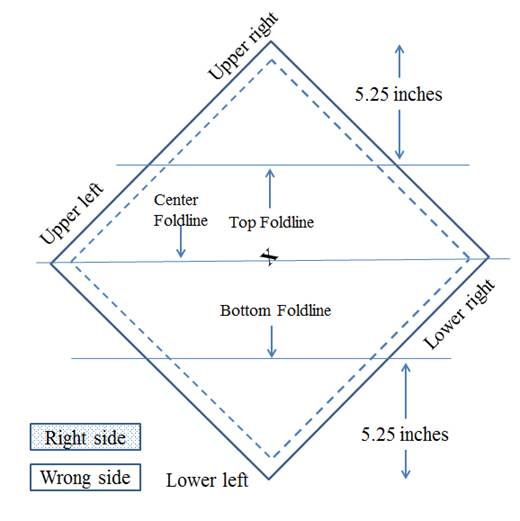
Step 4. Make the clutch using the following steps.
A.
Make the clutch body with the following
steps.
a.
Fold 1: Fold the lower left corner to the
center point with wrong sides together as shown in the following figure.
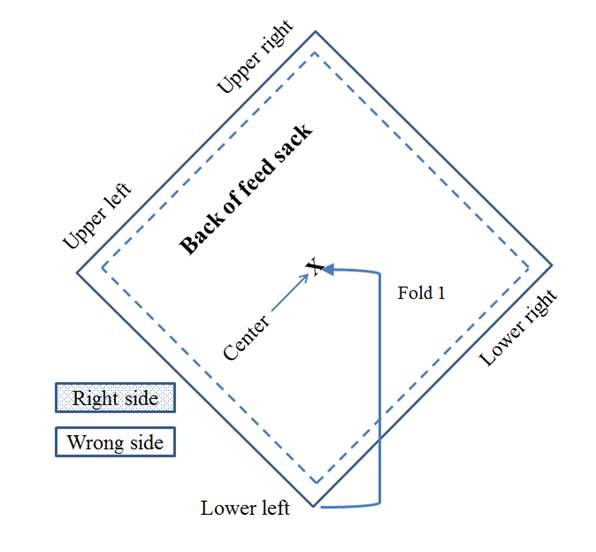
b.
Use your hands to flatten the folds and
make crisp seams.
c.
Fold 2: Fold the bottom half of the Origami
square onto the top half of the square lining up the outer edges as shown in
the following figure. The inside of fold
2 will be the inside of the clutch body.
d.
Use your hands to flatten the folds and
make crisp seams.
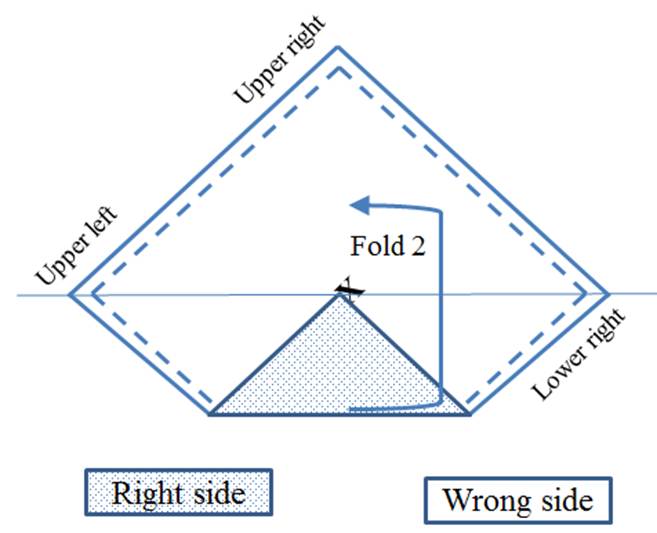
B.
The result is a triangle as shown in the
following figure.
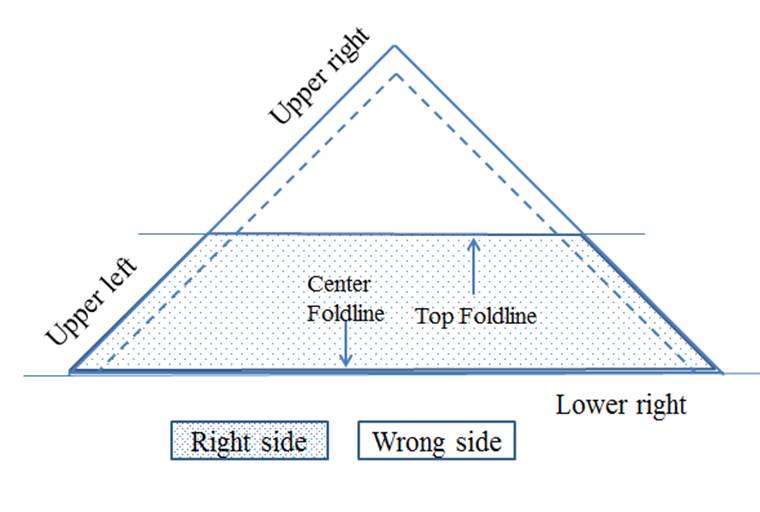
C.
Make the outside folds of the clutch body
with these steps.
a.
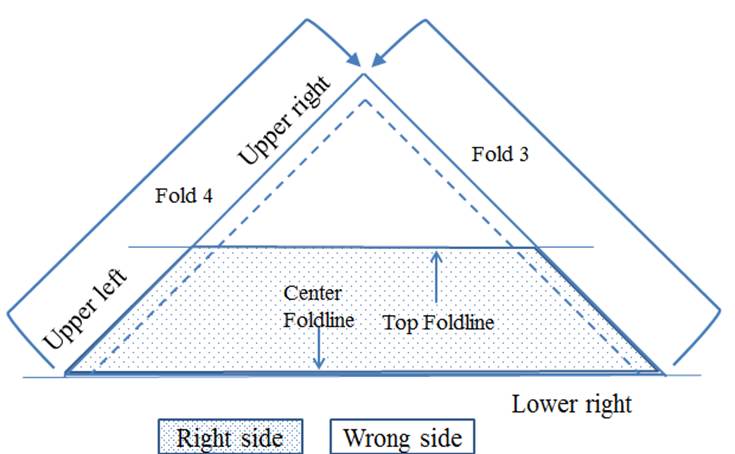
Fold 3: Fold the lower right corner to the
upper right corner keeping the outer edges together as shown in the following
figure.
b.
Use your hands to flatten the fold and
make a crisp seam.
c.
Fold 4: Fold the upper left corner to the
upper right corner keeping the outer edges together.
d.
Use your hands to flatten the fold and
make a crisp seam.
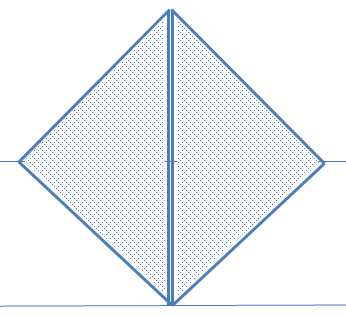
e.
The result is shown in the following
figure.
f.
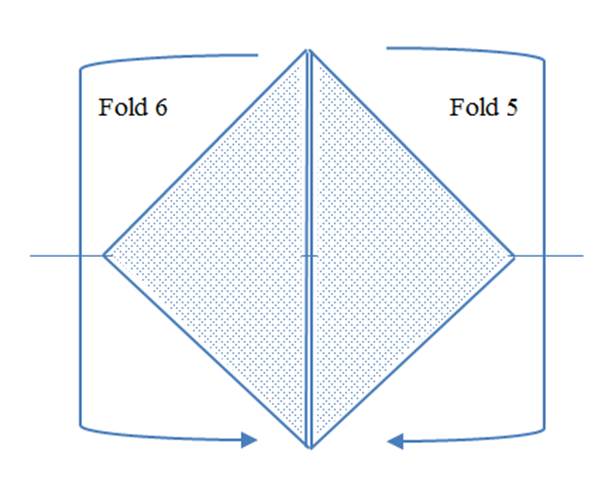
Fold 5: Fold the top right point down to the
bottom right point inside of the clutch body fold created in Fold 2 as shown in
the following figure.
g.
Fold 6: Fold the top left point down to
the bottom left point inside of the clutch body fold created in Fold 2.
h.
Use your hands to flatten the folds and
make crisp seams.
D.
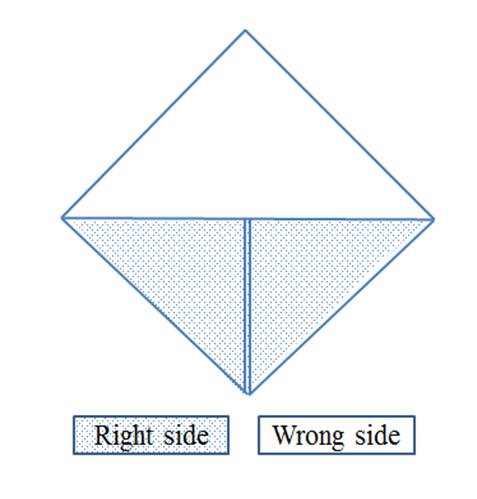
The result is a triangle clutch body with
a triangle flap as shown in the following figure.
E.
Finish the clutch with the following
steps.
a.
Top stitch the edge of the clutch opening
created by folds 5 and 6.
Do not stitch the clutch front to the clutch back along this edge.
b.
Top stitch the bottom left
and right sides of the clutch body as shown in the following figure.
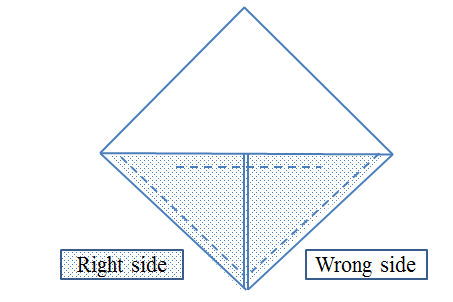
c.
Fold the flap over the front of the clutch
along the top foldline.
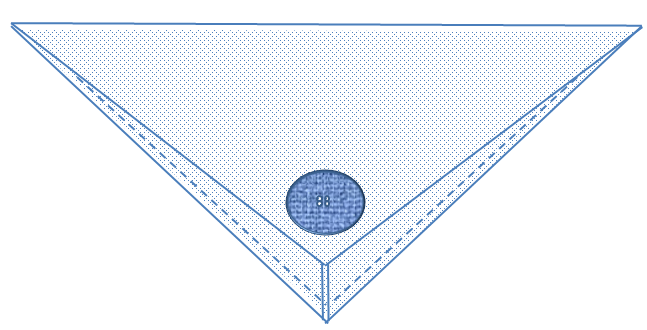
d.
The
result is a triangle flap folded over a triangle clutch
body.
e. If desired, Velcro, a button or a snap can be added to secure the flap to the clutch body.
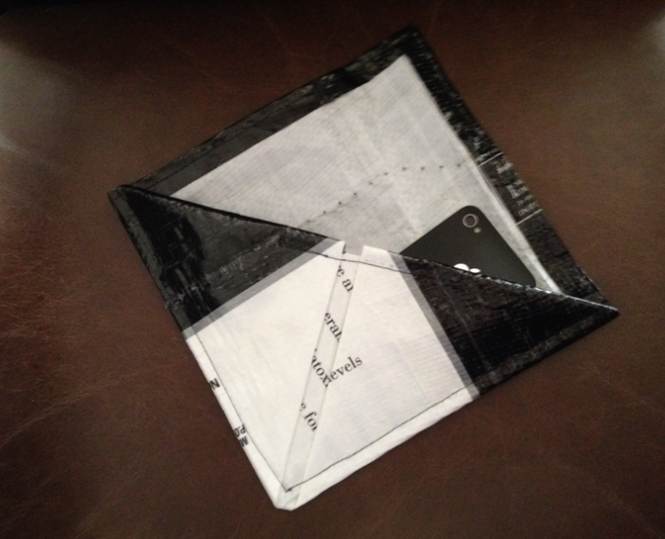
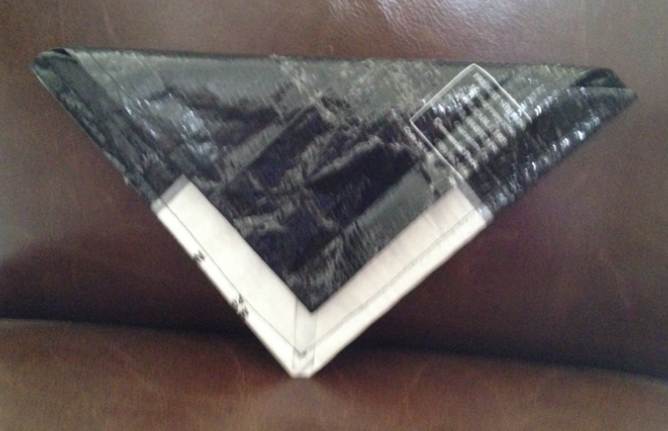
F.
Here is an example of a completed
Triangle clutch.
This pattern makes an Origami
inspired butterfly clutch using woven polypropylene feed sack fabric. The clutch inner pocket is secured with a
flap. The completed clutch is 5 inches high and the wings span 10 inches.
Instructions
Step 1. Clean
and flatten the feed sack using the Feed Sack Preparation Instructions.
Step 2. Create
a 15 inch Origami square using the Origami inspired
feed sack square preparation instructions.
Step 3. Mark the center of the Origami square using the following steps.
A.
An easy way to mark the
center is to use triangle folds bringing opposite corners together.
a.
Fold 1: Fold the upper left
corner to the lower right corner.
b.
Fold 2: Fold the upper
right corner to the lower left corner.
c. Mark the center point where the folds meet.
B.
Lay the Origami square
right side down and rotate 90 degrees as shown in the following figure. The following folds will use the fabric right
side down.
C. This pattern requires marking horizontal foldlines. On the wrong side of the 15 inch square, measure and mark the center foldline from the upper left to the lower right corner as shown in the following figure.
D. For a 15 inch square, measure and mark a top foldline 4 inches from the upper right corner and the bottom foldline 4 inches from the lower left corner.
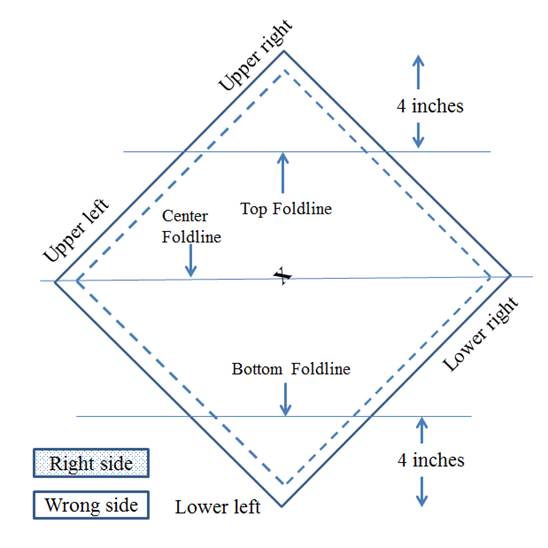
Step 4. Make the clutch using the following steps.
A.
Make the clutch pocket with the following
steps.
a.
Fold 1: With wrong sides together, fold the
lower left corner toward the center point along the bottom foldline
as shown in the following figure.
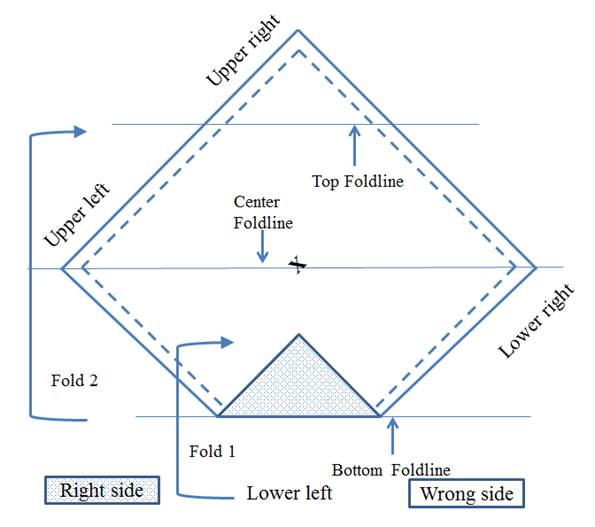
b.
Use your hands to flatten the folds and
make crisp seams.
c.
Fold 2: Use the center foldline
to fold the bottom edge to the top foldline as shown
in the above figure.
d.
Use your hands to flatten the folds and
make crisp seams.
e.
The result is a triangle as shown in the
following figure.
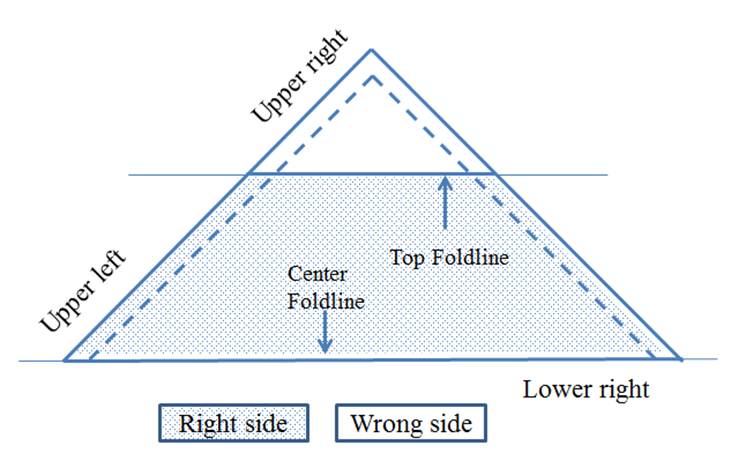
B.
Fold 3: Fold the lower right corner to the
upper right corner keeping the outer edges together as shown in the following
figure.
C.
Use your hands to flatten the fold and
make a crisp seam.
D.
Fold 4: Fold the upper left corner to the
upper right corner keeping the outer edges together.
E.
Use your hands to flatten the fold and
make a crisp seam.
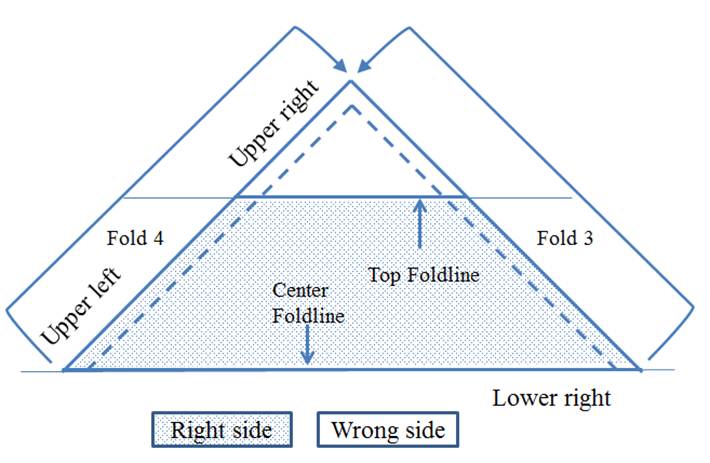
F.
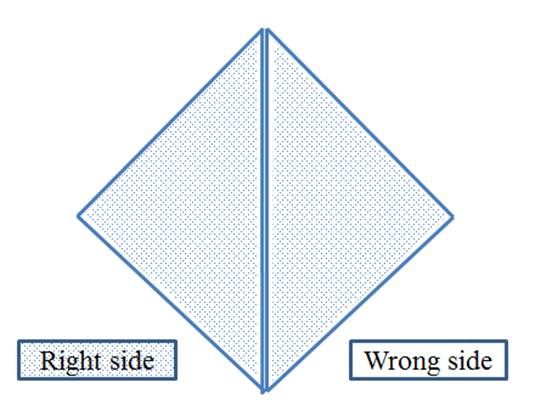
The result is a pair of triangles as shown
in the following figure.
G.
Make the butterfly wings with the
following steps.
a.
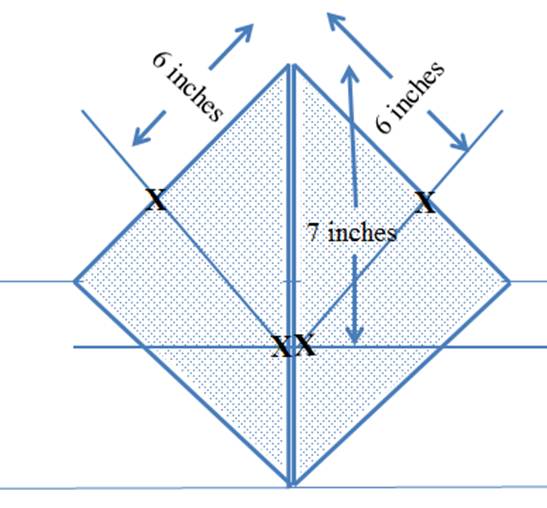
Measure and mark a point 7 inches from the
top on the left and right center edges of the triangles created in folds 4 and
5 as shown in the following figure.
These are the inner fold points for the butterfly wings.
b.
Measure and mark a point 6 inches from the
top on the left and right side edges of the triangles
created in folds 4 and 5.
These are the outer fold points for the wings.
c.
Mark a foldline
between the inner fold point and the outer fold point on the left and right
sides.
d.
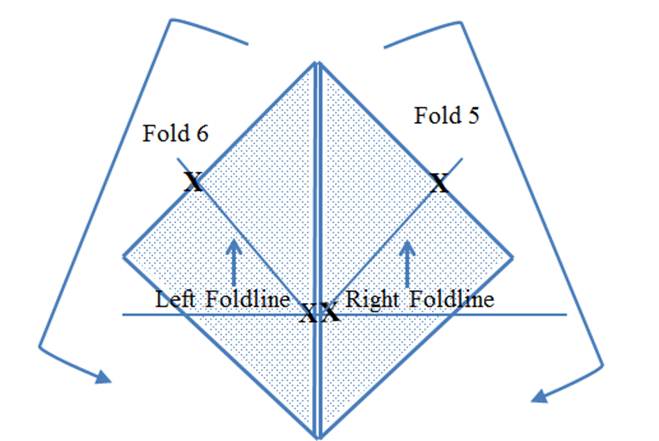
Fold 5: Fold the top right point down using
the right foldline as shown in the following figure.
e.
Fold 6: Fold the top left point down using the
left foldline.
f.
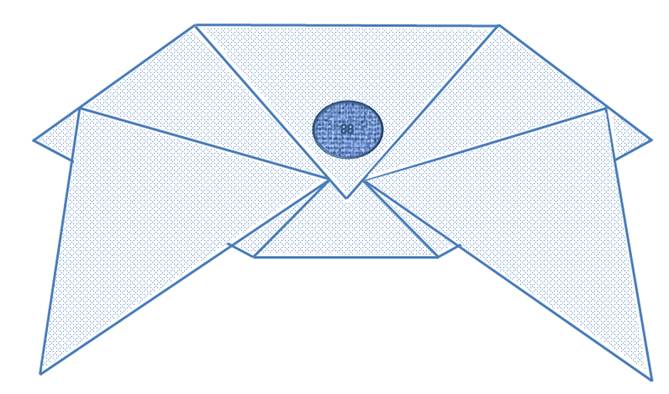
Use your hands to flatten the folds and
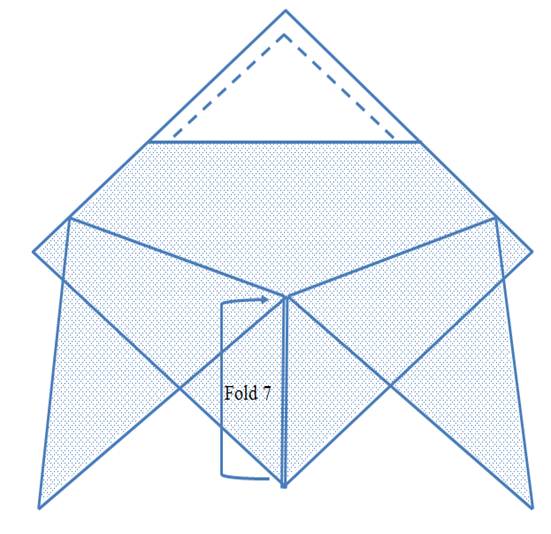
make crisp seams. The result is butterfly shaped clutch body and a triangular flap as shown
in the following figure.
g.
Fold 7: Fold the bottom point to the inner
fold points of the two butterfly wings.
h.
Use your hands to flatten the fold and
make a crisp seam.
H.
Finish the edges with the following steps.
a.
Topstitch the top edge of the clutch
opening as shown in the following figure.
Do not stitch the clutch front and back together along the top edge.
b.
Secure the top left and right points of
the wings for sewing.
c.
Topstitch through all layers on the upper
right clutch body side across the top right wing
point. Lift up
the right wing and continue top stitching
under the wing down the right side and across the clutch bottom. Lift up the left
wing and top stich up the left clutch body edge under
the wing. On the upper left clutch body
side, topstitch across the top left wing point.
d.
For stiff feed sack fabrics, the point and
wings maintain the folds and add extra interest if left un-secured. Lifting the bottom point with a light fold
can add more interest and make a butterfly tail.
e.
If the bottom point and inner wing edges
need to be secured, hand stitch the inner wing points and top triangle point
together or top stitch a line 1 inch above the clutch bottom from one side of
the bottom triangle fold to the other side as shown in the following
figure.
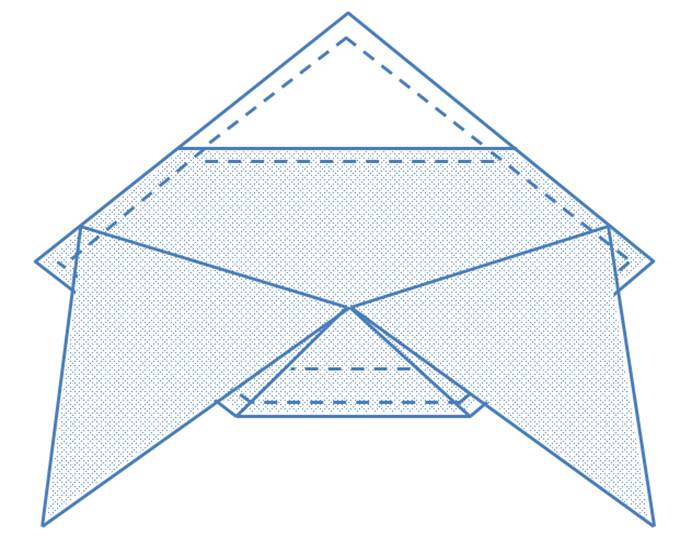
I.
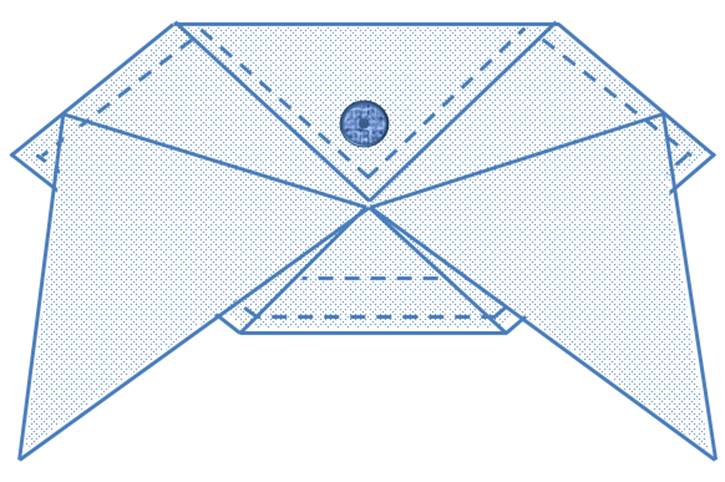
If desired, Velcro, a button or a snap can
be added to secure the flap to the clutch body.
The result is a butterfly clutch as shown in this figure.
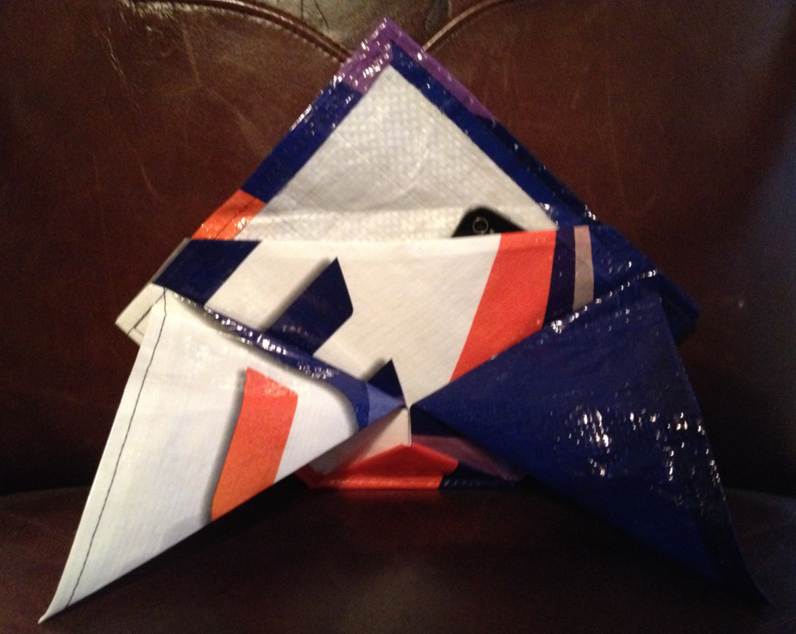
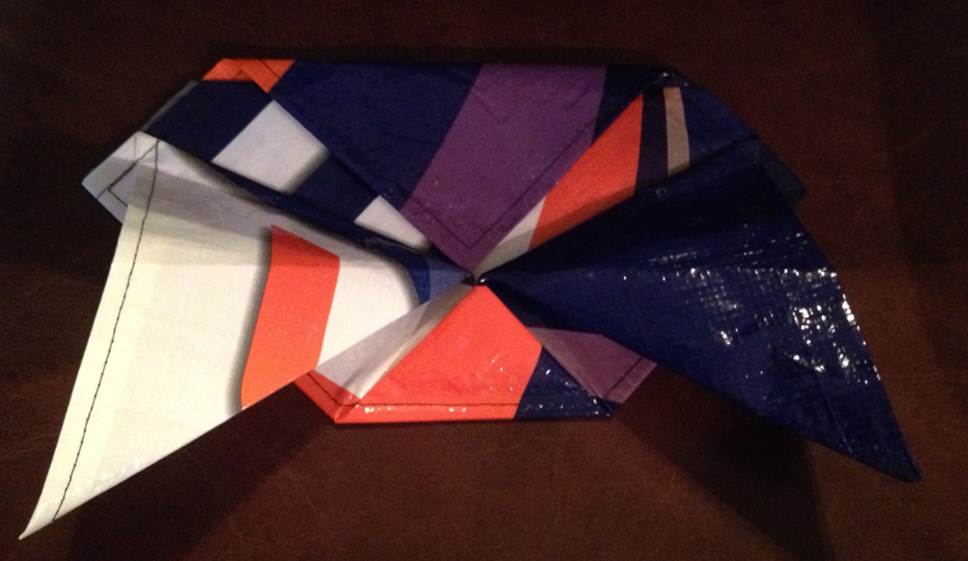
J. Here is an example of a completed butterfly clutch.
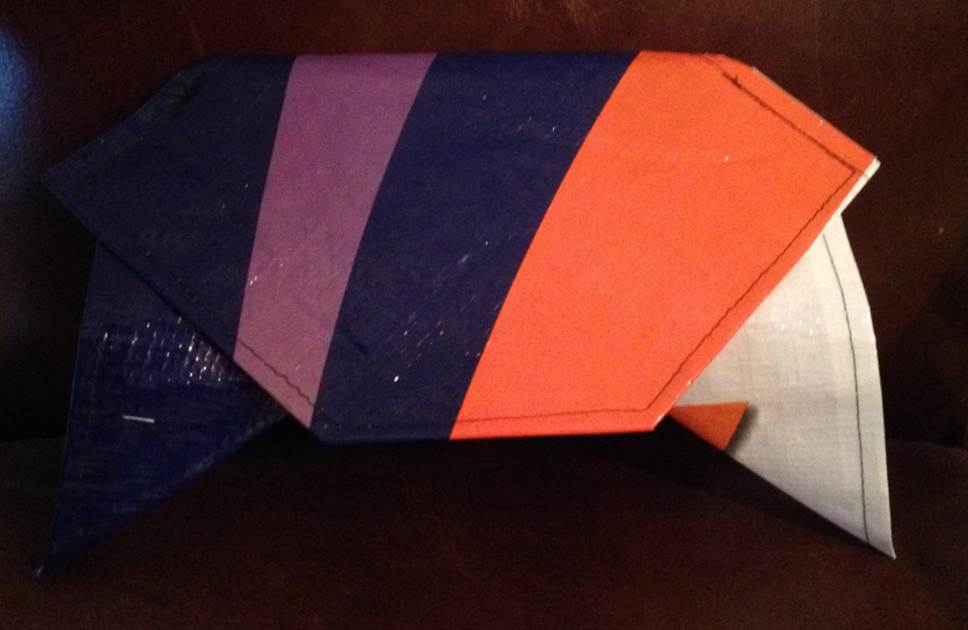
This pattern makes an Origami
inspired wedge clutch using woven polypropylene feed sack fabric. The clutch inner pocket is secured with an
asymmetric flap. The completed clutch is
6 inches high and 8 inches wide.
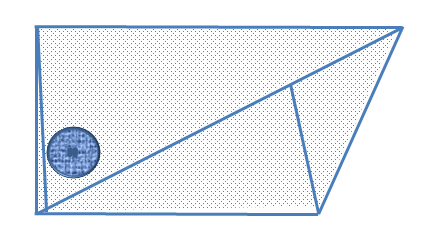
Instructions
Step 1. Clean
and flatten the feed sack using the Feed Sack Preparation Instructions.
Step 2. Create
a 15 inch Origami square using the Origami inspired
feed sack square preparation instructions.
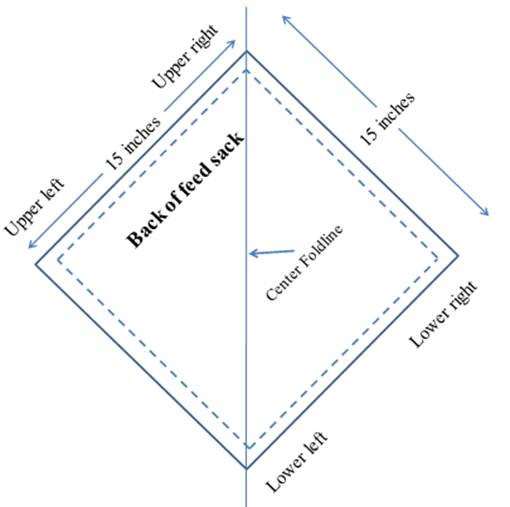
Step 3. Make the center foldline of the Origami square using the following steps.
A.
Mark a center foldline
on the wrong side of the feed sack square from the lower left corner to the
upper right corner as shown in the following figure.
B. Lay the Origami square right side down and rotate 90 degrees as shown in the following figure. The following steps will use the fabric right side down.
Step 4. Make the clutch using the following steps.
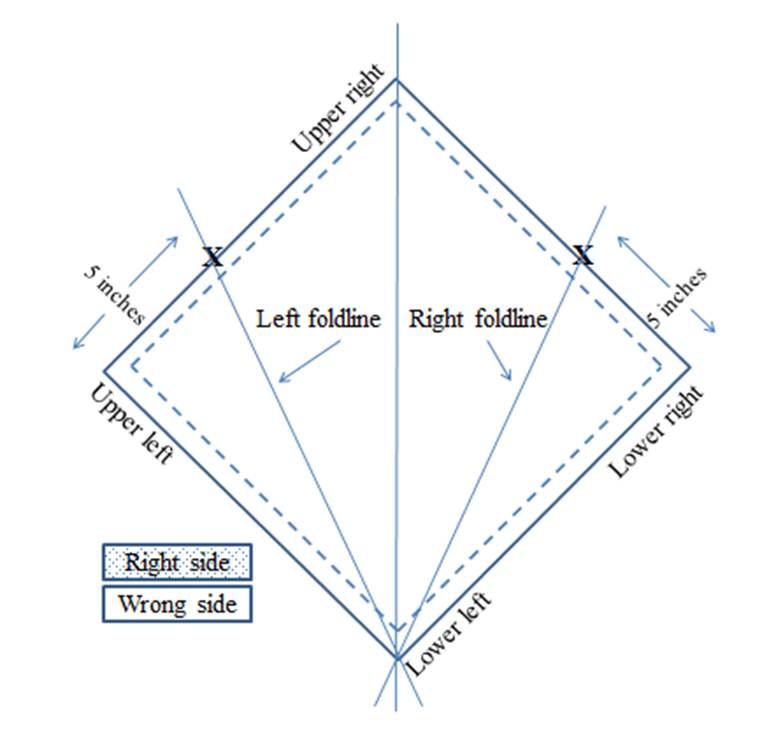
A.
Mark foldlines
with the following steps.
a.
Measure and mark 5 inches from the lower
right corner.
b.
Mark the right foldline
from this point to the lower left corner.
c.
Measure and mark 5 inches from the upper
left corner.
d.
Mark the left foldline
from this point to the lower left corner as shown in the following figure.
B.
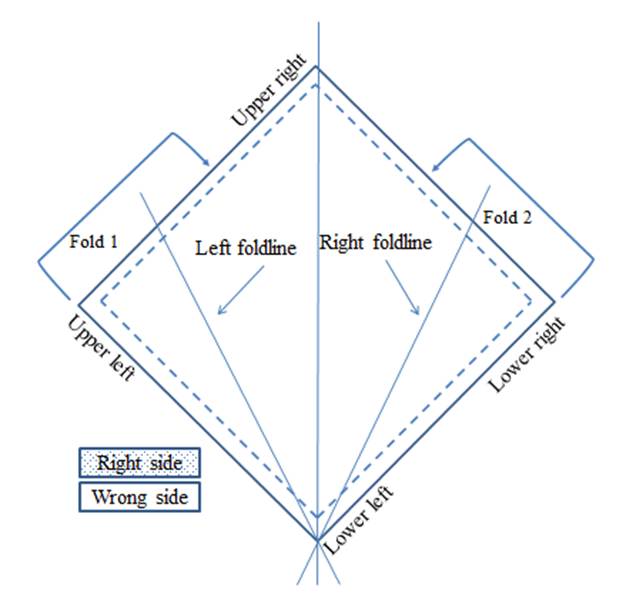
Make the outer edges of the clutch with
the following steps.
a.
Fold 1: With wrong sides together, fold the upper
left corner and side along to the left foldline as
shown in the following figure.
b.
Fold 2: With wrong sides together, fold the
lower right corner and side along to the right foldline.
c.
Use your hands to flatten the folds and
make crisp seams.
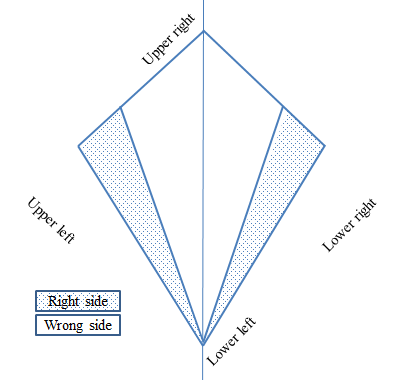
d.
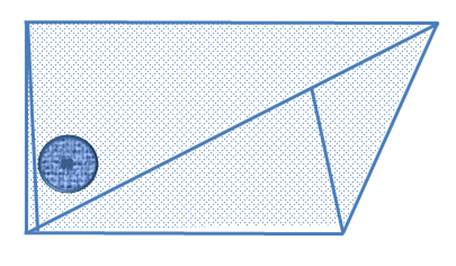
The result looks like a kite.
C.
Make the body of the clutch with the
following steps.
a.
Fold 3: Fold the upper right corner over to
the rightmost point and the leftmost corner to the center line as shown in the
following figure.
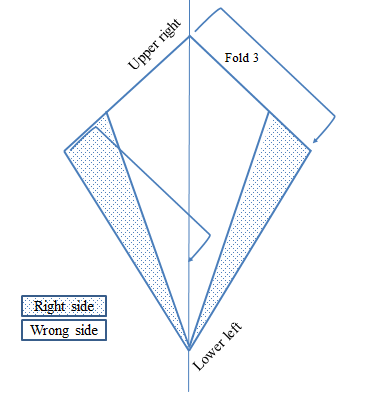
b.
Use your hands to flatten the fold and
make a crisp seam.
c.
The result is shown in the following
figure.
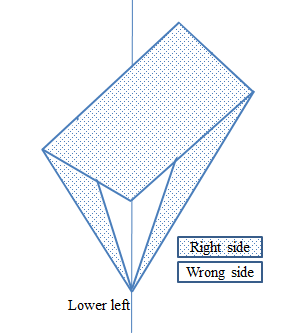
d.
Fold 4: Fold the upper right edge toward the
lower left side from fold 3 as shown in the following figure.
e.
Use your hands to flatten the fold and
make a crisp seam.
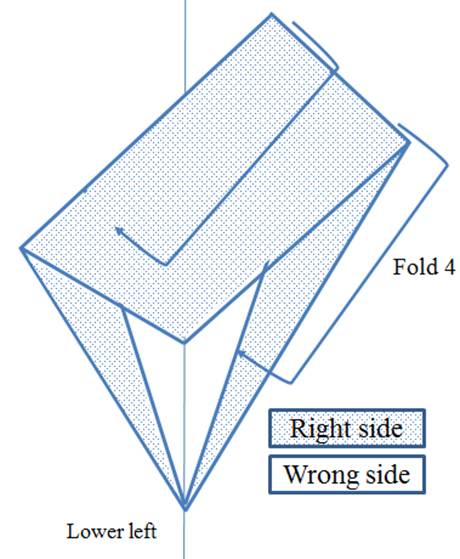
f.
The result is shown in the following
figure.
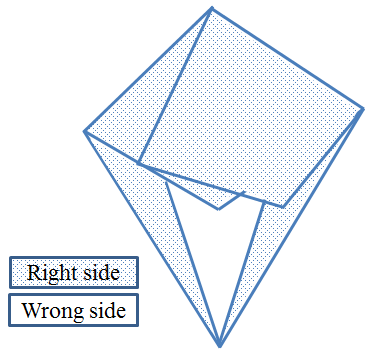
D.
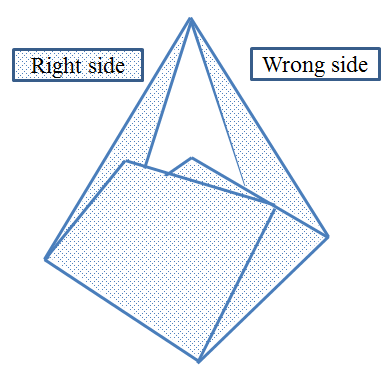
Rotate the clutch 180 degrees so that the
lower left point is at the top as shown in the following figure.
E.
Finish the clutch using the following
steps.
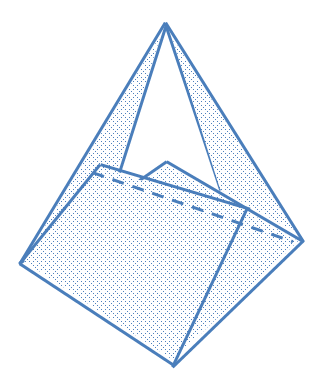
a.
Top stitch the open edges from folds 3 and
4 as shown. Do not stitch this edge to
the back of the clutch. This will be the
top inner edge of the clutch body.
b.
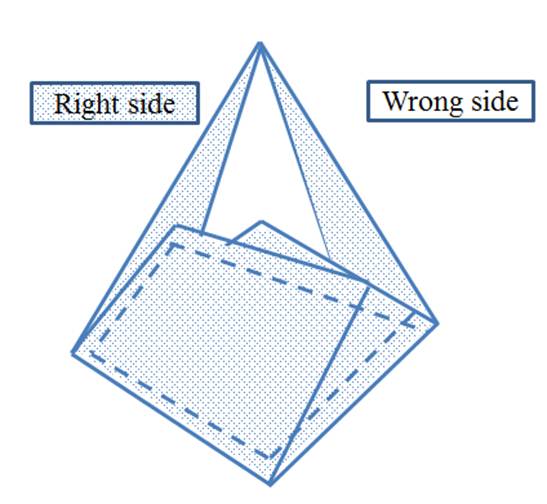
Secure the clutch body by top stitching
the lower right side, bottom, and left side seams as shown in the following
figure.
c.
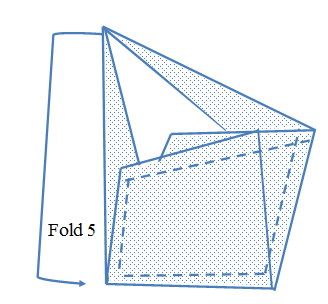
Fold 5: The clutch flap is formed by folding
the topmost point down to the leftmost point of the clutch body as shown in the
following figure.
d.
Use your hands to flatten the fold and
make a crisp seam.
e.
If desired, topstitch around the outer
edge of the flap to secure the point fabric.
F.
If desired, Velcro, a button or a snap can
be added to secure the flap to the clutch body.
G.
The result is a clutch as shown in this
figure.
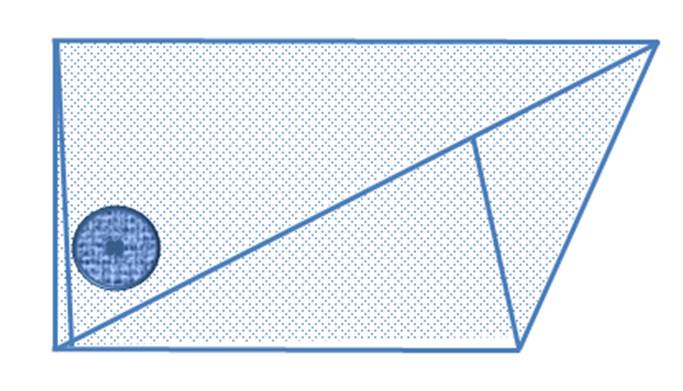
H. Here is an example of a completed clutch.
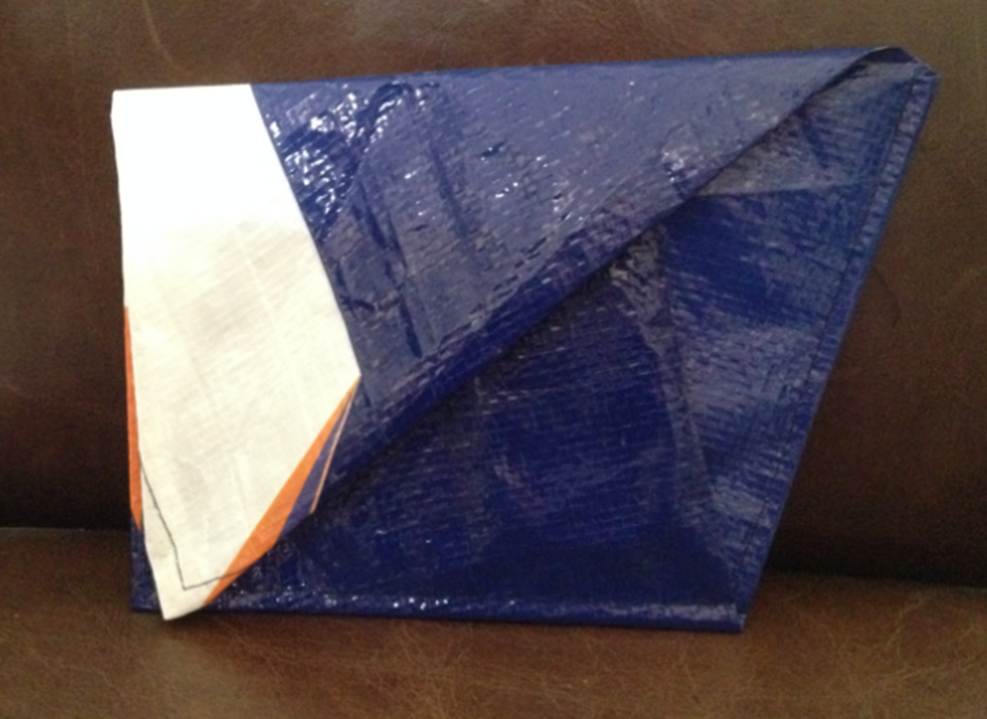
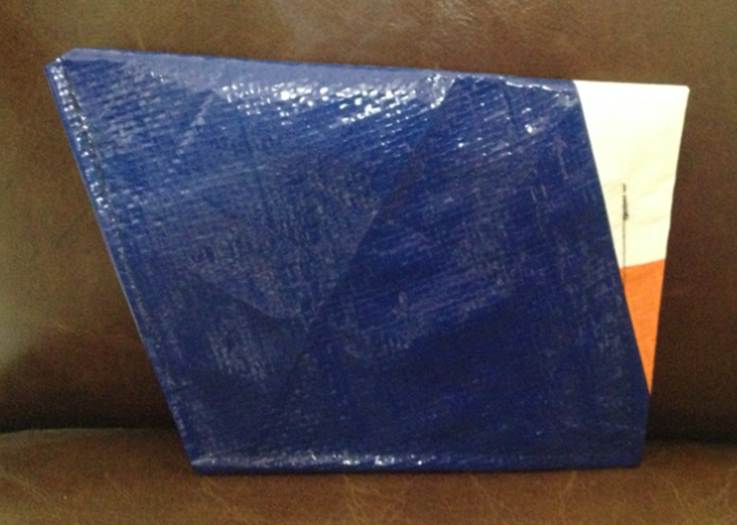
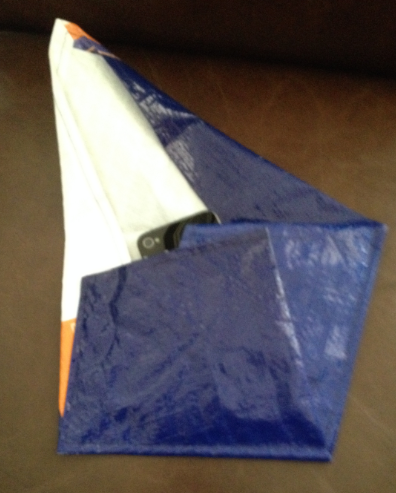
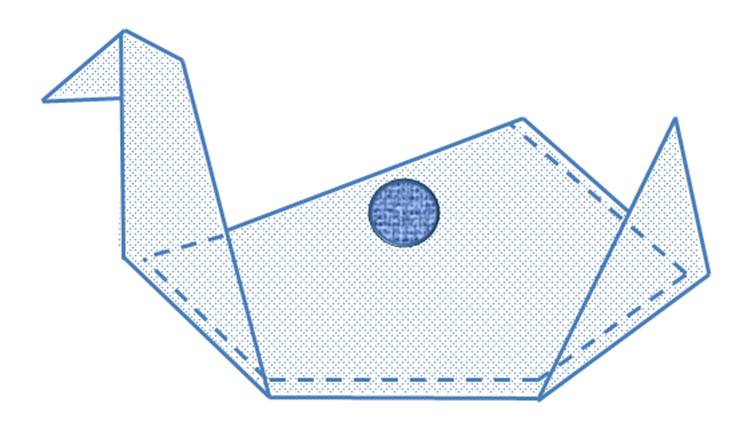
This pattern makes an Origami
inspired graceful swan clutch using woven polypropylene feed sack fabric. The clutch top is secured with a button or
other closure. The usable body of the
clutch measures 5 inches high by 9 inches wide.
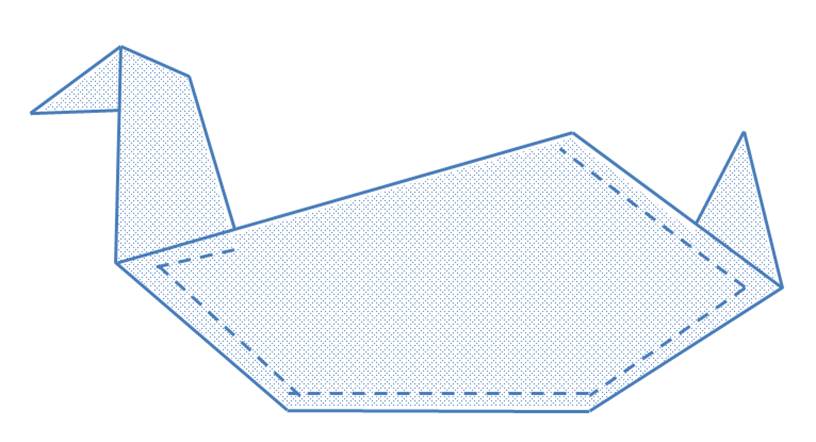
The completed swan is 8 inches high and 12
inches wide.
Instructions
Step 1. Clean
and flatten the feed sack using the Feed Sack Preparation Instructions.
Step 2. Create
a 15 inch Origami square using the Origami inspired
feed sack square preparation instructions.
Step 3. Mark the center of the Origami square using the following steps.
A.
An easy way to mark the
center is to use triangle folds bringing opposite corners together.
a.
Fold 1: Fold the upper left
corner to the lower right corner.
b.
Fold 2: Fold the upper
right corner to the lower left corner.
c. Mark the center point where the folds meet.
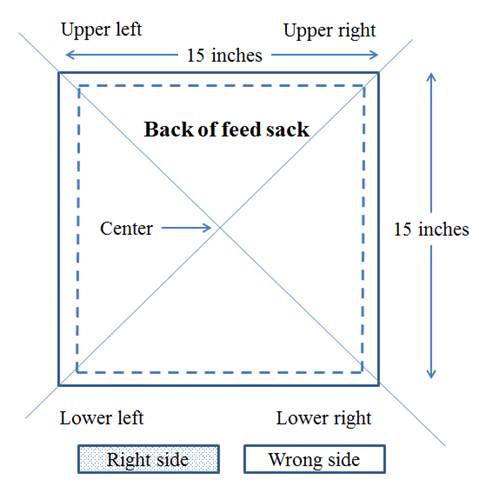
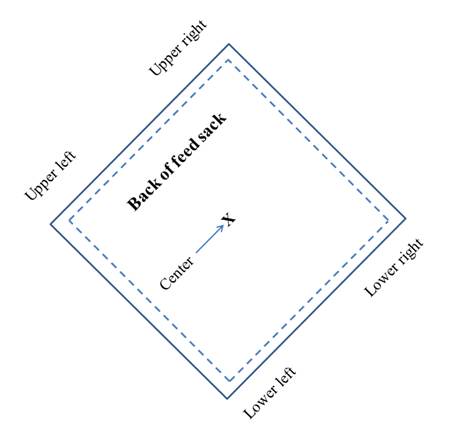
B. Lay the Origami square right side down and rotate 90 degrees as shown in the following figure. The following folds will use the fabric right side down.
Step 4. Make the clutch using the following steps.
A.
Create the body of the swan with the
following steps.
a.
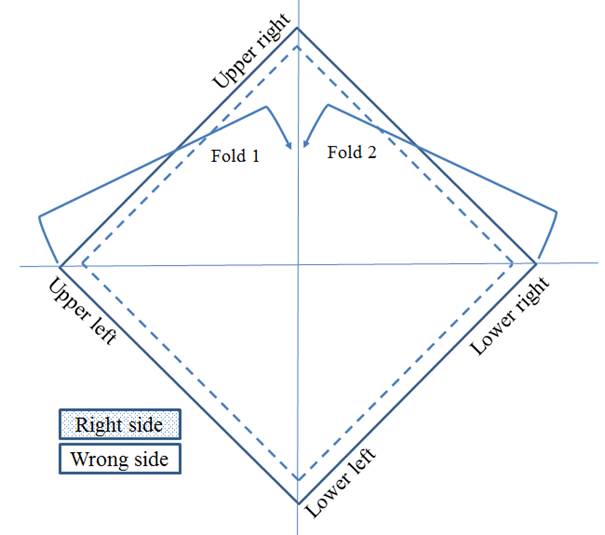
Fold 1: With wrong sides together, fold upper
left corner up along vertical foldline as shown in
the following figure.
b.
Fold 2: With wrong sides together, fold lower
right corner up along vertical foldline as shown in
the following figure.
c.
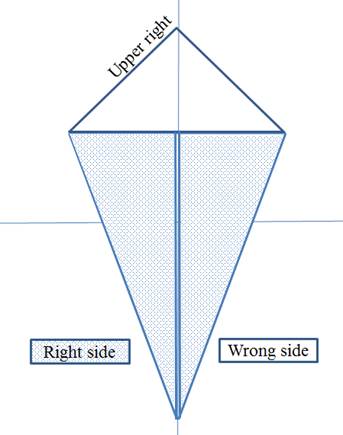
Use your hands to flatten the folds and
make crisp seams. The result looks like
a kite.
d.
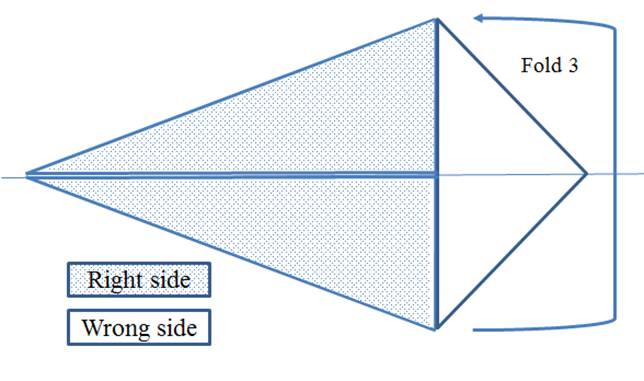
Rotate the top of the kite 90 degrees to
the right.
e.
Fold 3: Fold the lower half up over the upper
half along the horizontal foldline as shown in the
following figure.
f.
Use your hands to flatten the fold and
make a crisp seam. The result is a large
triangle.
B.
Make the swan tail with the following
steps.
a.
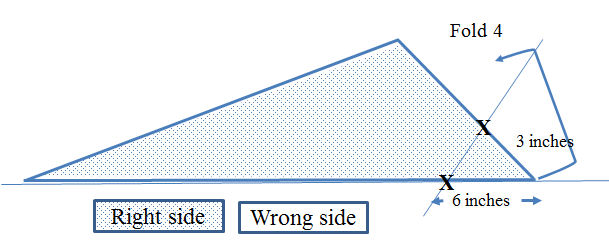
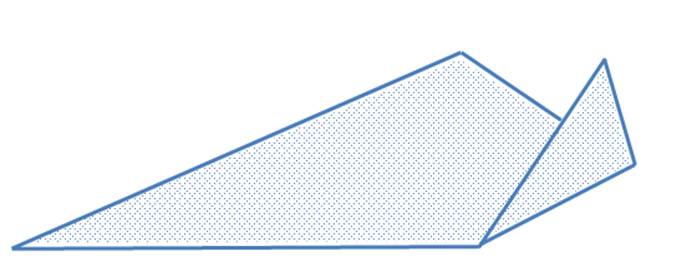
On the bottom of the triangle, measure and
mark 6 inches from the rightmost point of the triangle as shown in the
following figure.
b.
On the right side of the triangle, measure
and mark 3 inches from the rightmost point of the triangle.
c.
Mark a foldline
between these two points.
d.
Fold 4: fold the rightmost point of the
triangle up along the foldline.
e.
Use your hands to flatten the fold and
make a crisp seam. The swan tail is
shown in the following figure.
C.
Make the swan head and neck with the
following steps.
a.
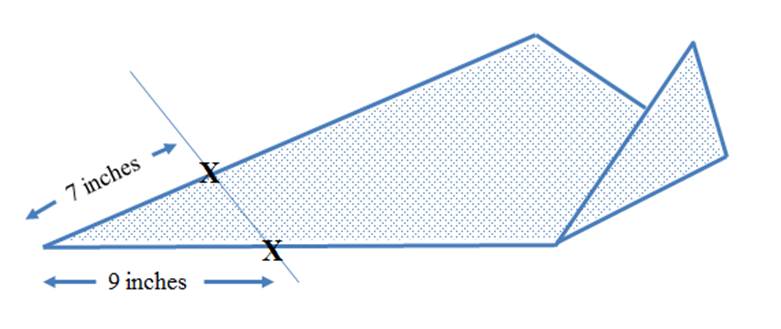
On the bottom of the triangle, measure and
mark 9 inches from the leftmost point of the triangle as shown in the following
figure.
b.
On the left side of the triangle, measure
and mark 7 inches from the leftmost point of the triangle.
c.
Mark a foldline
between these two points.
d.
Fold 5: fold the leftmost point of the
triangle up along the foldline as shown in the
following figure.
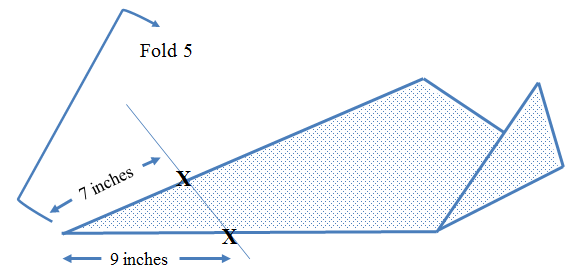
e.
Use your hands to flatten the fold and
make a crisp seam.
f.
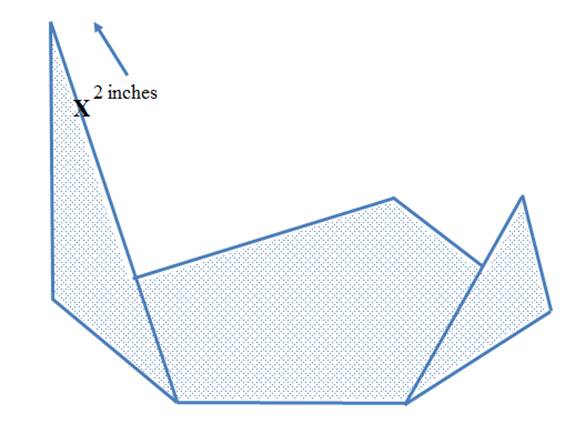
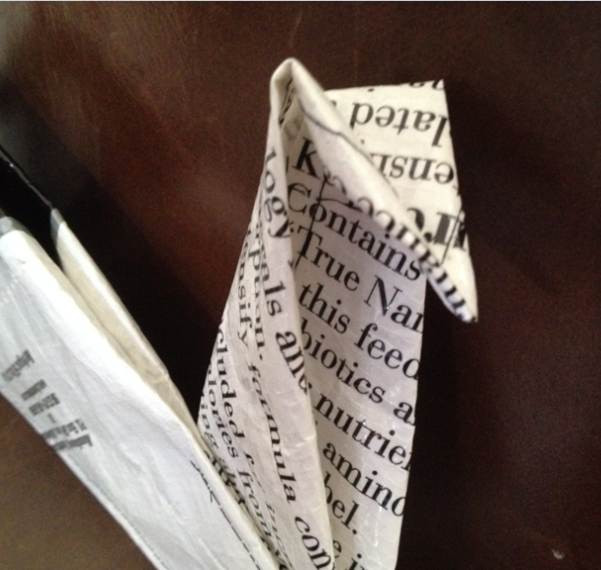
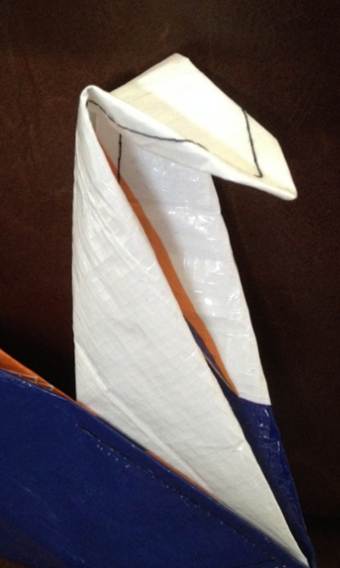
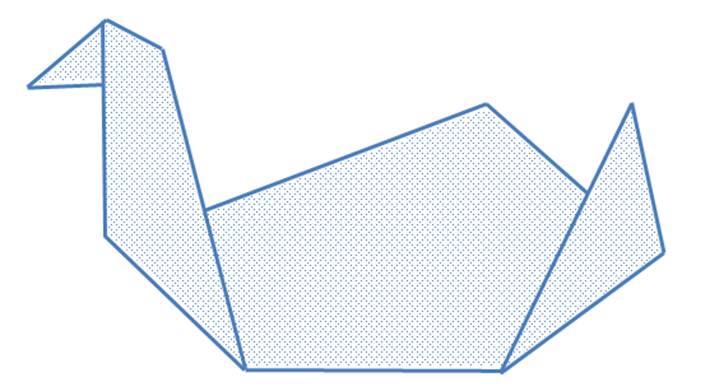
The top 2 inches of the uppermost point
will become the swan’s head as shown in the following figure.
g.
Hold the point 2 inches below the topmost point
on the right side of the head, pull the topmost point down and inside of the
neck folded fabric.
h.
Make a crisp seam of the fold for the top
of the swan’s head.
i.
Pull the point back out and position it for
the swan’s head. The result is shown in
the following figures.
D.
Finish the graceful swan clutch with the
following steps.
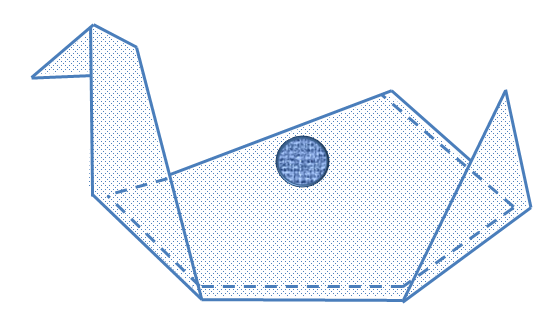
a.
Topstitch the outer edges of the swan to
create the clutch body as shown in the following figure.
b.
If desired, the neck and tail can be top
stitched to add stability for thinner feed sack fabric.
c.
The top of the clutch is open and needs to
be secured. Velcro, a button, or a snap should
be added to secure the flap to the clutch body.
d.
The back of the graceful swan is shown in
the following figure. For some added
interest or to highlight a feature on the feed sack imagery, the tail and neck
of the swan can be folded on different sides of the clutch.
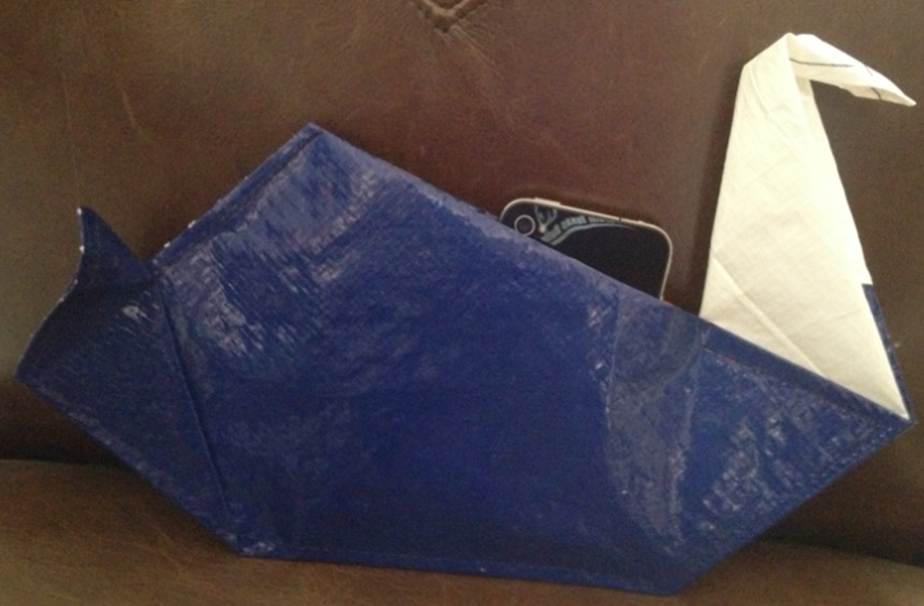
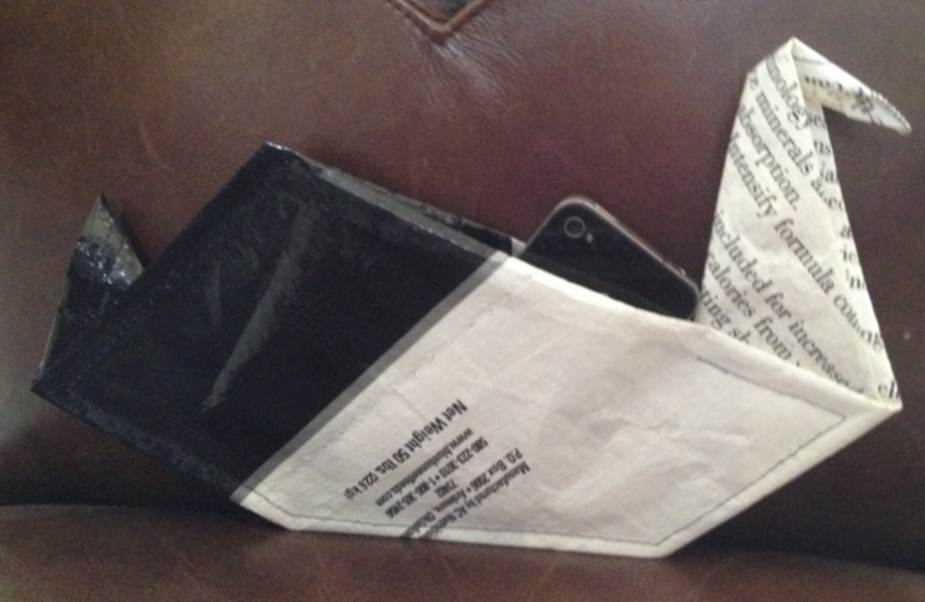
E. Here are examples of completed graceful swan clutches.